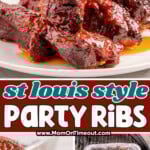
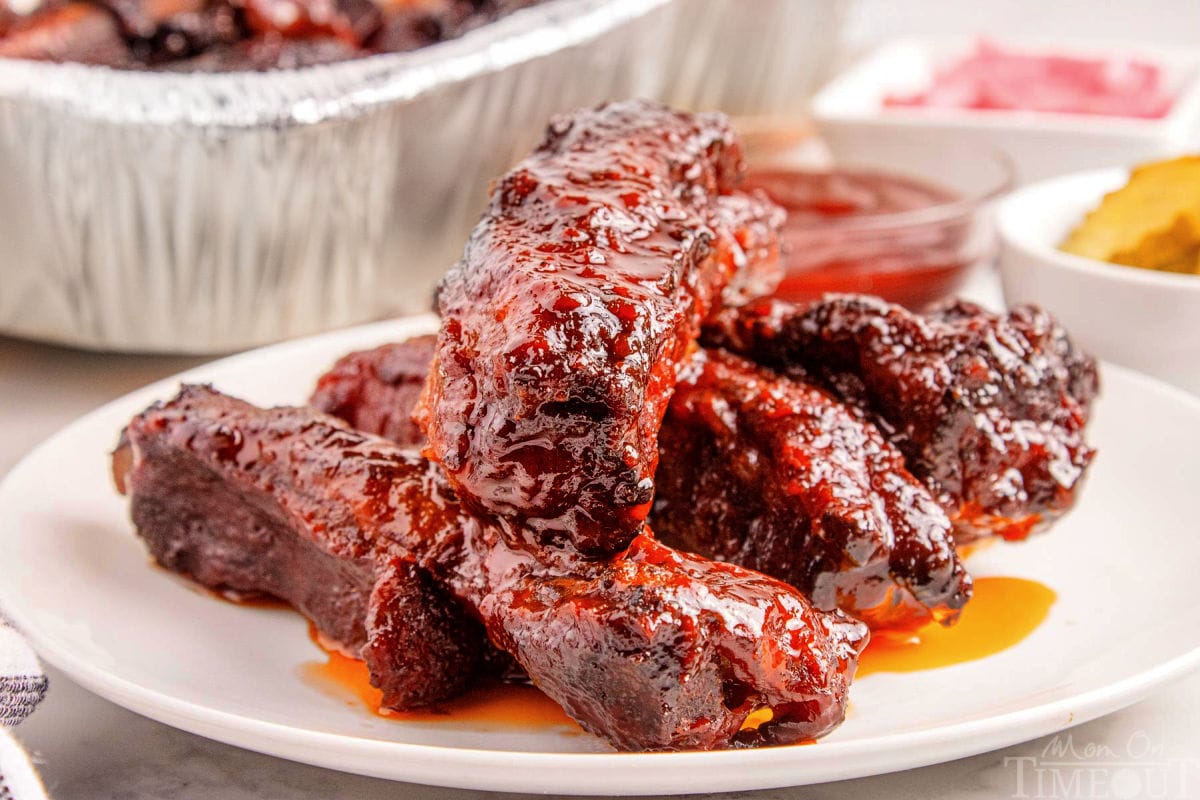
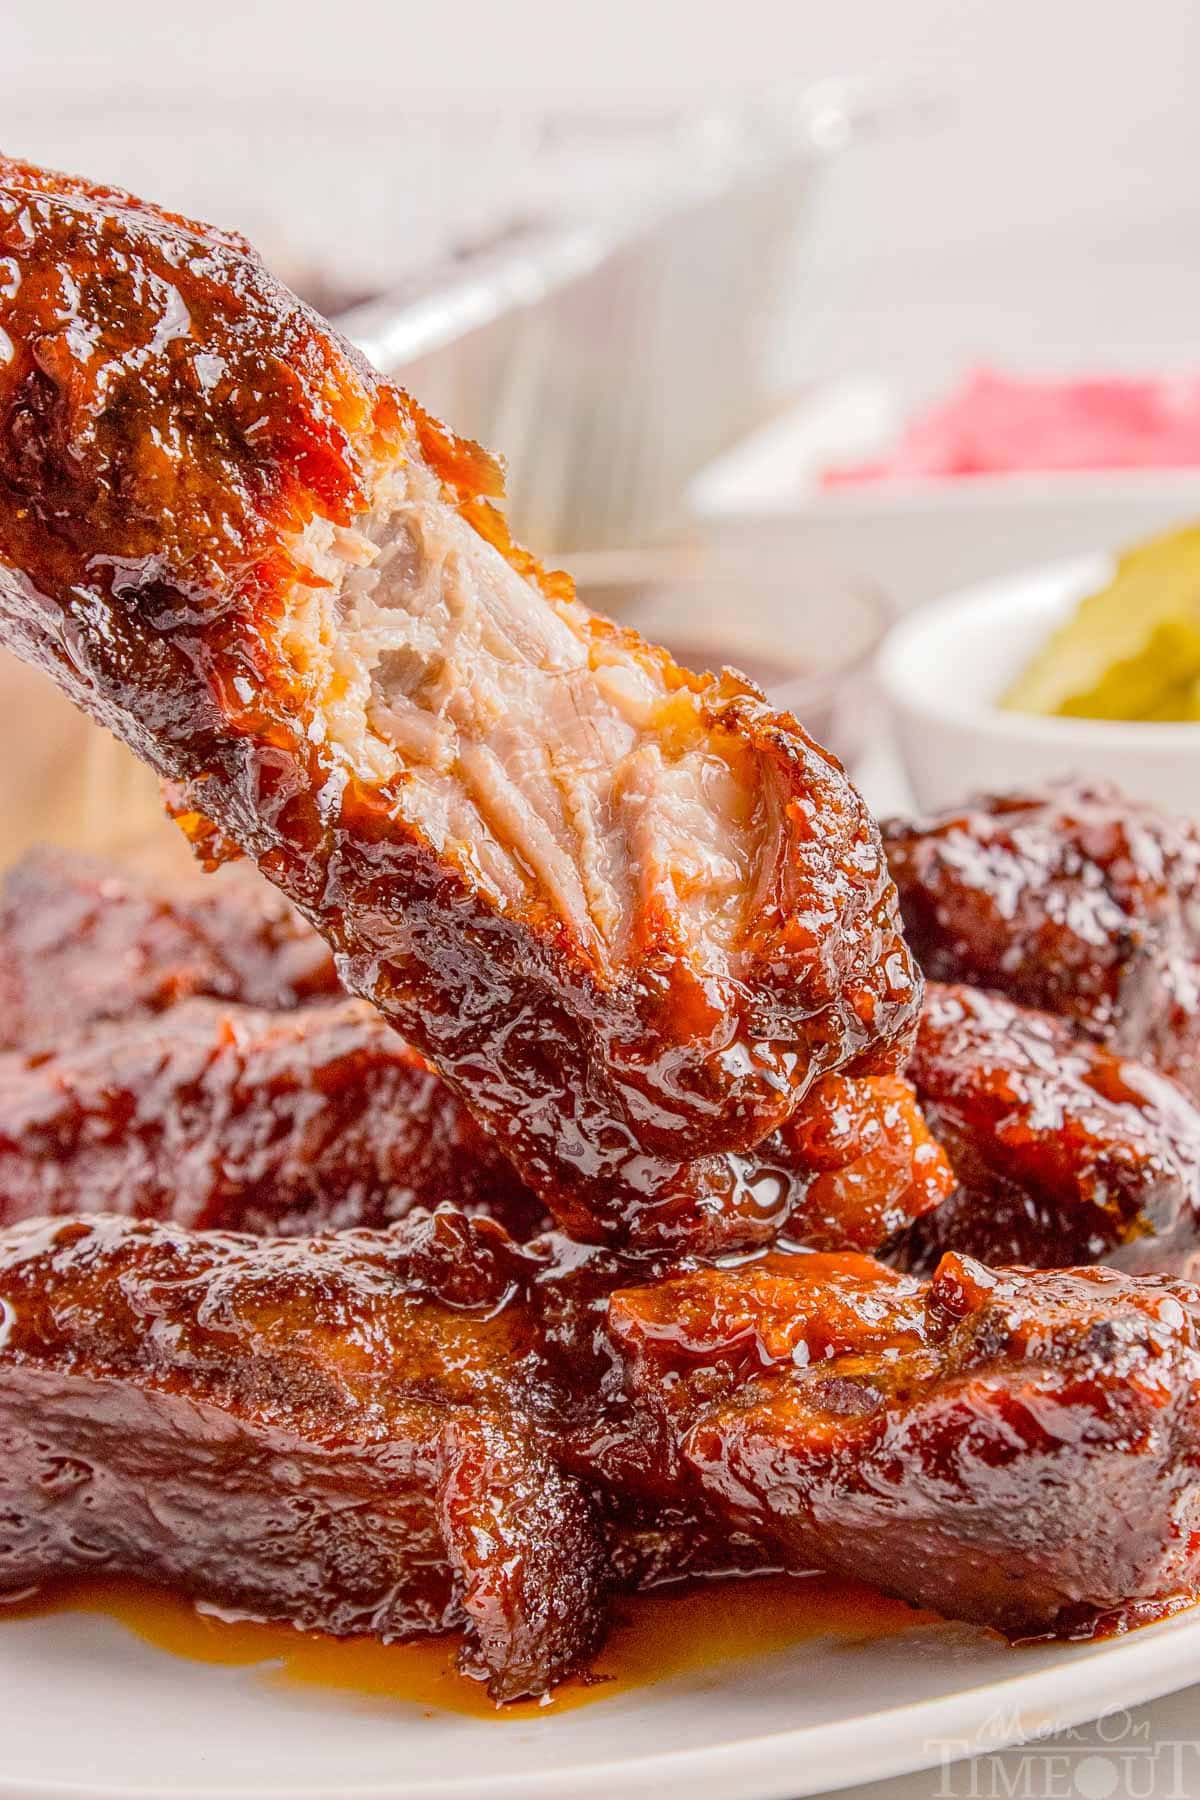
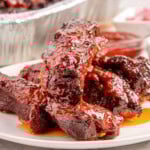
These St. Louis Style Party Ribs are all about big flavor and melt-in-your-mouth tenderness! Each rib is seasoned to perfection, grilled low and slow and finished with an irresistible glaze. These fall-off-the-bone ribs are perfect for parties, BBQs, holidays and family dinners!
Take your next cookout to the next level with these great recipes: Chicken Marinade, Steak Marinade and this Grilled Ribeye Steak!
St. Louis Ribs
There’s nothing quite like tender, juicy ribs that practically melt off the bone. These St. Louis Style Party Ribs are a backyard barbecue favorite, combining smoky flavor with a sweet and tangy BBQ glaze that everyone will love. Whether you’re hosting a big summer cookout, a game-day gathering, or just treating your family to something special, these ribs will be the star of the table.
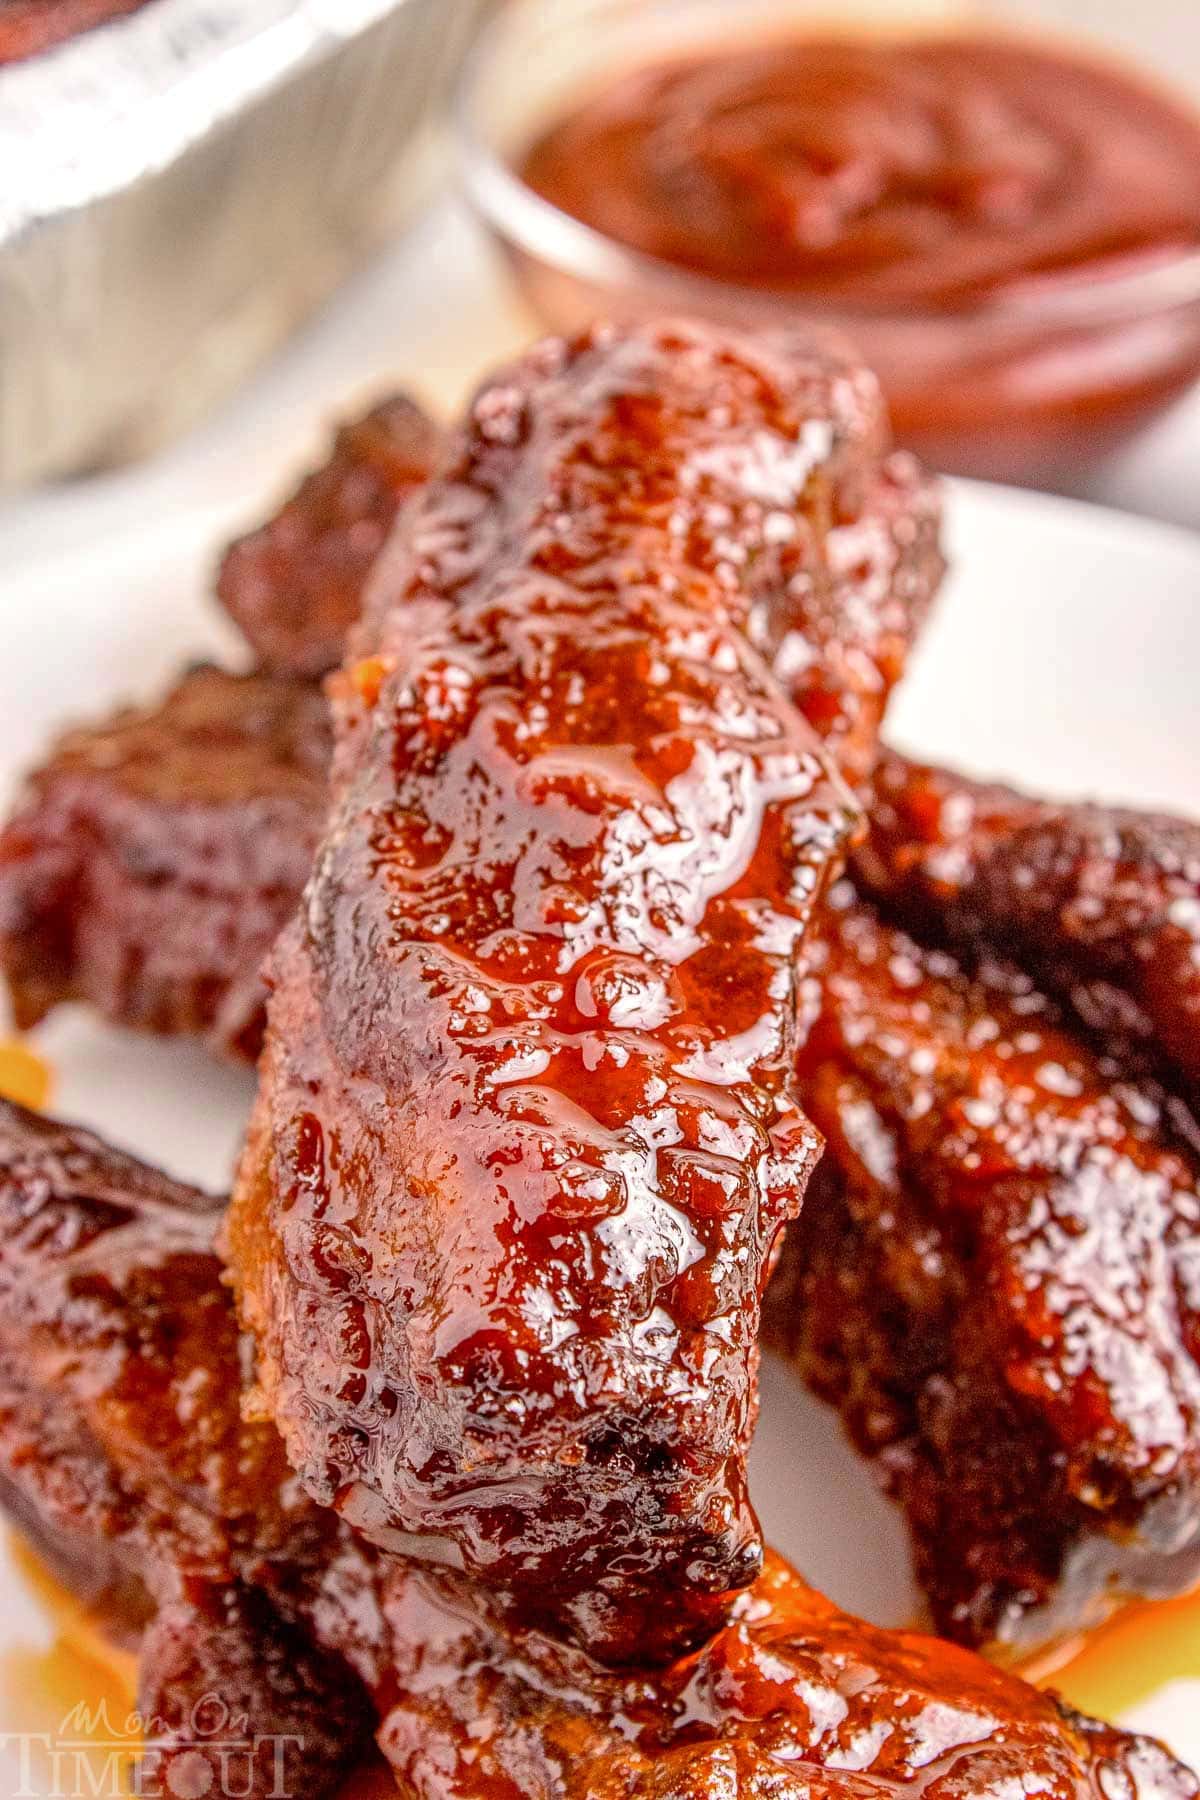
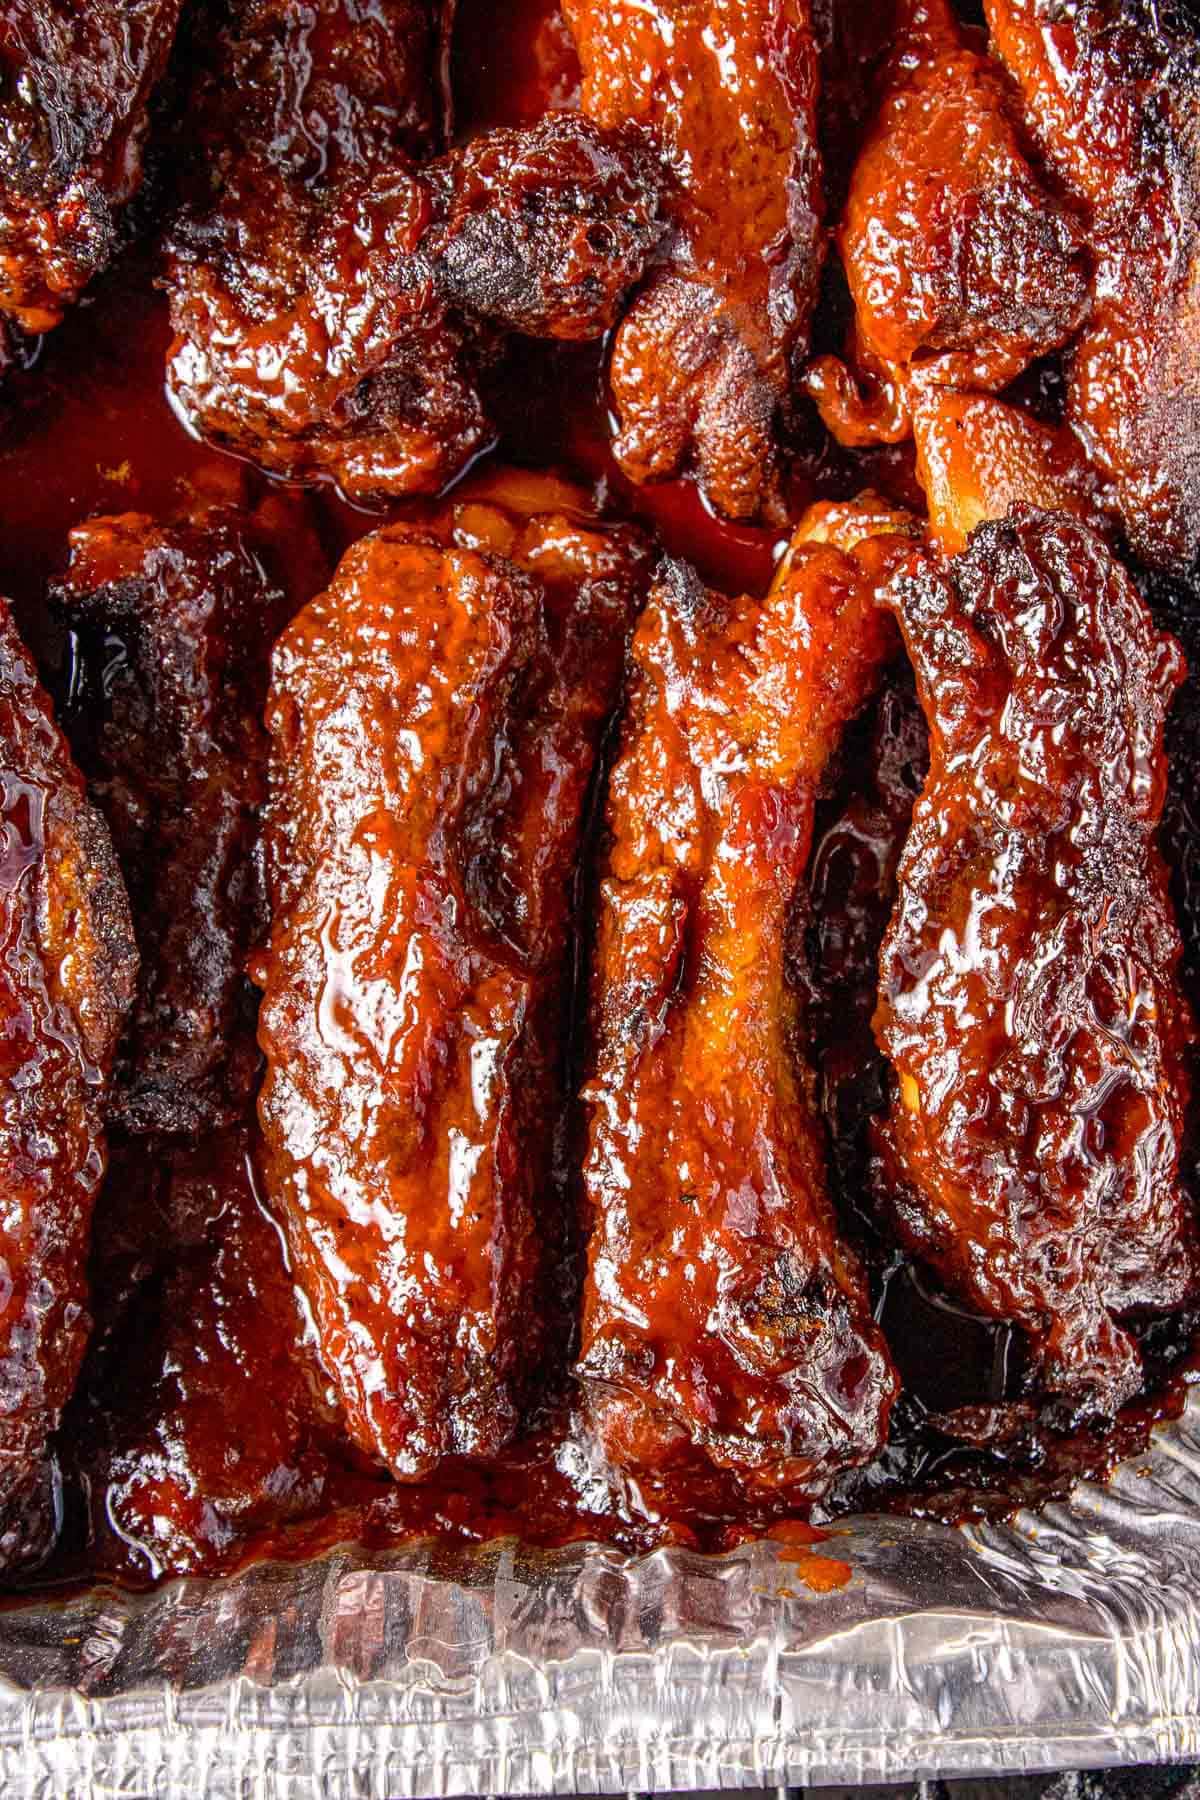
Cooked low and slow for maximum flavor, these ribs are seasoned with a simple dry rub, grilled to perfection, and then finished with butter, brown sugar and your favorite BBQ sauce. The result? Finger-licking good ribs that are saucy, smoky and downright irresistible. These ribs are going to bring everyone to the table and keep them coming back for seconds.
What Are St. Louis-Style Ribs?
St. Louis-style ribs come from the belly side of the pig and are trimmed into a rectangular shape. They’re meatier and have more fat than baby back ribs, which means they stay juicy and flavorful when cooked low and slow. They’re a favorite cut for grilling and smoking because they turn out so tender and flavorful.
What Are Party Ribs?
“Party ribs” are simply St. Louis-style ribs that are cut into individual pieces before cooking. Instead of grilling a whole rack, each rib is separated, seasoned and cooked on its own. This method allows the seasoning and smoke to cover every side of the rib, making them even more flavorful.
Plus, they’re easier to handle and serve which makes them perfect for parties, game days, and backyard gatherings where everyone wants to grab a rib and dig in! Hence the name – Party Ribs!
Why You’ll Love This Recipe
Say hello to your new favorite St Louis ribs recipe! These party ribs are smoky, saucy and absolutely irresistible. Perfect for sharing with friends and family at your next get-together!
- Party Perfect – These party ribs are cut into individual pieces before grilling, making them easy to grab and enjoy. They’re the ultimate crowd-pleaser for cookouts, game days or family dinners. These next level juicy ribs are a total crowd-pleaser at any backyard bbq or tailgate party. They’re casual, messy, and satisfying.
- Incredible Flavor – A simple dry rub of pantry spices builds the base, and the final glaze of butter, brown sugar and BBQ sauce takes the ribs over the top with sweet, smoky goodness.
- Fall-Off-the-Bone Tender – Cooking low and slow ensures that the St Louis pork ribs turn out perfectly tender every single time.
- Easy to Make – Don’t let ribs intimidate you! With step-by-step instructions and simple ingredients, you’ll feel confident making this recipe whether you’re a seasoned griller or a beginner.
- Customizable – Adjust the seasoning, swap in your favorite BBQ sauce, or make them spicy or extra sweet. This recipe is versatile and easy to customize to your family’s preferences.
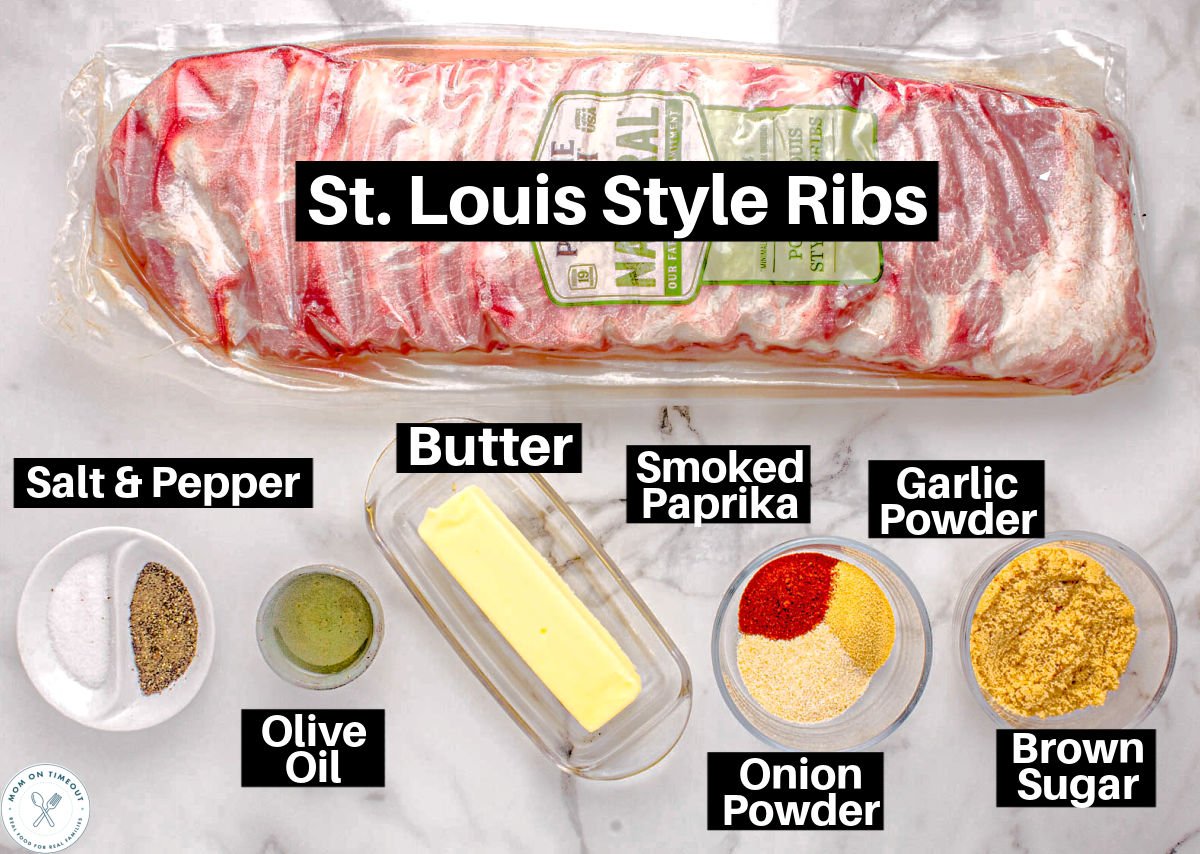
Ingredients and Substitutions
These St. Louis Style Party Ribs are juicy, fall-off-the-bone tender and packed with smoky flavor. Cooked low and slow, then finished with a sweet BBQ glaze, these ribs are perfect for cookouts, parties, or family dinners. Just a handful of ingredients are all you need for these next level ribs!
- St. Louis Style Pork Ribs: These St. Louis cut ribs are tender and cook relatively quickly. They also have a great surface area for seasoning. You can use spare ribs or baby back ribs instead. If pork isn’t your thing, beef ribs can be used instead.
BBQ Sauce: I used store-bought for convenience’s sake, but you can make your own if you’re feeling adventurous. Feel free to swap in Japanese BBQ sauce, spicy chipotle or any sweet flavor BBQ sauce. - Brown Sugar: This adds a sweet flavor that helps caramelize the ribs while cooking, balancing the tang and spice. If you’re out of brown sugar, regular granulated sugar works or you could try maple syrup or honey.
- Garlic and Onion Powder: These pantry staples add depth without the hassle of chopping fresh garlic and onions. If you prefer fresh, minced garlic and finely chopped onions will definitely step up the flavor.
- Smoked Paprika: A little smoky kick that gives the ribs that rich color and flavor. If you don’t have smoked paprika, regular paprika will work just fine.
How to Make St. Louis Style Party Ribs
These St. Louis Style Party Ribs are tender, flavorful and saucy. An easy crowd-pleasing recipe that uses pantry staples for unbelievably delicious St. Louis ribs. Love this one for backyard barbecues or weeknight dinners!
Let’s take a quick look at how to make the recipe and as always, you’ll find the full printable recipe card at the end of this post.
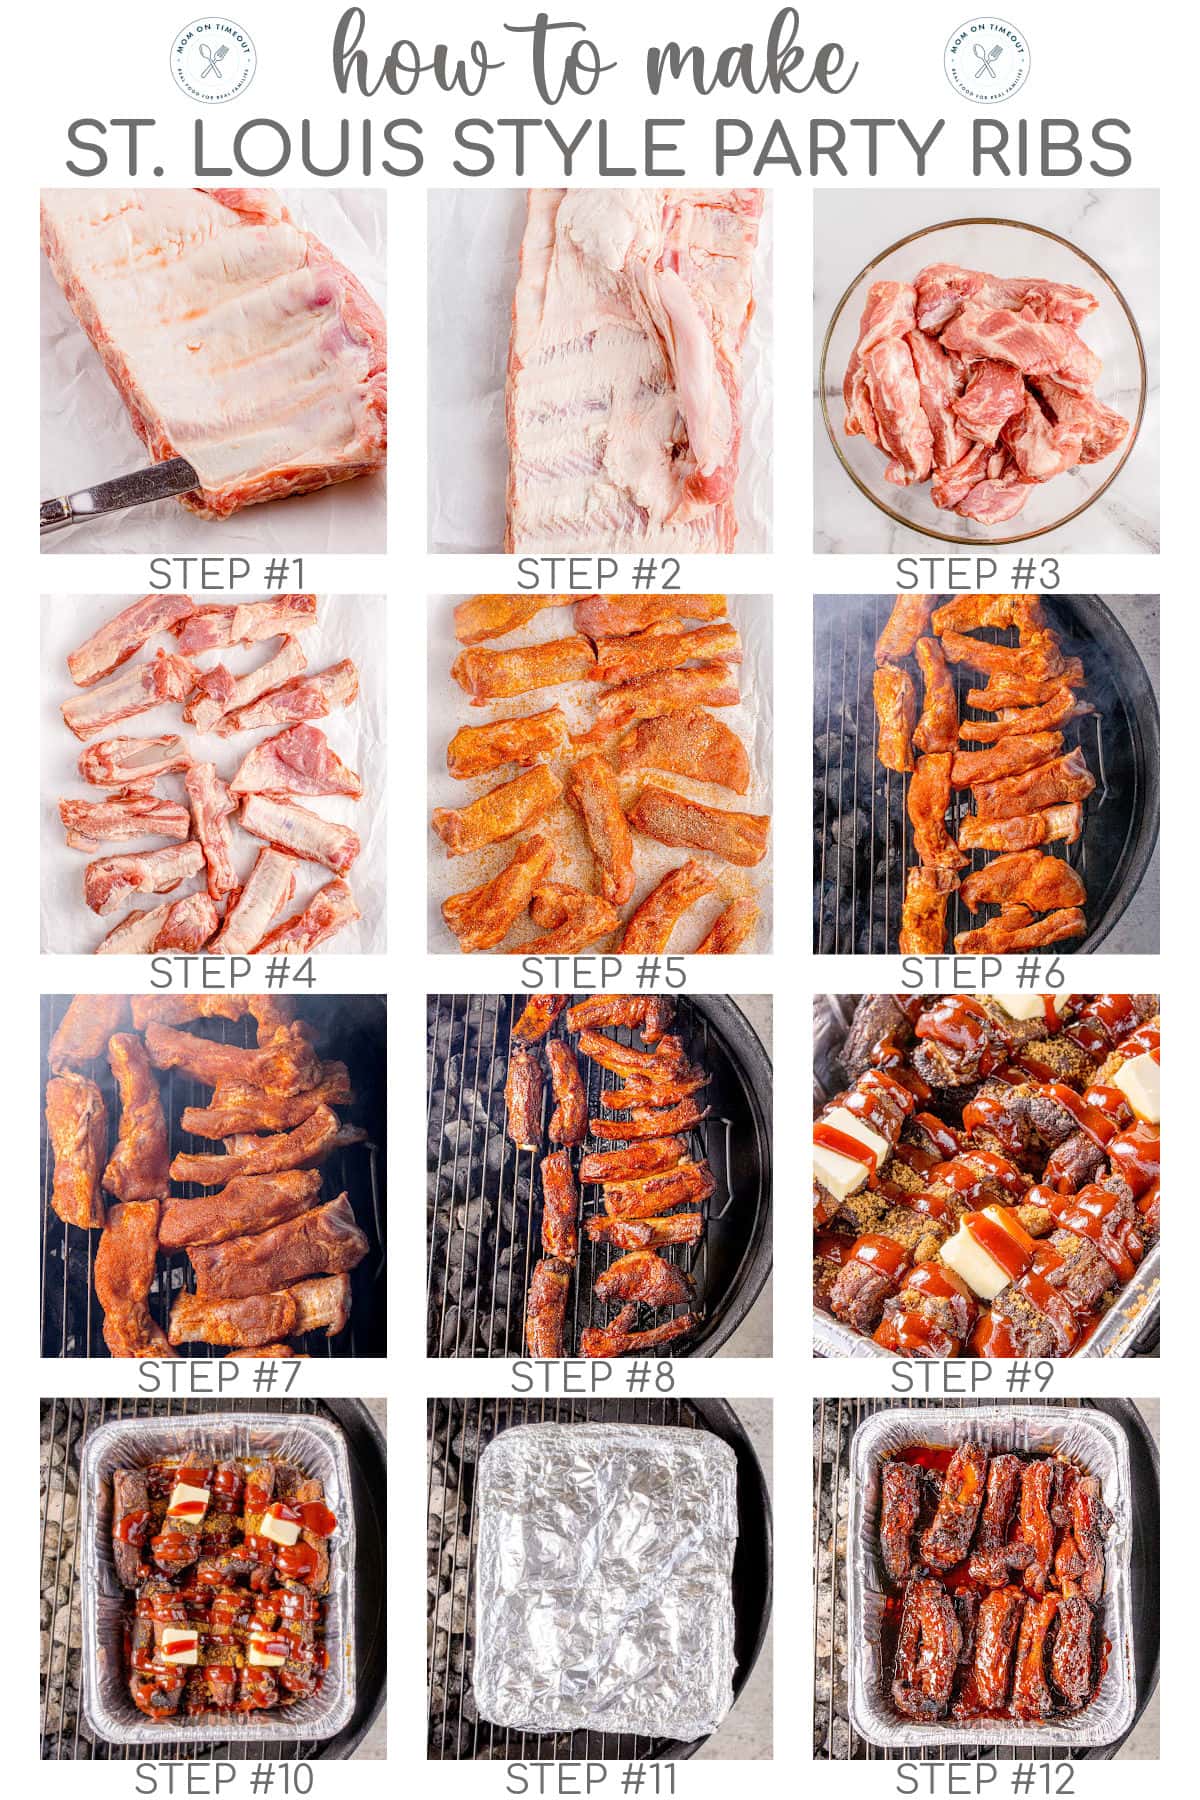
Prepare the Ribs
- Slide a butter knife under the thin layer of white membrane at one end.
- Grip membrane with a paper towel and peel it off completely.
- Slice between the bones to separate the rack into individual ribs.
Season Ribs
- Drizzle about 2 tablespoons of olive oil over ribs. Toss well.
- Sprinkle with dry rub (onion powder, garlic powder, smoked paprika, salt and pepper to taste)and let come to room temperature for 30 to 45 minutes before grilling.
Set Up the Grill (Two-Zone Method at 250°F)
- For Traeger Grills or Wood Pellet Grills: Fill the hopper with premium wood pellets, then preheat the grill to 250°F.
- Charcoal Grill: Light the charcoal and then move it to one side of the grill. Leave the other side empty for indirect cooking. Adjust the bottom and top vents to keep the grill at 250°F.
- Gas Grill: Turn the burners on one side only, leaving the other side off. Preheat your grill to 250°F, using the cool side for the ribs.
Grill Ribs and Glaze
- Place the ribs on the cool side of the grill grate, away from direct heat.
- Close the lid.
- Cook them low and slow for about 2 to 2½ hours.
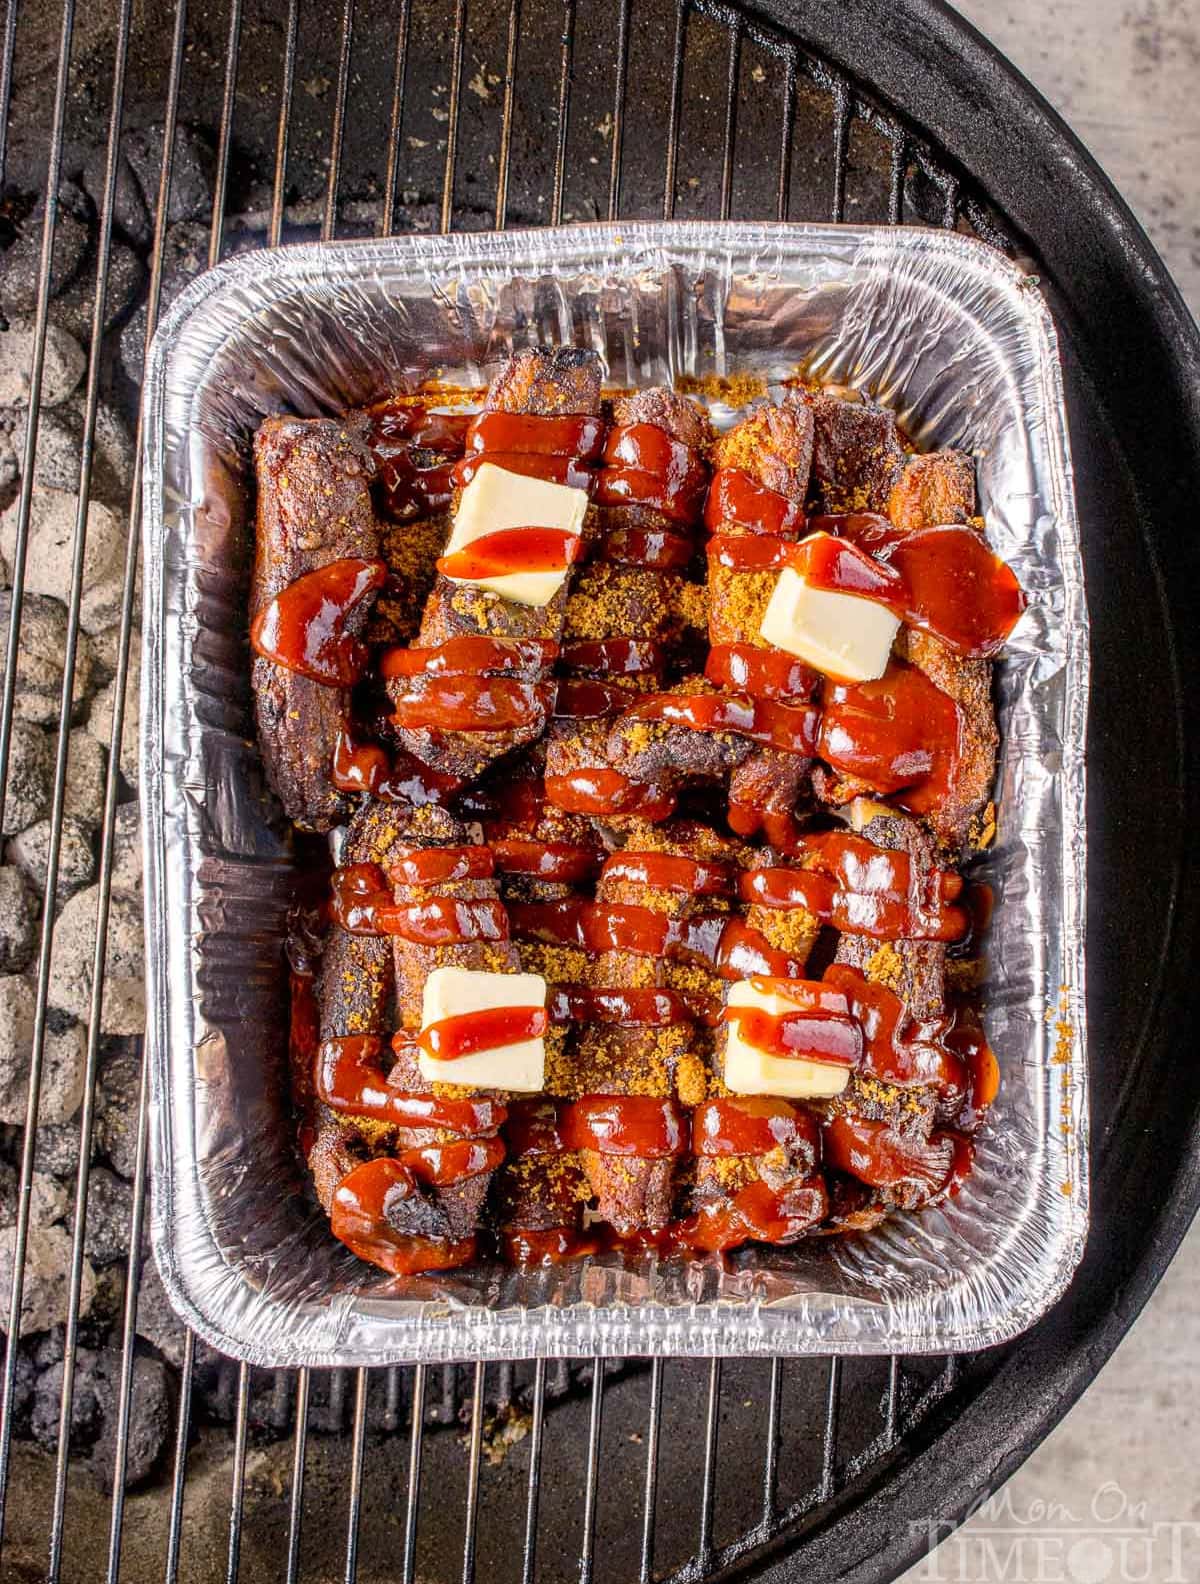
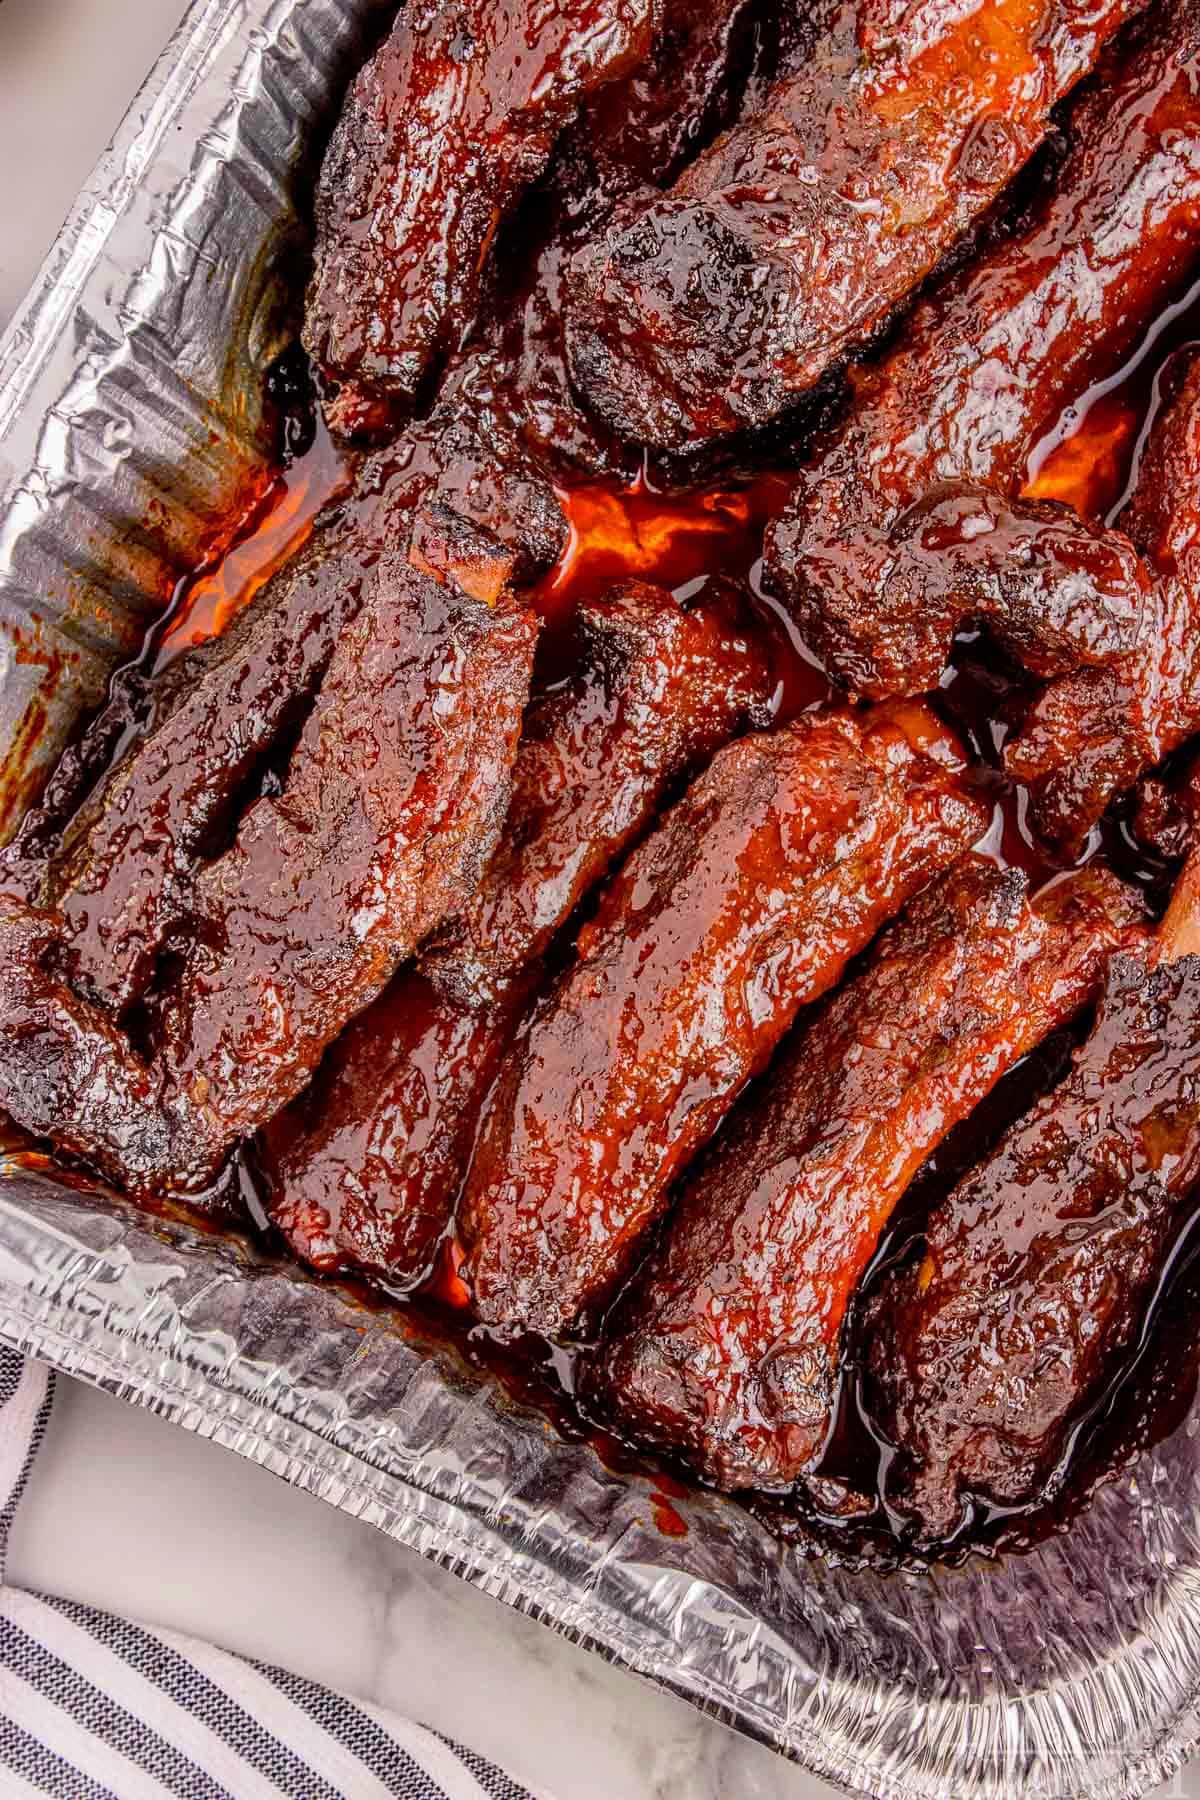
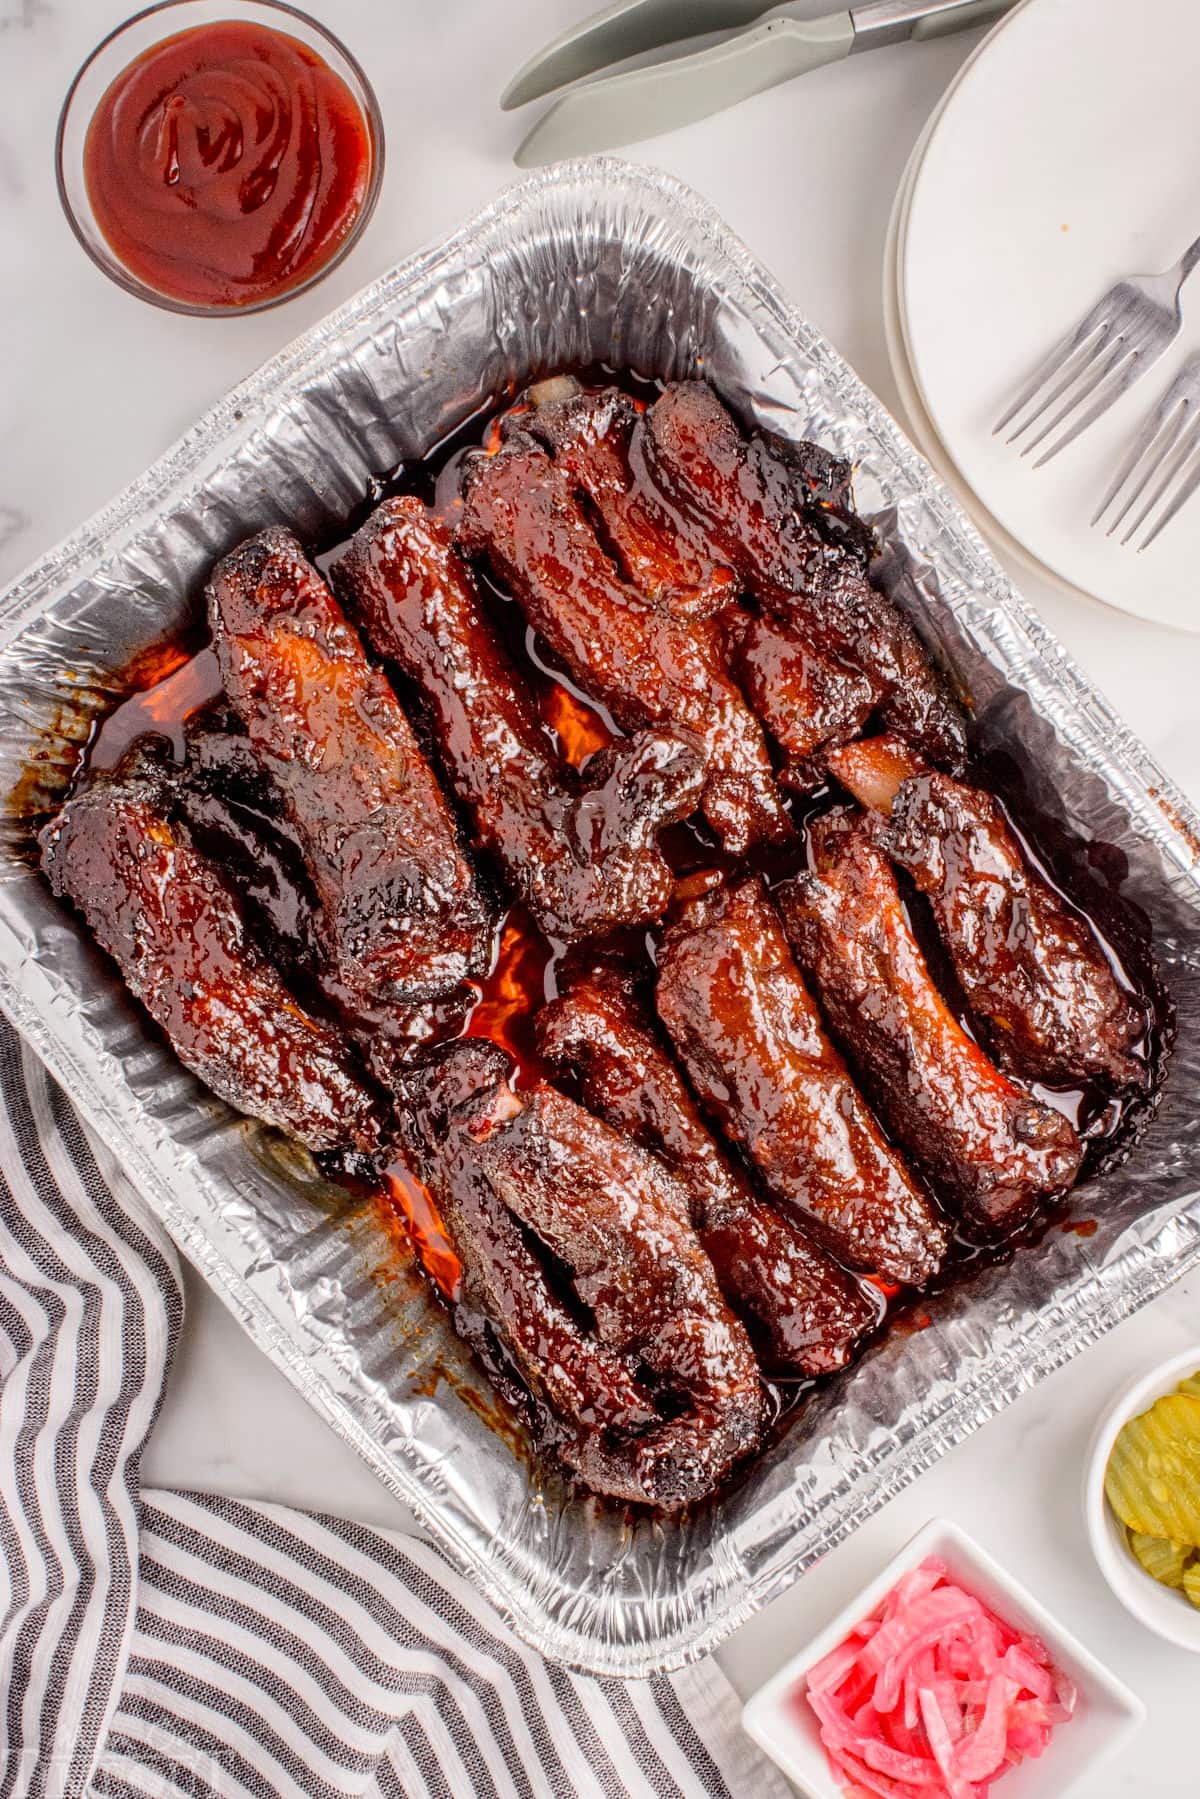
- Move the ribs to a disposable aluminum pan. Sprinkle with brown sugar then top with butter pieces and BBQ sauce.
- Place pan on grill, close the lid.
- Let the sauce glaze and the butter melt over the ribs for about 15 to 20 minutes.
- Remove ribs from the grill, let them rest and serve warm alongside your favorite sides.
Plan Ahead: If you can, let your ribs sit with the dry rub overnight or at least a few hours. This gives the flavors time to really soak into the meat instead of just sitting on the surface.
Storage Information
These Party Ribs are the best day of but can be stored in the refrigerator or freezer to enjoy later. See reheating instructions below as well.
- Refrigerator: Store leftover ribs in an airtight container for up to 3 days. Reheat in the oven at 300°F, covered with foil, until warmed through. To keep them juicy, reheat them gently without overcooking.
- Freezer: Wrap cooled ribs tightly in foil and place in a freezer-safe bag or container. Freeze for up to 2 months. When you’re ready to enjoy them, thaw them in the fridge overnight before reheating.
- Make Ahead: You can season the ribs up to 24 hours in advance and refrigerate them until ready to grill.
How To Reheat
- Oven Method: Preheat your oven to 300°F (150°C). Place the ribs in a disposable aluminum pan, pour a little BBQ sauce on them, and cover the pan with foil to prevent drying. Heat them for about 20-30 minutes until they are warmed through.
- Microwave Method: Place your ribs on a microwave-safe plate, cover them with a damp paper towel to keep the moisture in, and heat them on medium power in 1-minute bursts until they are heated through.
- Grill Method: Preheat your grill to medium heat. Place the ribs in a disposable aluminum pan, pour BBQ sauce on them, and cover the pan with foil to prevent drying. Warm them for 10-15 minutes.
Variations to Try
These St. Louis Style Party Ribs are the kind of dish that turns a casual get-together into something special. Smoky, saucy, and bursting with flavor, they’re sure to become a cookout favorite! Here are some delicious variations to consider:
- Add cayenne pepper to the seasoning mix or hot sauce to the BBQ sauce to give your ribs a spicy kick.
- Swap the brown sugar for honey when glazing for a sticky-sweet finish.
- Skip the sauce and enjoy the smoky rub flavor on its own.
- If you have a smoker, use applewood or hickory for an authentic smoked flavor.
Do I have to remove the membrane?
Yes, removing the membrane helps the seasoning absorb better and ensures more tender ribs.
What’s the difference between St. Louis-style ribs and baby back ribs?
St. Louis-style ribs are cut from the belly area of the pig, making them meatier and a bit fattier than baby back ribs. They’re perfect for grilling.
Can I make these in the oven instead of on the grill?
Absolutely! Bake the seasoned ribs at 250°F on a foil-lined sheet pan for about 2½ hours, then finish with the butter, sugar, and sauce for 15–20 minutes.
What’s the best way to tell when ribs are done?
Look for meat that pulls away from the individual bone easily and the internal temperature hitting around 190-203°F. You want them tender, not rubbery.
Can I use a slow cooker for this recipe?
Sure! Slow cookers are great for getting tender ribs. Just cook them on low for 6-8 hours with the dry rub, then finish them on the grill or under the broiler for that perfect char and crispy finish.
Trish’s Tips
If you’re looking for a show-stopping recipe to serve at your next cookout or family gathering, these St. Louis Style Party Ribs are it! Here are some tips for the best results:
- Let the ribs come to room temperature before grilling for even cooking.
- Before seasoning your ribs, make sure to peel off the thin silver membrane on the back of the ribs. Removing it helps the dry rub soak in better, making the ribs tender and flavorful.
- Make sure your grill has adequate cooking space to accommodate your ribs without overcrowding.
- Serve with classic BBQ sides like coleslaw, cornbread, or baked beans for a complete meal.
- Don’t skip resting! Letting the ribs rest a few minutes before slicing ensures juices redistribute, keeping them moist.
- If you like extra saucy ribs, make a little more of the butter-brown sugar-BBQ sauce mix and serve on the side.
- Keep an eye on temperature while cooking. Maintaining a steady 250°F is the secret to tender ribs.
- If your ribs look too dark before they’re done, wrap them in foil to prevent burning while they finish cooking.
- If you’re new to grilling ribs, remember that patience is key. Ribs are best when cooked low and slow, which allows the connective tissue to break down and the meat to become tender and juicy.
- Using the two-zone cooking method keeps the ribs away from direct heat, preventing them from drying out or burning.
- A reliable meat thermometer is your best friend here. Once the ribs reach that perfect 190-203°F range, you’ll know they’re ready to enjoy!
- If you can, let your ribs sit with the dry rub overnight or at least a few hours. This gives the flavors time to really soak into the meat instead of just sitting on the surface.
What to Serve with Ribs
These ribs pair beautifully with classic BBQ sides! Together, these sides turn your ribs into a complete meal that’s just right for summer cookouts, backyard parties or a weekend family feast. Try serving with these favorites:
- Coleslaw – Creamy, cool and crunchy to balance the richness of the ribs.
- Mac and Cheese – Everyone’s favorite side dish!
- Cornbread or Biscuits – Perfect for soaking up extra sauce.
- Jalapeno Cornbread – Cornbread with a spicy kick is the perfect pairing with the sweet glaze.
- Deviled Egg Macaroni Salad – A traditional BBQ favorites.
- Baked Beans – Sweet and smoky beans are a perfect match.
- Broccoli Salad or Cucumber Salad – A lighter option that pairs perfectly with the ribs.
Grilled Party Ribs Recipe
Ingredients
- 1 rack St. Louis style pork ribs
- 2 tablespoons extra virgin olive oil
- 4 teaspoons onion powder
- 4 teaspoons garlic powder
- 1½ teaspoons smoked paprika
- salt to taste
- black pepper to taste
BBQ Glaze
- ¼ cup packed brown sugar
- 4 tablespoons salted butter cut into small pieces
- ½ cup barbecue sauce plus more as needed
Instructions
Prep the Ribs
- Flip the whole rack so the bone side is up, then slide a butter knife under the thin layer of white membrane at one end to loosen it. Grip it with a paper towel and peel it off completely.1 rack St. Louis style pork ribs
- Slice between the bones to separate the rack into individual ribs.
Season Ribs
- Place the ribs in a large bowl or foil pan and drizzle with olive oil over them. Toss them well.2 tablespoons extra virgin olive oil
- In a small bowl, prepare the dry rub by whisking together onion powder, garlic powder, smoked paprika, salt and pepper to taste.4 teaspoons onion powder, 4 teaspoons garlic powder, 1½ teaspoons smoked paprika, salt, black pepper
- Sprinkle the dry rub all over the ribs, ensuring both the meat side and bone side are covered. Let the seasoned ribs come to room temperature for 30 to 45 minutes before grilling.
Set Up the Grill (Two-Zone Method at 250°F)
- For Traeger Grills or Wood Pellet Grills: Fill the hopper with premium wood pellets, then preheat the grill to 250°F.
- Charcoal Grill: Light the charcoal and then move it to one side of the grill. Leave the other side empty for indirect cooking. Adjust the bottom and top vents to keep the grill at 250°F.
- Gas Grill: Turn the burners on one side only, leaving the other side off. Preheat your grill to 250°F, using the cool side for the ribs.
Grill the Ribs
- Place the ribs on the cool side of the grill grate, away from direct heat. Close the lid. Cook them low and slow for about 2 to 2½ hours, or until the cooked ribs have a beautiful mahogany color and reach an internal temperature of 190-203°F and feel tender when poked with tongs.
Glaze
- Move the ribs to a disposable aluminum pan. Sprinkle brown sugar over the ribs, then top them butter pieces and ½ cup or more of your favorite BBQ sauce.4 tablespoons salted butter, ¼ cup packed brown sugar, ½ cup barbecue sauce
- Close the lid and let the sauce glaze and the butter melt over the ribs for about 15 to 20 minutes.
Serve and Enjoy
- Remove the delicious ribs from the grill, let them rest for a few minutes, and serve warm alongside your favorite sides.
Notes
Storage Information
These Party Ribs are the best day of but can be stored in the refrigerator or freezer to enjoy later. See reheating instructions below as well.- Refrigerator: Store leftover ribs in an airtight container for up to 3 days. Reheat in the oven at 300°F, covered with foil, until warmed through. To keep them juicy, reheat them gently without overcooking.
- Freezer: Wrap cooled ribs tightly in foil and place in a freezer-safe bag or container. Freeze for up to 2 months. When you’re ready to enjoy them, thaw them in the fridge overnight before reheating.
- Make Ahead: You can season the ribs up to 24 hours in advance and refrigerate them until ready to grill.
How To Reheat
- Oven Method: Preheat your oven to 300°F (150°C). Place the ribs in a disposable aluminum pan, pour a little BBQ sauce on them, and cover the pan with foil to prevent drying. Heat them for about 20-30 minutes until they are warmed through.
- Microwave Method: Place your ribs on a microwave-safe plate, cover them with a damp paper towel to keep the moisture in, and heat them on medium power in 1-minute bursts until they are heated through.
- Grill Method: Preheat your grill to medium heat. Place the ribs in a disposable aluminum pan, pour BBQ sauce on them, and cover the pan with foil to prevent drying. Warm them for 10-15 minutes.
Tools and Equipment (affiliate links): Instant-Read Meat Thermometer | Silicone Basting Brush | Grill Tongs | Grill Safe Dish or Heavy Duty Foil Pan
Preheat your grill properly: Give your grill at least 10 to 15 minutes to get hot. A properly preheated grill will help you get the searing temperature needed to lock in the steak’s juices and create a delicious crust and beautiful grill marks.
Can I make these in the oven instead of on the grill? Absolutely! Bake the seasoned ribs at 250°F on a foil-lined sheet pan for about 2½ hours, then finish with the butter, sugar, and sauce for 15–20 minutes.
What’s the best way to tell when ribs are done? Look for meat that pulls away from the individual bone easily and the internal temperature hitting around 190-203°F. You want them tender, not rubbery.
Can I use a slow cooker for this recipe? Sure! Slow cookers are great for getting tender ribs. Just cook them on low for 6-8 hours with the dry rub, then finish them on the grill or under the broiler for that perfect char and crispy finish.
Trish’s Tips
- Let the ribs come to room temperature before grilling for even cooking.
- Before seasoning your ribs, make sure to peel off the thin silver membrane on the back of the ribs. Removing it helps the dry rub soak in better, making the ribs tender and flavorful.
- Serve with classic BBQ sides like mac and cheese, coleslaw, cornbread, or baked beans for a complete meal.
- Don’t skip resting! Letting the ribs rest a few minutes before slicing ensures juices redistribute, keeping them moist.
- Keep an eye on temperature while cooking. Maintaining a steady 250°F is the secret to tender ribs.
- If your ribs look too dark before they’re done, wrap them in foil to prevent burning while they finish cooking.
- If you’re new to grilling ribs, remember that patience is key. Ribs are best when cooked low and slow, which allows the connective tissue to break down and the meat to become tender and juicy.
- Using the two-zone cooking method keeps the ribs away from direct heat, preventing them from drying out or burning.
- A reliable meat thermometer is your best friend here. Once the ribs reach that perfect 190-203°F range, you’ll know they’re ready to enjoy!
- If you can, let your ribs sit with the dry rub overnight or at least a few hours. This gives the flavors time to really soak into the meat instead of just sitting on the surface.
Please see post above for more information, step-by-step process photos, recipe tips and frequently asked questions.


Leave a Reply