
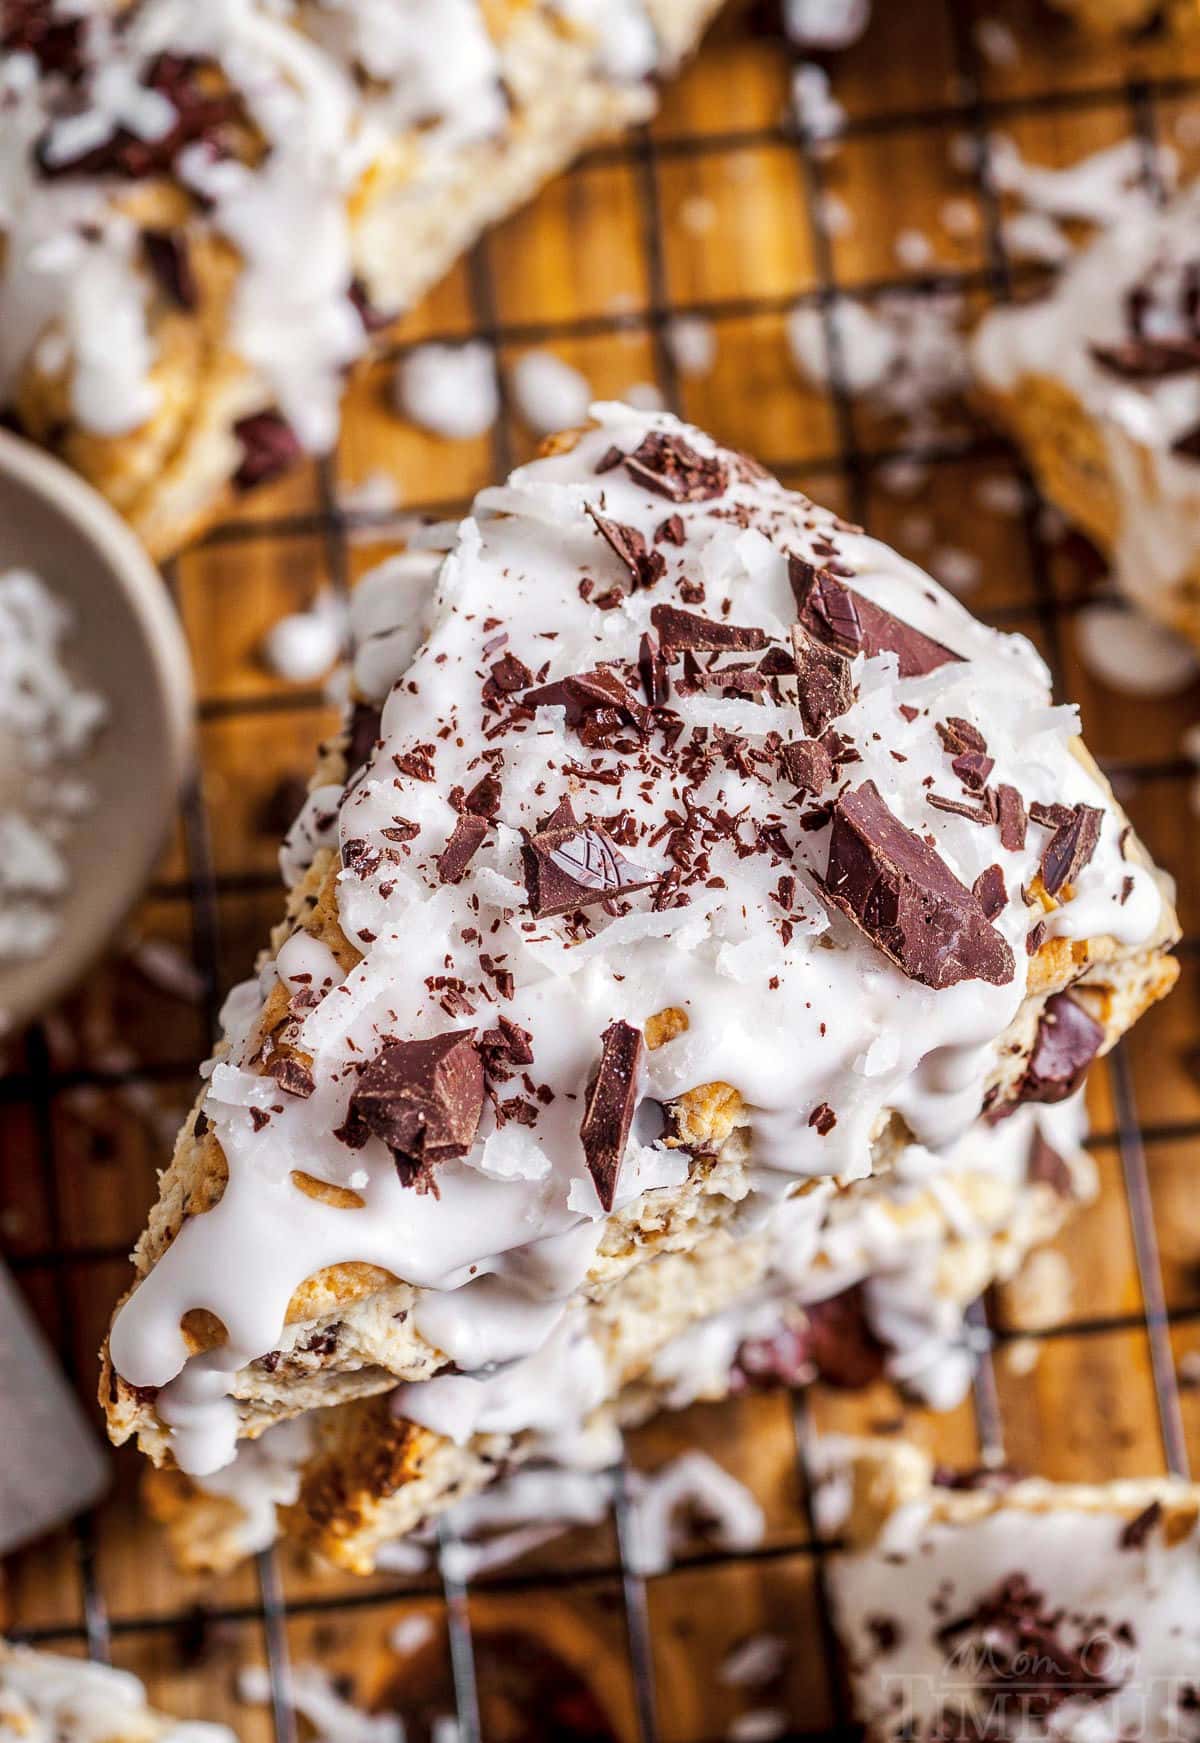
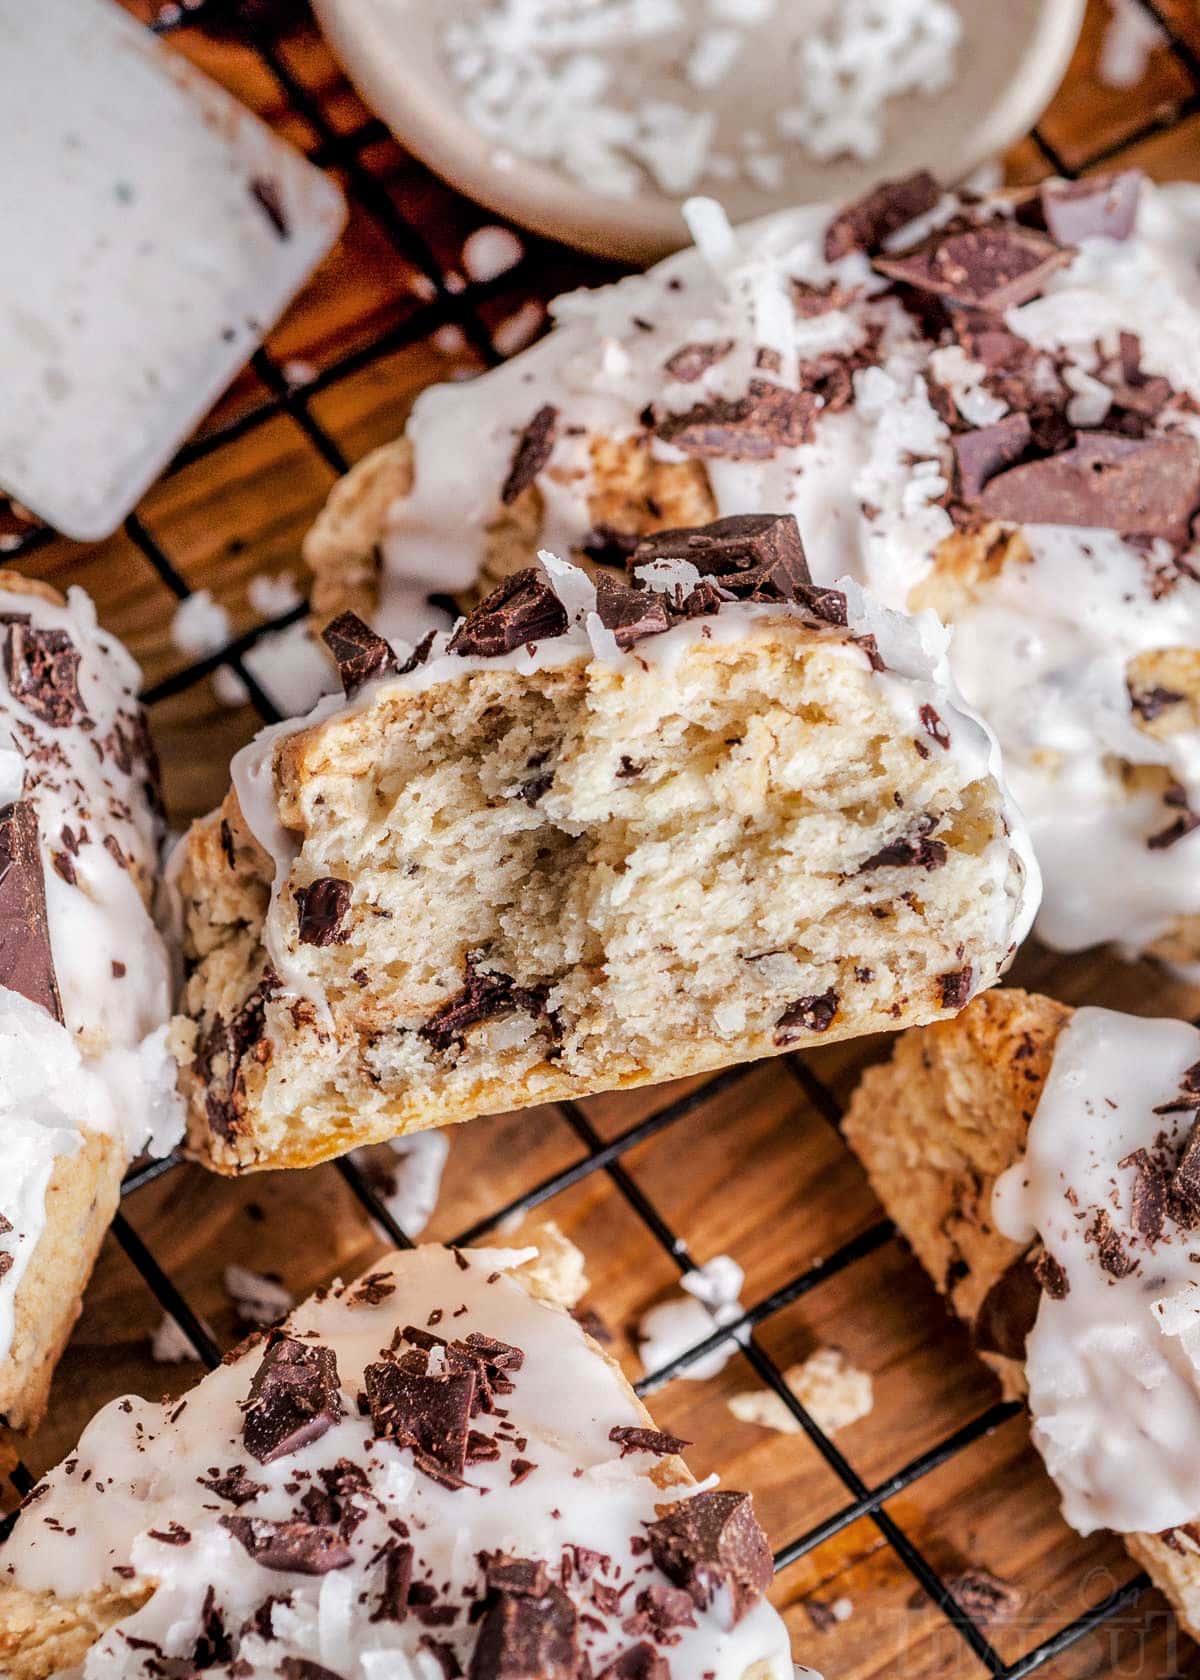
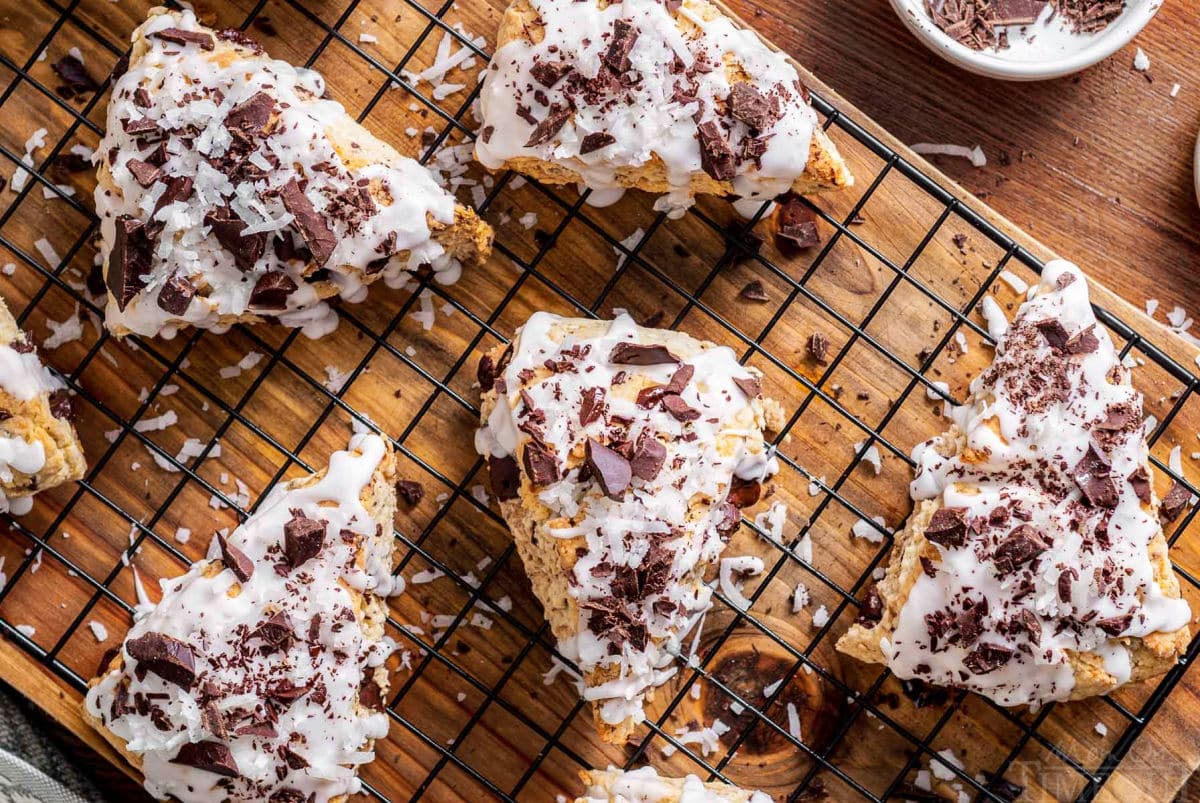
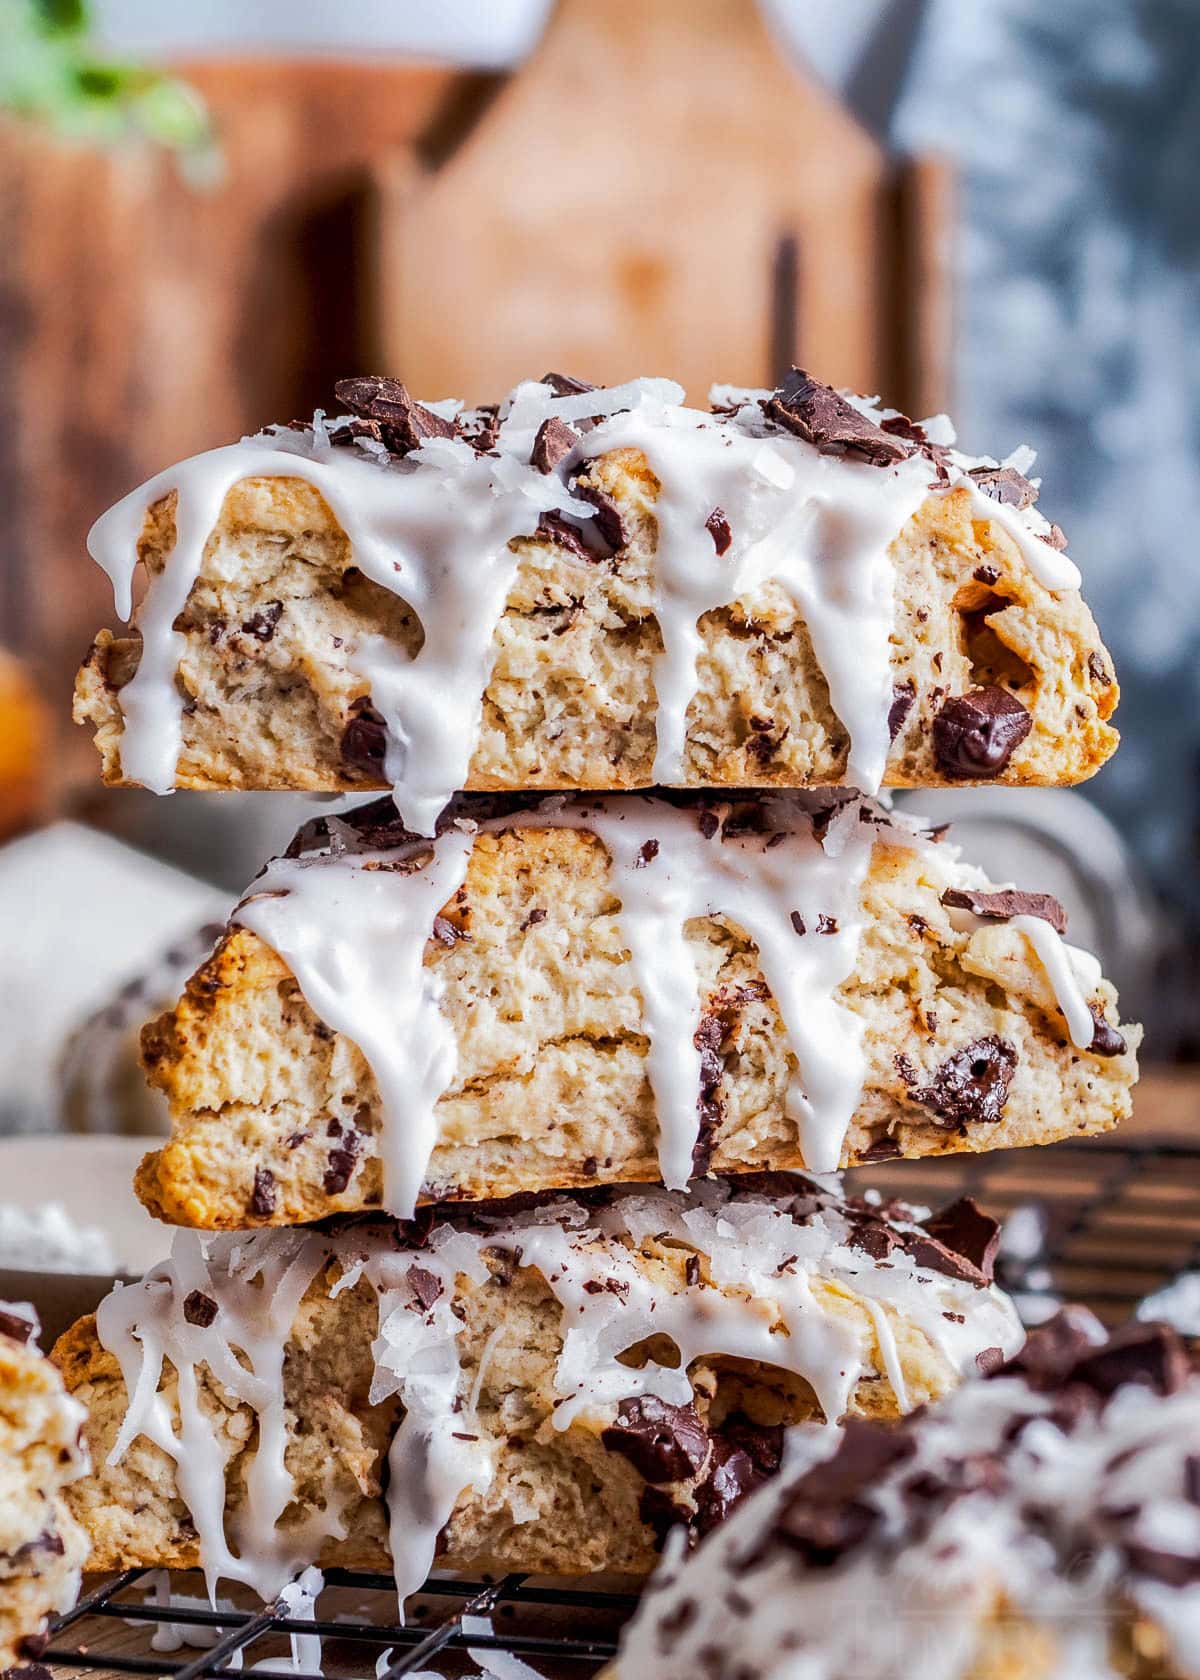
These delightful Coconut Scones are studded with dark chocolate and topped with a decadent coconut icing. This easy chocolate coconut scones recipe has a tender crumb and is full of coconut flavor – perfect for brunch, breakfast or afternoon tea!
Love delicious scones? Make sure to try my Lemon Blueberry Scones, Cranberry Orange Scones and Pumpkin Scones!
Coconut Scones Recipe
Coconut and chocolate are one of my all time favorite flavor combinations (which explains my obsession with Almond Joy candy!). On it’s own, coconut is amazing but when it’s paired with chocolate – watch out!
These easy scones make a tasty and delightful addition to any brunch or breakfast menu but are equally delicious with a cup of coffee or tea as an afternoon snack. The coconut icing is totally optional but is a deliciously sweet addition to these scones.
My scone recipes typically call for heavy cream but I’m using unsweetened coconut cream in these scones to really amp up that coconut flavor.
Difference Between Biscuits and Scones
The differences that I have noticed are in preparation, flavor, and texture. Scones are most often prepared with cream instead of the milk or buttermilk that biscuit recipes generally call for. Scones are also sweeter than biscuits and sometimes have sanding sugar sprinkled on top to enhance both flavor and presentation. Additionally, scones are typically served room temperature or slightly warm whereas biscuits are served hot.
Ingredients Needed
This easy scones recipe is inspired by Almond Joys and packs a powerful coconut punch. The scones are perfect for breakfast, brunch and after school snack. As always, you can find the full printable recipe with complete instructions in the recipe card at the end of this post. Let’s take a look at what you’ll need…
For The Coconut Scones
- sweetened coconut flakes – Part of the coconut flakes get processes into smaller pieces so that the coconut flavor is evenly distributed. The remaining coconut flakes adds additional texture to the scones.
- all purpose flour – This ingredient provides the structure.
- granulated sugar – Adds a little sweetness to the scones.
- baking powder – This is the leavening agent in this recipe and gives the scones some lift and a lighter texture.
- salt – Balances and enhances the flavors of all the scone ingredients.
- dark chocolate – Grab a high quality chocolate bar that you can chop up. Aim for 70% cacao and higher.
- salted butter – The butter needs to be nicely chilled and cut into small pieces. Cold butter will ensure a tender crumb and aids in the flakiness of the scones.
- unsweetened coconut cream – My scone recipes typically call for heavy cream but I’m using unsweetened coconut cream in these scones to really amp up that coconut flavor.
- vanilla extract and coconut extract – These two extracts and warmth and flavor to the scones.
For The Coconut Icing
- unsweetened coconut cream – This is the “liquid” for the icing and adds additional coconut flavor. Add a little more if the icing is too thick. You can also add a teaspoon or milk or heavy cream (or more!) as needed.
- coconut extract – Adds even more coconut flavor to the icing. Vanilla extract can be substituted.
- powdered sugar – Sweetens the icing as well as thickens it. If the icing is too thin, you’ll want to add a little bit more.
How To Make Coconut Scones
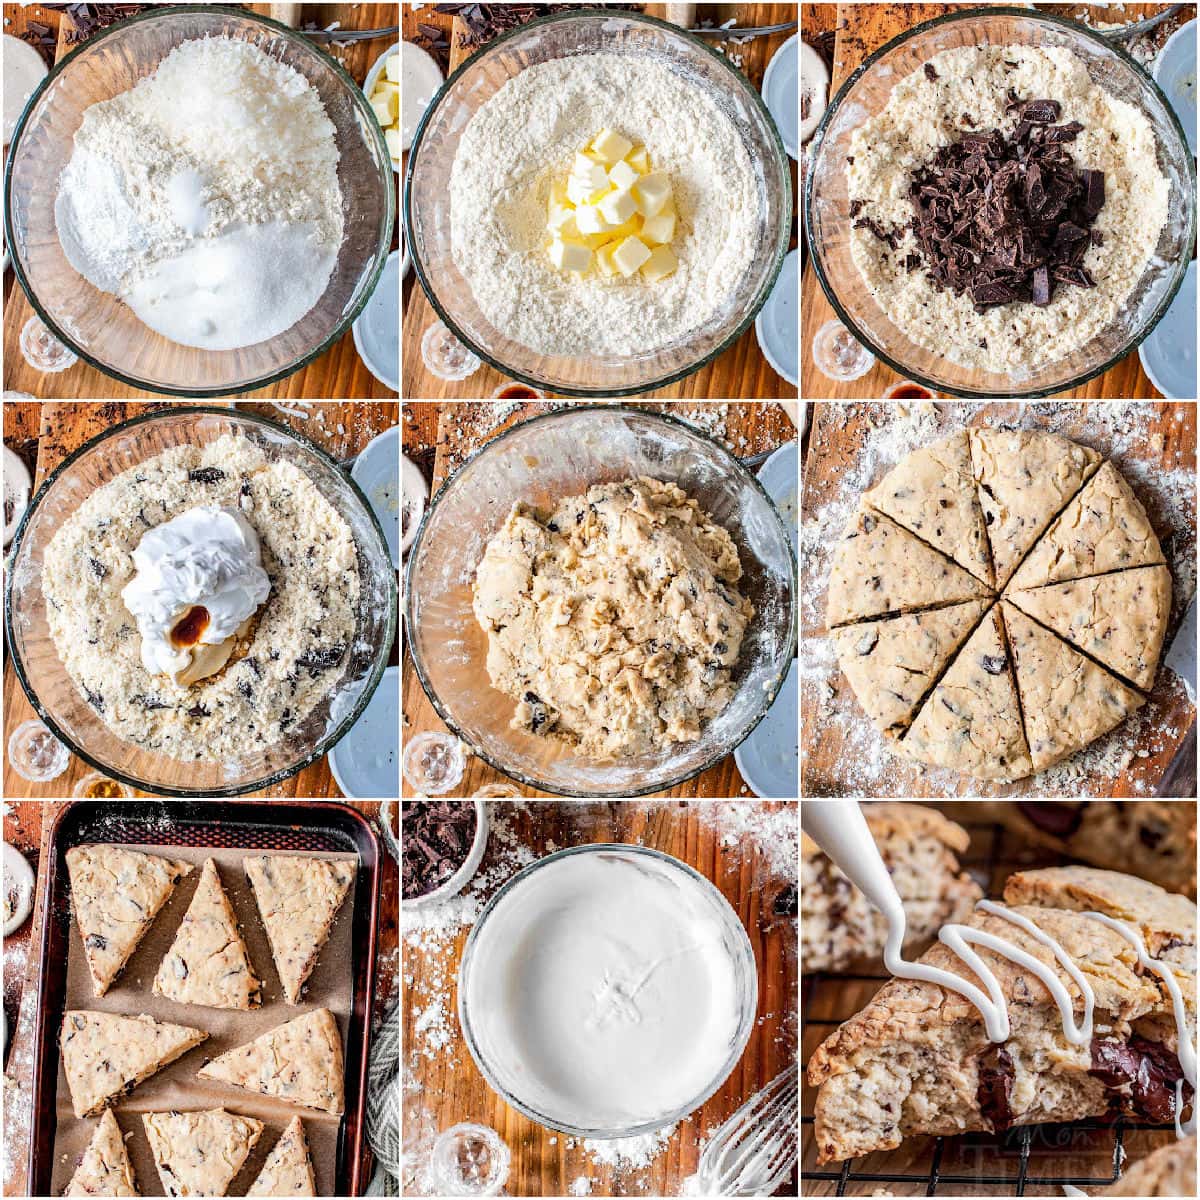
- Prep. Preheat the oven to 400°F. Line a baking sheet by lining with parchment paper or a silicone baking mat. Set aside.
- Dry Ingredients. Pulse ¾ cup of the sweetened coconut flakes in a food processor until they become granular. Place processed coconut, flour, sugar, baking powder and salt in a large bowl and whisk to combine.
- Chocolate. Chop the dark chocolate into chunks and slivers – you want a variety of sizes. Reserve about ¼ of the chopped chocolate to use as a topping later, place the remaining ¾ of the chopped chocolate into the bowl with the flour mixture. Stir to combine.
- Butter and Wet Ingredients. Add the cold butter cubes to the bowl and using your fingers or a pastry cutter, cut the butter into the dry ingredients until it has a coarse, sandy texture. Add coconut cream, vanilla extract, and coconut extract and stir together until a dough forms, the dough should not be sticky or too wet, it will be on the drier side and just hold together. (If your dough is too wet, add a little extra flour. If your dough is too dry add a little more coconut cream.)
- Shape and Bake. Turn the dough out onto a lightly floured cutting board. Press the dough into an 8” circle, rounding the edges and trying to press any cracks around the edges together. Cut the circle of dough into 8 wedges. Transfer the scones to the prepared baking sheet. Bake the scones for approximately 25 to 30 minutes, just until the edges are lightly golden. Remove from the oven and transfer to a cooling rack.
Make The Coconut Icing
- Combine ingredients. Whisk coconut cream, coconut extract and powdered sugar together in a small bowl. This icing should be fairly thick, but still be easy to pipe. You can add additional powdered sugar or coconut cream as needed to achieve the thick texture. Add the icing to a piping bag and snip the tip.
- Ice Scones. Pipe the coconut icing on the top of cooled scones. Sprinkle with the remaining shredded coconut and chopped dark chocolate.
- Serve. Scones are ready to enjoy immediately or can be stored in an airtight container.
Shaping Scones
Scones come in all shapes and size. You can cut them into circles using a biscuit cutter or take the easy route and make drop scones by simply scooping out dough and dropping onto a baking sheet. My preferred method for shaping scones is to shape the dough into a disc and then cut the dough into wedges.
Storage Information
Scones should be stored at room temperature in an airtight container for up to 2 days.
To freeze, transfer cooled scones to a freezer safe, airtight container and freeze for up to 3 months. Thaw at room temperature before enjoying.
Tools You’ll Need
You most likely have all of these on hand but here is a quick look at what you’ll need to make these scones:
- large baking sheet – A half sheet pan is plenty big for this recipe.
- Parchment paper or a silicone baking mat will make transferring the scones easy and ensures they come off in one piece.
- pastry cutter makes quick work of cutting the butter into the flour. Two knives or forks will also work.
- bench scraper or large knife to cut the disc into wedges. You can also use a large knife.
Frequently Asked Questions
Yes! Let the scones cool completely and then transfer to a freezer ziploc bag. Reheat scones in the microwave for about 20 seconds on medium heat or let thaw at room temperature.
Scones can be made in advance although they are definitely better enjoyed the same day as baking. After baking, they are good for about 2 days. You can also freeze (see above).
Scones can be stored at room temperature or in the fridge. Cover loosely at room temperature or store in an airtight container in the fridge.
Trish’s Tips and Tricks
- Coconut cream is a key ingredient and it is not the same thing as coconut milk. Coconut cream can be purchased at most grocery stores in the Asian foods section, or wherever they stock canned coconut milk. Coconut cream comes in a can, it is very thick, almost like yogurt or sour cream in texture.
- Processing the coconut is key. I recommend not skipping the food processor step. It chops up the coconut flakes so you get amazing coconut flavor in every bite without that stringy coconut flake texture that not everyone loves. If you don’t have a food processor, no worries. You can absolutely skip this step and use the flakes whole, the texture and flavor might be a tiny bit different but still delicious!
- Chocolate, chocolate, chocolate. I went with a dark chocolate for these scones. You can go really, really dark or opt for a semi-sweet chocolate if you prefer.
More Coconut Treats
Love coconut as much as I do? Here are some treats you won’t want to miss!
- Coconut Cream Pie
- Almond Joy Cookies
- Copycat Almond Joy Candy Bars
- Coconut Macaroons
- Raspberry Coconut Magic Bars
How To Make Chocolate Coconut Scones

Chocolate Coconut Scones
Ingredients
Scones
- 1 cup sweetened coconut flakes
- 2 ½ cups all purpose flour
- ¼ cup sugar
- 1 tablespoon baking powder
- ½ teaspoon salt
- 6 ounces dark chocolate I used two bars
- 7 tablespoons salted butter cubed and chilled
- 1 cup coconut cream
- 1 teaspoon vanilla extract
- ½ teaspoon coconut extract
Coconut Icing
- 3 tablespoons coconut cream
- ½ teaspoon coconut extract
- ¾ cup powdered sugar
Instructions
- Preheat the oven to 400°F. Line a baking sheet by lining with parchment paper or a silicone baking mat. Set aside.
- In a food processor, pulse ¾ cup of the sweetened coconut flakes until they become granular. Remove from the food processor and place into a large mixing bowl.
- Add the flour, sugar, baking powder and salt to the bowl with the coconut and stir to combine.
- Chop the dark chocolate into chunks and slivers, a variety of sizes. Reserve about ¼ of the chopped chocolate to use as a topping later, place the remaining ¾ of the chopped chocolate into the bowl with the flour mixture. Stir to combine.
- Add the cold butter cubes to the bowl and using your fingers or a pastry cutter, cut the butter into the dry ingredients until it has a coarse, sandy texture.
- Add coconut cream, vanilla extract, and coconut extract and stir together until a dough forms, the dough should not be sticky or too wet, it will be on the drier side and just hold together. (If your dough is too wet, add a little extra flour. If your dough is too dry add a little more coconut cream.)
- Turn the dough out onto a lightly floured cutting board. Press the dough into an 8” circle, rounding the edges and trying to press any cracks around the edges together. Cut the circle of dough into 8 wedges. Transfer the scones to the prepared baking sheet.
- Bake the scones for approximately 25 to 30 minutes, just until the edges are lightly golden. Remove from the oven and transfer the scones to a cooling rack.
Coconut Icing
- Whisk coconut cream, coconut extract and powdered sugar together in a small bowl. This icing should be fairly thick, but still be easy to pipe. You can add additional powdered sugar or coconut cream as needed to achieve the thick texture. Add the icing to a piping bag and snip the tip.
- When the scones have cooled completely, pipe a cross hatch pattern of icing on the top of each scone. Sprinkle the tops of the iced scones with the remaining shredded coconut and reserved chopped dark chocolate.
- Serve immediately or store in an airtight container.


SabineV says
I have no words. I followed the recipe and these are so decadent. I am not sure I will share them with the rest of the family but these are definitely a make again! I might share then :). Thank you for a fabulous recipe!
Trish - Mom On Timeout says
Best compliment ever! Thank you so much!