
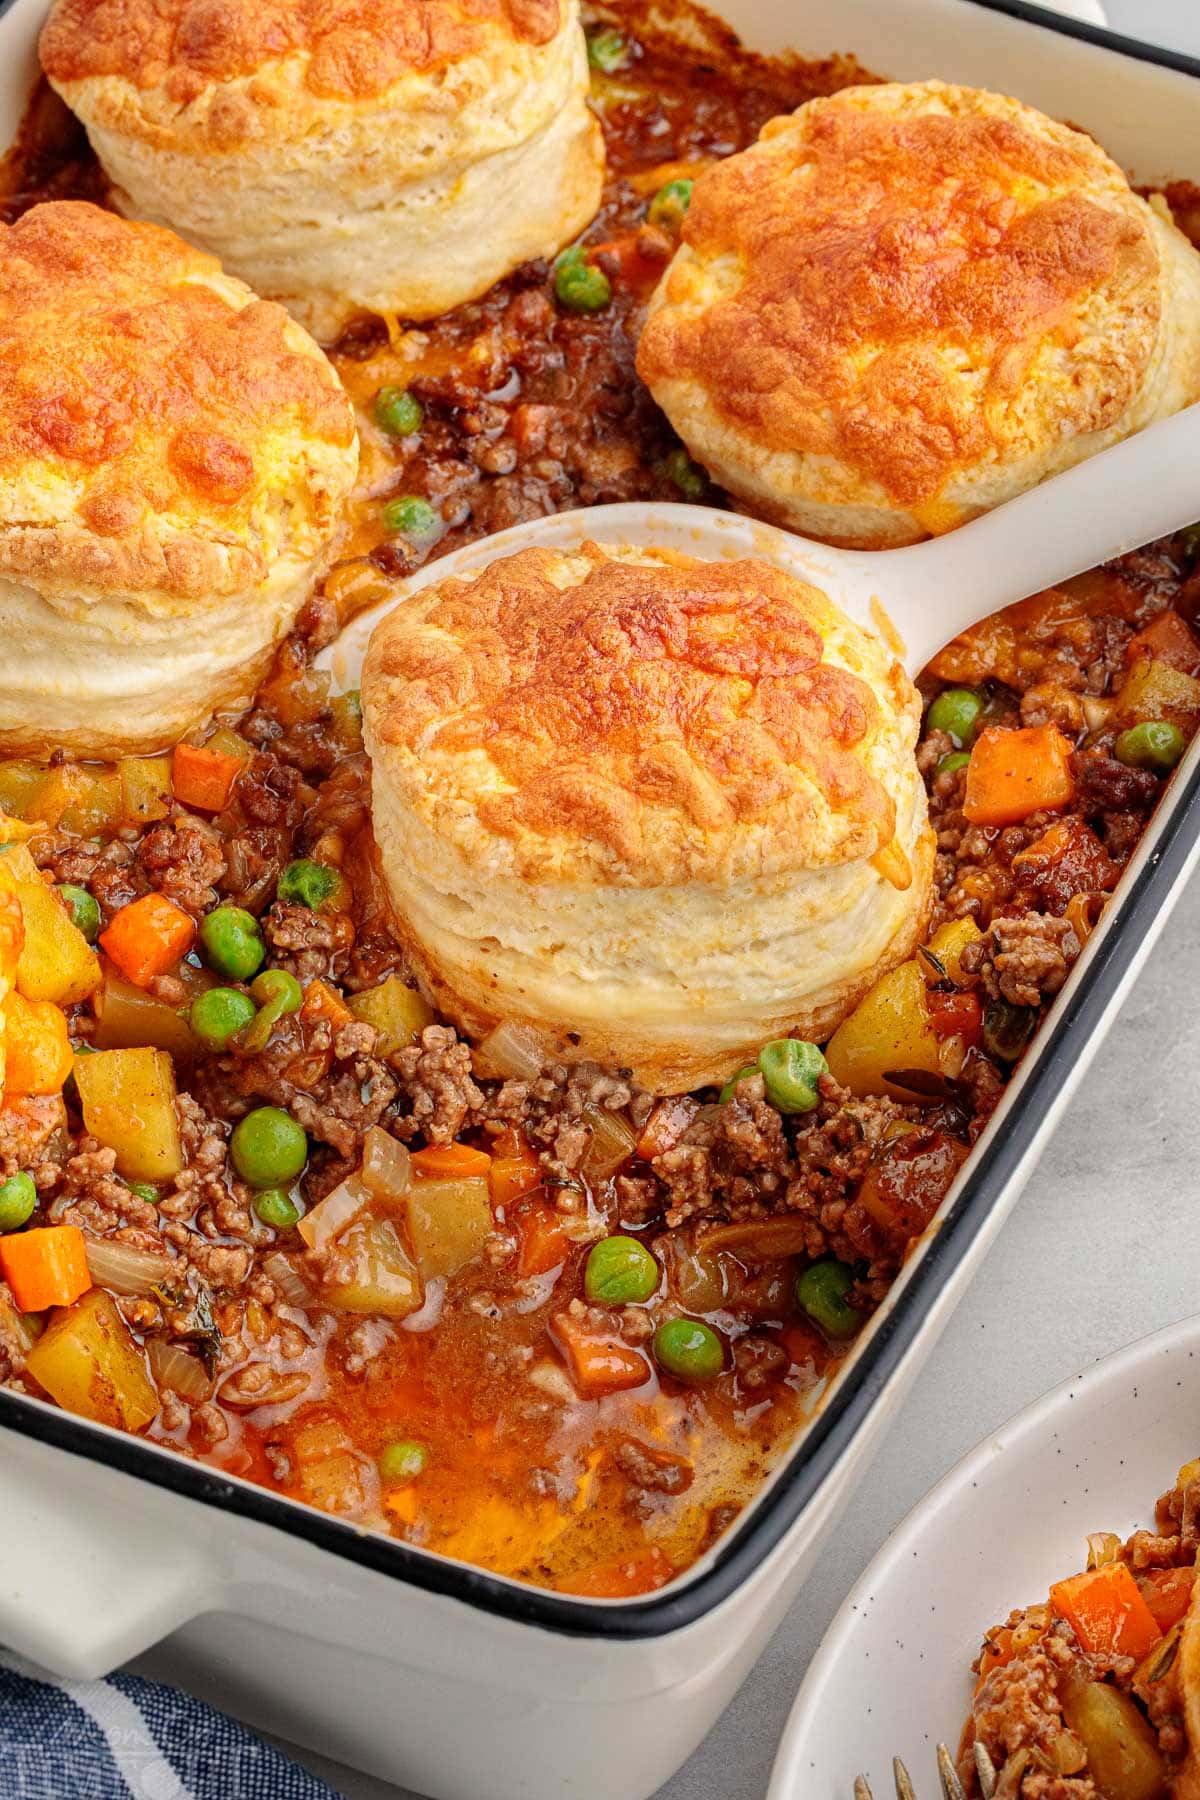
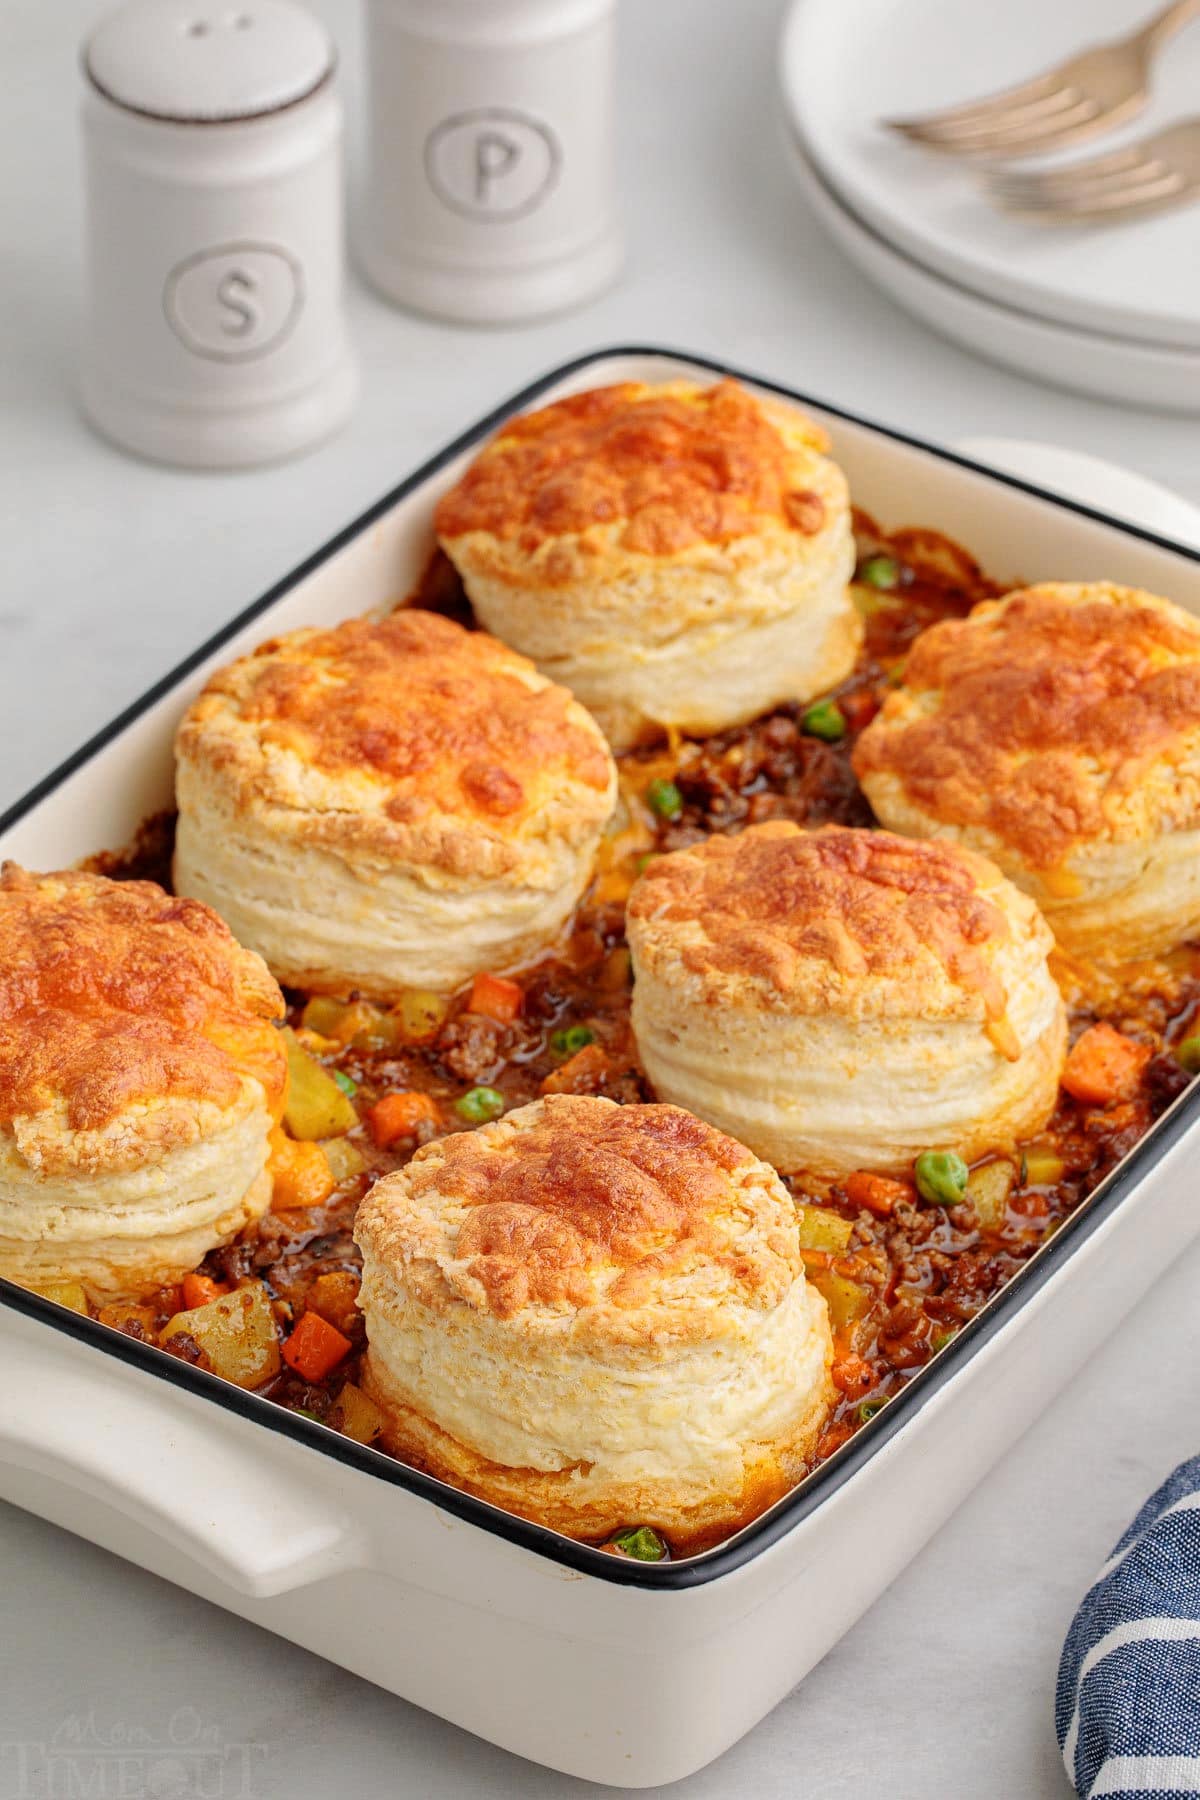
This Ground Beef Pot Pie recipe with biscuits is the ultimate comfort food! A savory beef and vegetable filling is baked beneath fluffy, golden biscuits for a cozy, family-friendly dinner everyone will love. Ready in about an hour and perfect for busy weeknights or Sunday supper!
Looking for more comfort food? Make sure to try these fan favorites: Creamy Chicken Noodle Soup, Mac and Cheese and this Tater Tot Casserole!
Beef Pot Pie Recipe
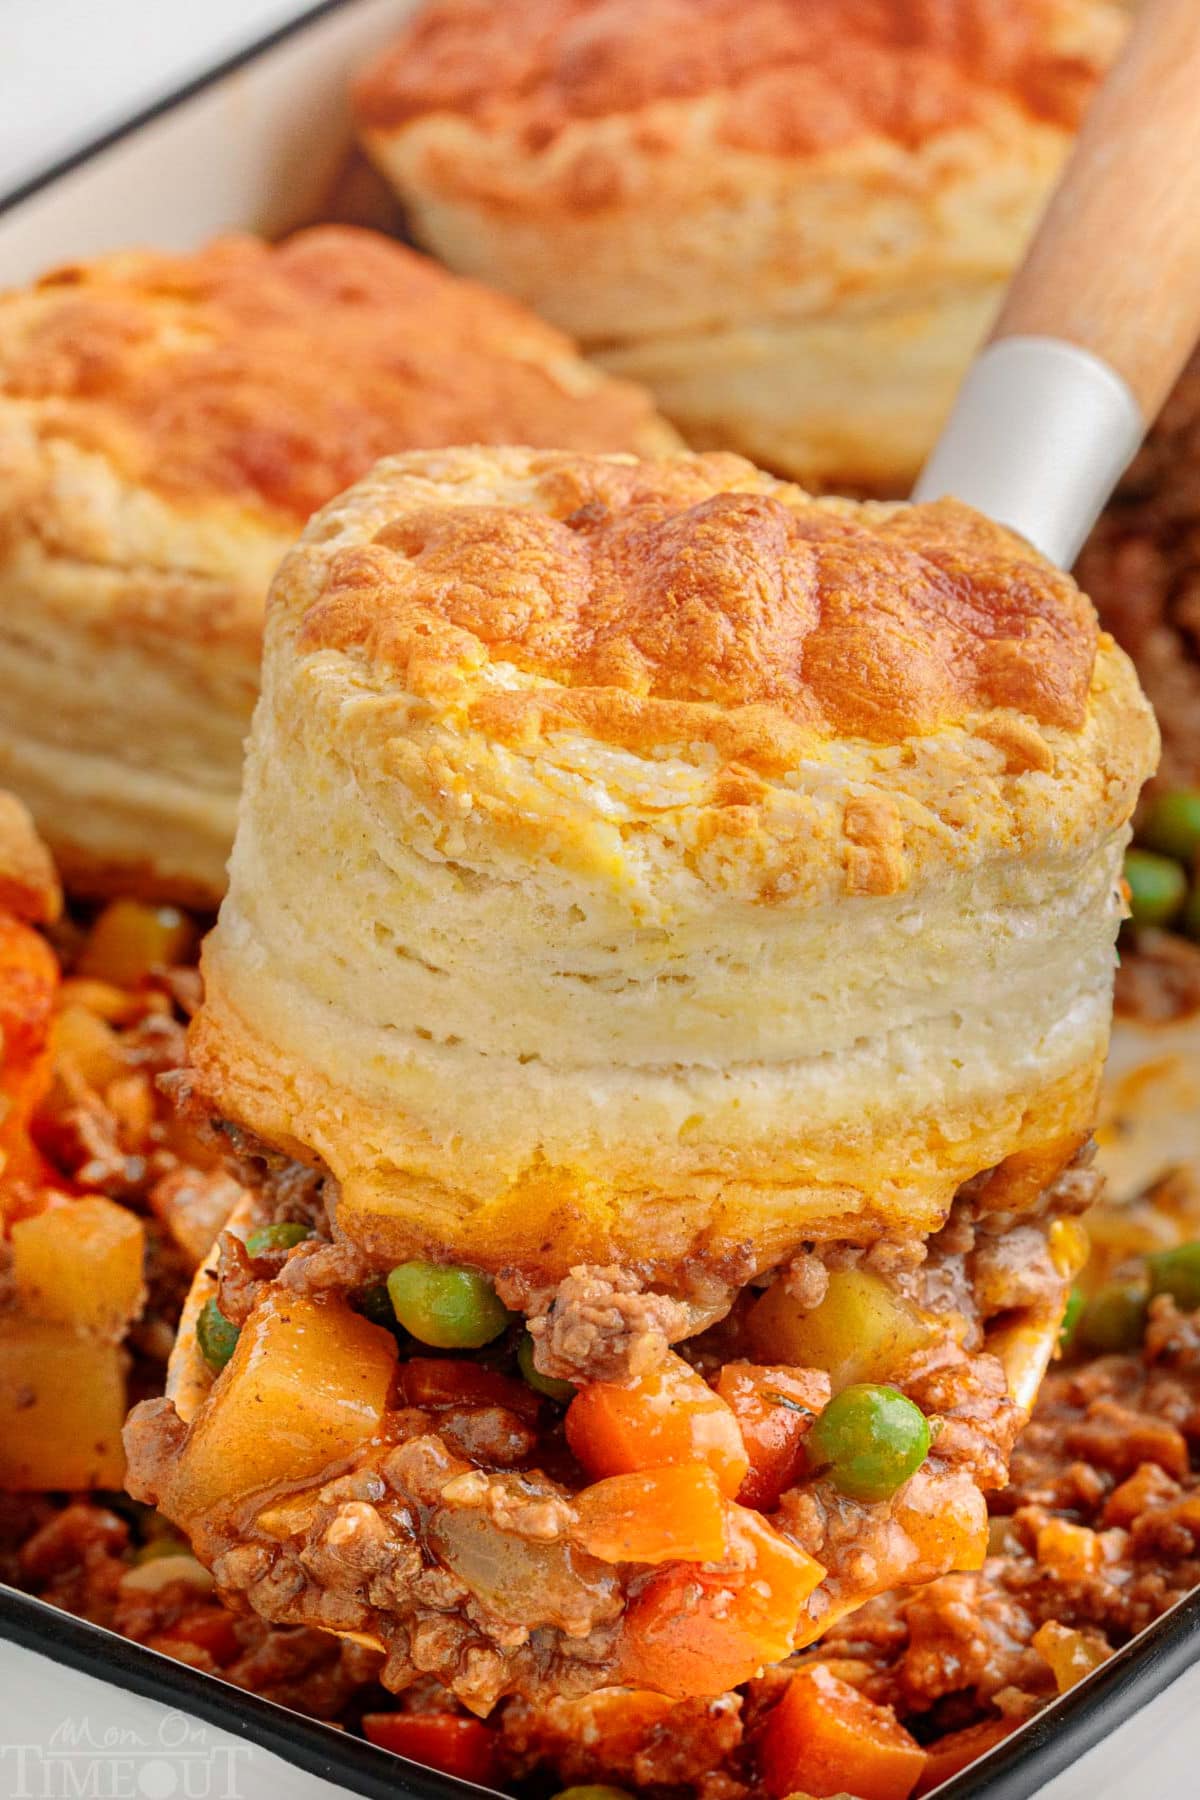
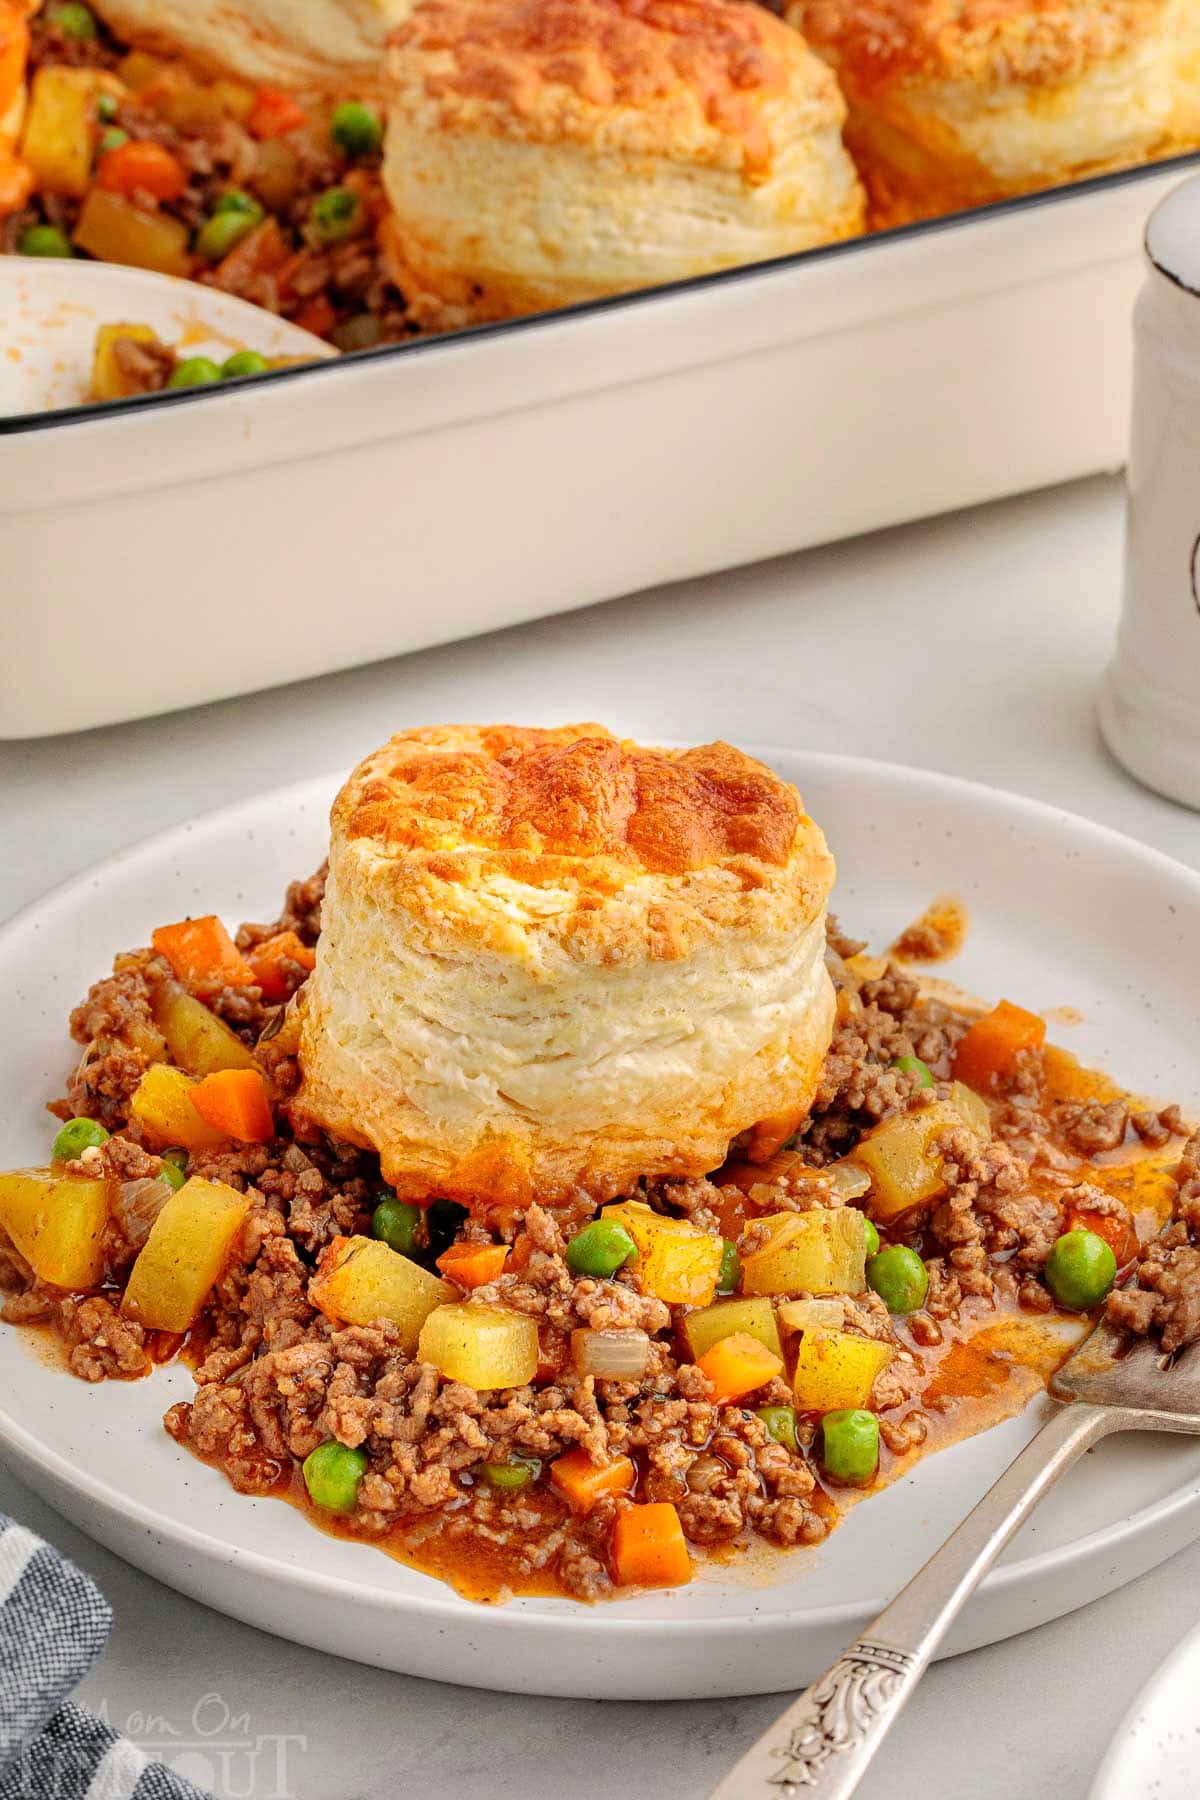
Comfort food doesn’t get any better than this Ground Beef Pot Pie! Tender ground beef, hearty vegetables and a rich, flavorful gravy are baked beneath fluffy, flaky, golden biscuits topped with cheddar cheese. Your family is going to love this dinner that’s as satisfying as it is simple. It’s a cozy, family-friendly meal that’s perfect for busy weeknights or lazy weekends at home.
The hardest part of any pot pie is the pie crust which is what we’ve replaced here with flaky buttermilk biscuits. I feel like it’s not only a smart trade, but a delicious one as well. Pieces of biscuit are perfect for dipping into the pot pie filling or scooping up a big, hearty bite.
This easy ground beef pot pie recipe combines all the best parts of a classic beef stew, homey pot pie and homemade biscuits into one delicious casserole. The filling is savory and hearty, while the biscuit topping adds buttery flavor and the perfect amount of crunch. Every bite feels like a warm hug which is exactly what comfort food should taste like!

Why You’ll Love This Recipe
Looking for an easy way to feed your hungry family? This Ground Beef Pot Pie with Biscuits delivers big comfort with simple ingredients. Flavorful ground beef, veggies, and homemade biscuits baked to golden perfection – what’s not to love?
- Hearty and Filling: Packed with protein, veggies, and topped with biscuits, this dish is a full meal all on its own.
- Simple Ingredients: Everything you need is easy to find and you probably have most of it in your pantry already! This is one of those easy recipes you’ll find yourself turning to again and again.
- Weeknight Ready: This delicious dish is ready in about an hour and bakes up beautifully in one pan. The cheesy, golden biscuit topping adds the perfect finishing touch to this cozy comfort dish.
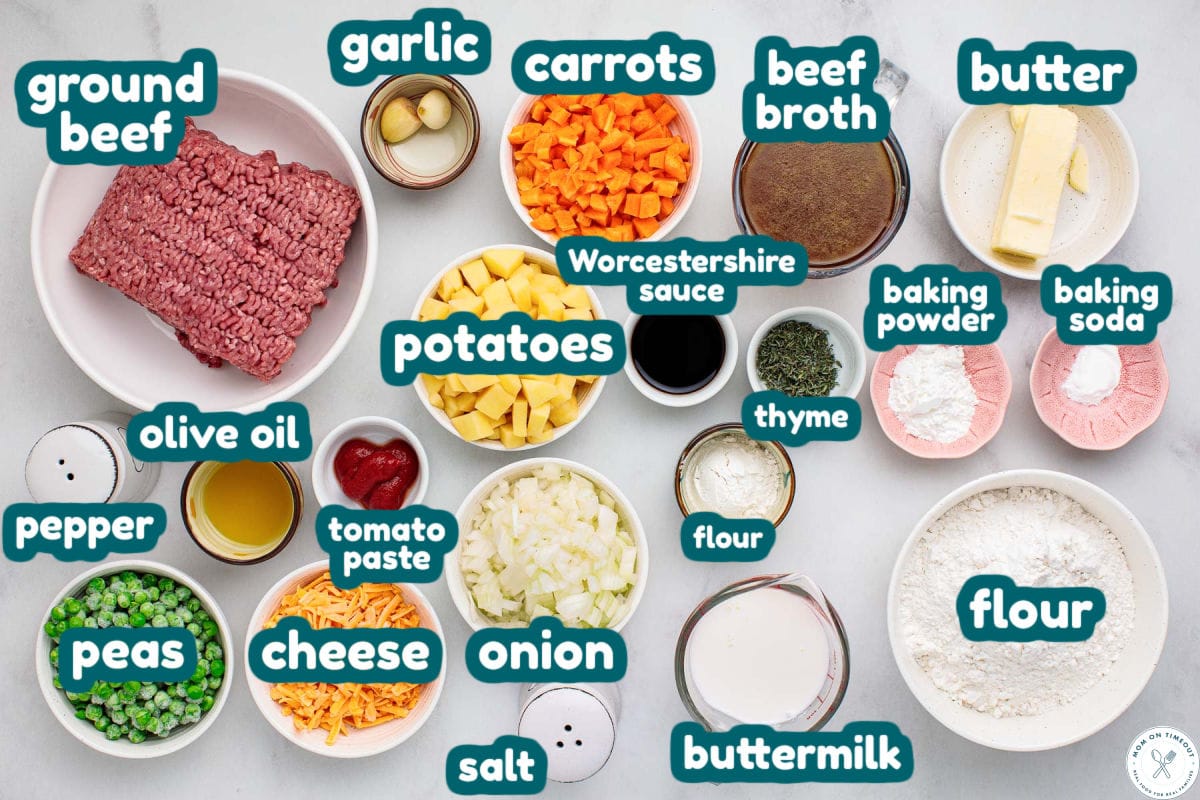
Ground Beef Pot Pie Ingredients
Savory beef, tender veggies, and cheesy biscuits bake together into one comforting casserole your whole family will devour! Here’s what you’ll need to make this recipe:
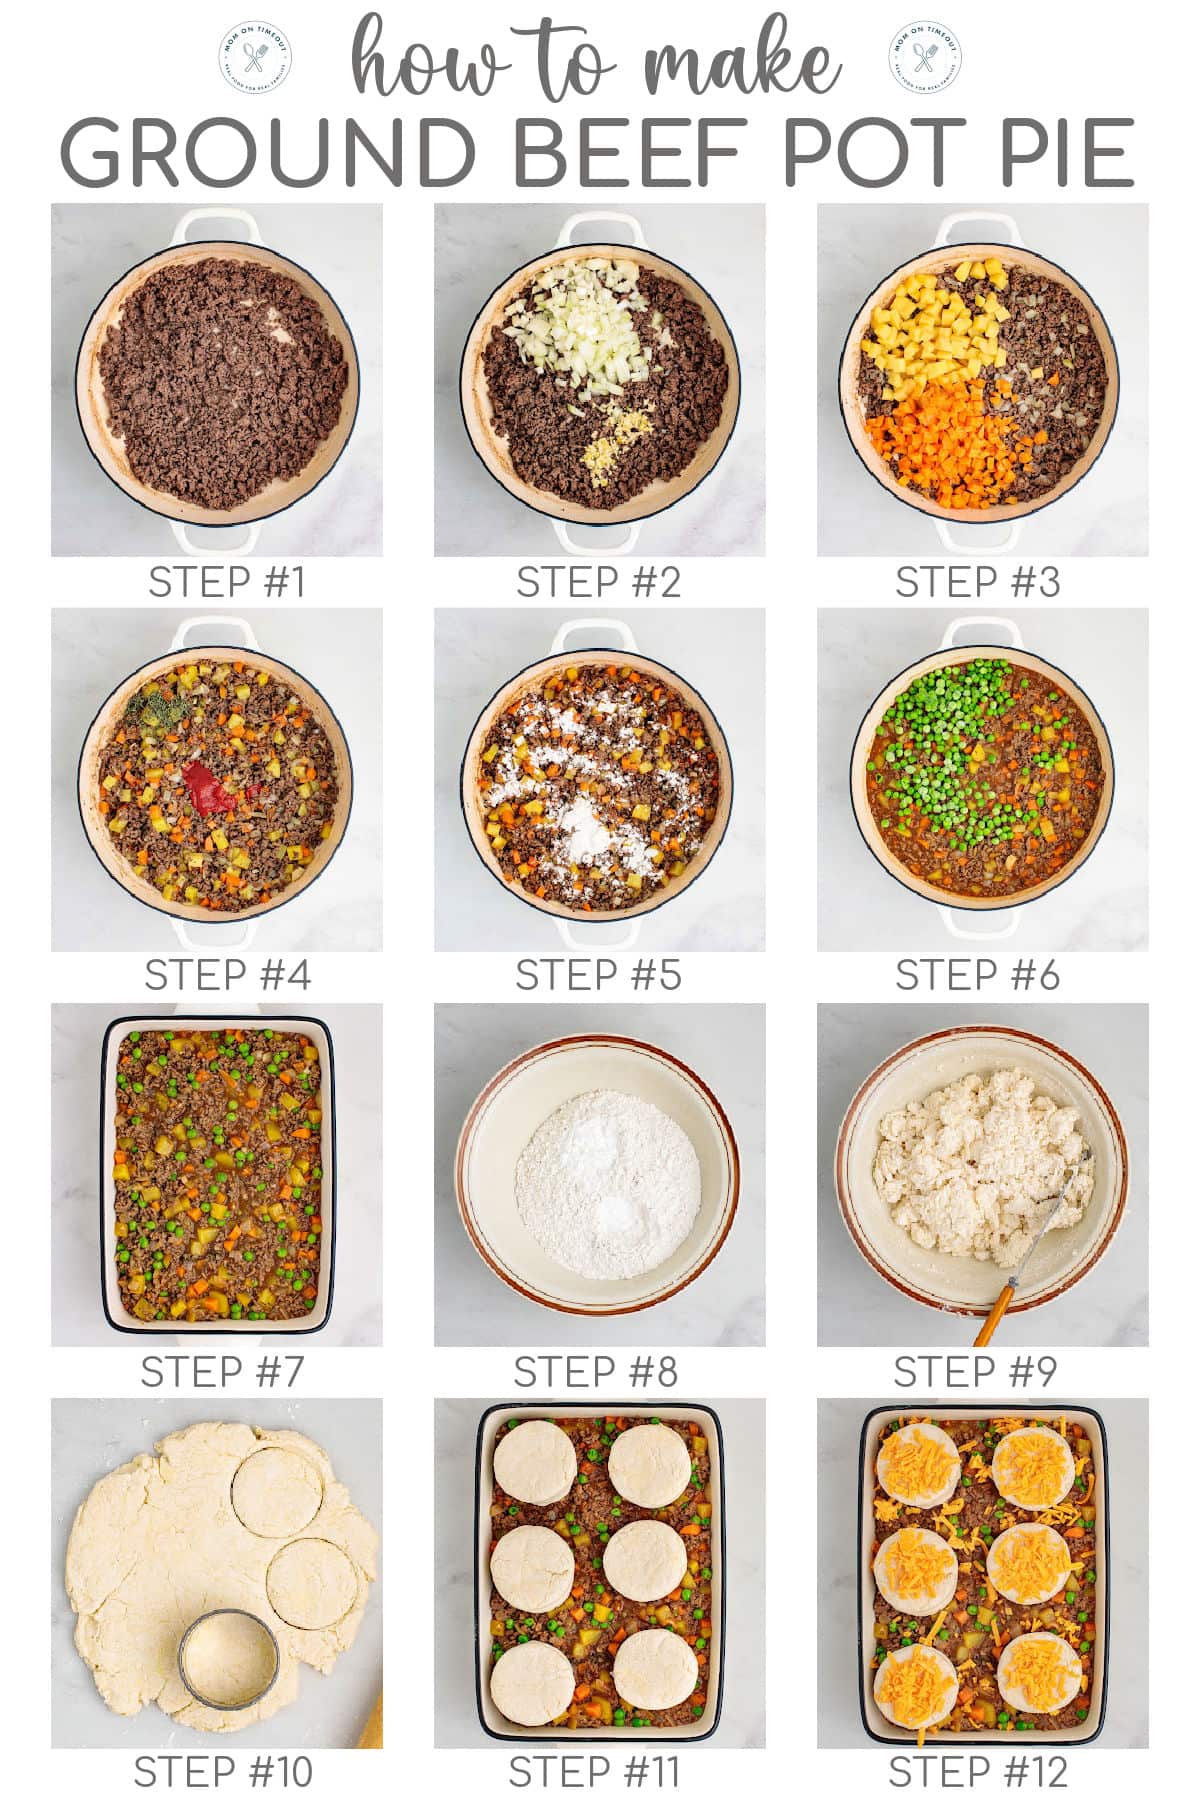
How To Make This Beef Pot Pie Recipe
This Ground Beef Pot Pie with Biscuits is pure comfort in every bite. A savory beef and veggie filling topped with flaky, cheesy biscuits makes this easy dinner a crowd-pleaser any night of the week!
Let’s take a quick look at how to make this recipe and as always, you can find the full printable recipe card at the end of this post.
Make the Filling
- Heat olive oil over medium heat. Add ground beef and cook until browned.
- Add onion and garlic, cooking for 2 minutes until fragrant.
- Add the carrots and potatoes, cooking for another 3 minutes while stirring.
- Stir in tomato paste, Worcestershire sauce, thyme, salt, and pepper.
- Sprinkle flour over the mixture, stirring to coat. Slowly add beef broth while stirring. Simmer for about 5 minutes until thickened.
- Stir in peas and remove from heat.
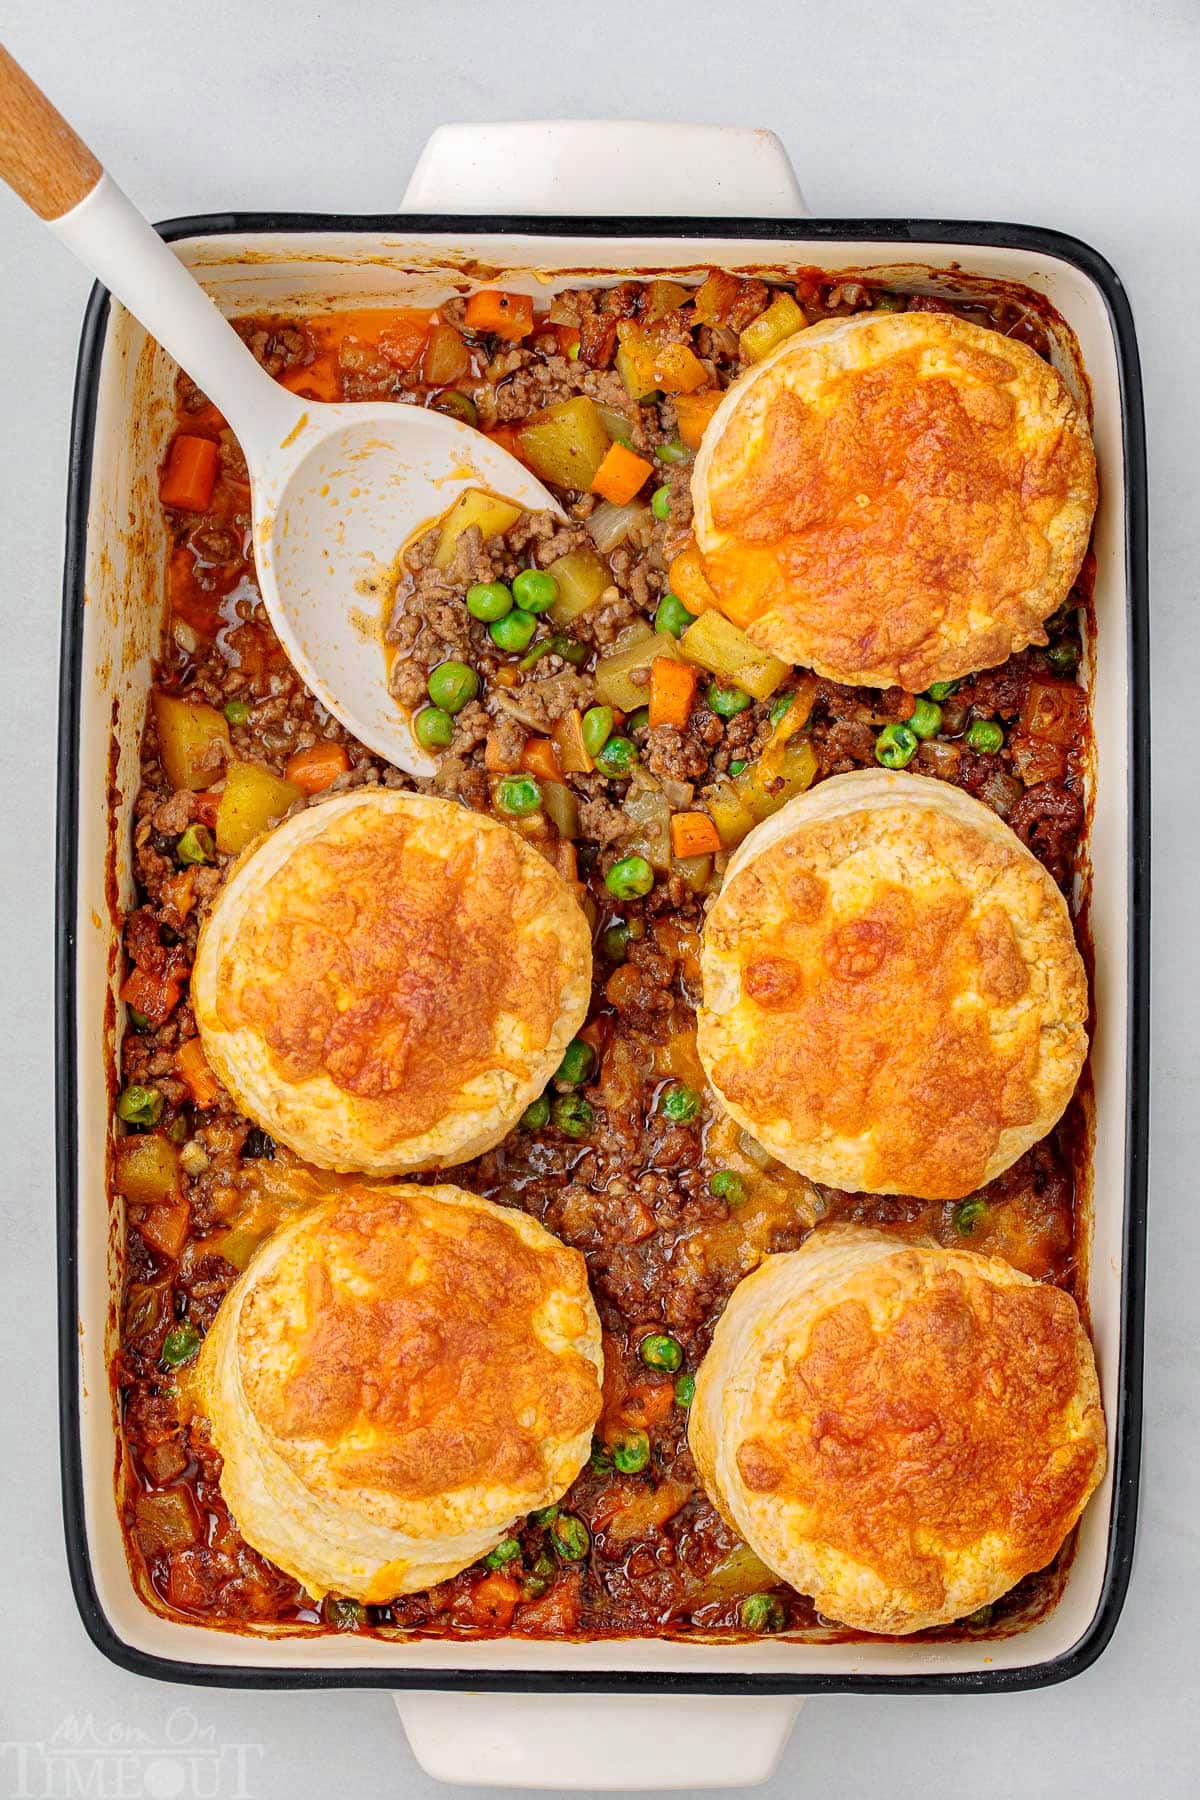
- Transfer the filling to a greased 9 x 13 casserole dish.
Make the Biscuit Topping and Bake
- Whisk together flour, baking powder, and baking soda.
- Work the cold butter into the flour until the mixture resembles coarse crumbs or flakes. Add buttermilk and stir until just combined.
- Roll or pat dough gently into a ball and roll or press out to desired thickness.
- Cut out biscuits and place on filling.
- Sprinkle the cheese on top and bake for 25-30 minutes. Cool for 5-10 minutes before serving.
Storage Information
This pot pie is best enjoyed the day it’s made but leftovers are still delicious! Here is the information you’ll need for storing this recipe:
- Refrigerator: Store cooled leftovers in an airtight container in the refrigerator for up to 4 days. Reheat individual portions in the microwave or the whole dish in the oven at 350°F until warmed through.
- Freezer: You can freeze the baked pot pie for up to 2 months. Simply wrap in foil and place in large freezer safe ziploc bag. Or transfer portions to individual airtight, freezer safe bags.Thaw overnight in the fridge before reheating. To freeze before baking, assemble the filling in a baking dish but don’t add the biscuit topping yet. Cover tightly and freeze for up to 3 months. When ready to eat, thaw in the fridge overnight, top with fresh biscuit dough, and bake.
- Make Ahead: The filling can be made up to 2 days in advance and stored in the refrigerator. Add the biscuit topping just before baking for best results.
Variations To Try
- Sauté sliced mushrooms with the onions for extra earthy flavor.
- Corn, green beans, or celery all work great in this recipe. Feel free to swap or add your favorites!
- Swap cheddar for Monterey Jack, Colby, or even a smoky gouda.
- Ground turkey or chicken make tasty alternatives and can be substituted in this recipe easily.
Can I use canned biscuits instead of making homemade?
Yes! If you’re short on time, canned biscuits work well. Just arrange them on top and bake until golden brown.
Can I make this gluten-free?
You can substitute a gluten-free all-purpose flour blend for both the filling and biscuit dough.
What’s the best way to reheat it?
For best texture, reheat in the oven at 350°F until hot and the biscuits crisp up again.
Can I make this dish ahead of time?
Absolutely! Prepare the filling and store it in the fridge for up to 2 days. When ready to bake, top with fresh biscuit dough and bake as directed.
Can I freeze this pot pie?
Yes! To freeze, assemble the filling in a baking dish but don’t add the biscuit topping yet. Cover tightly and freeze for up to 3 months. When ready to eat, thaw in the fridge overnight, top with fresh biscuit dough, and bake.
Trish’s Tips
- Cut the vegetables into small, even pieces so they cook through evenly.
- Don’t overwork the biscuit dough – this keeps them tender and flaky.
- Let the pot pie rest for 5 to 10 minutes after baking so the filling can thicken slightly before serving.
- Add a sprinkle of fresh parsley or thyme on top before serving for a pop of color and freshness.
More Ground Beef Recipes for the Week

Ground Beef Pot Pie with Biscuits
Ingredients
For the Filling:
- 1 tablespoon extra virgin olive oil
- 1 ½ pound lean ground beef I like an 85/15
- 1 small yellow onion diced
- 2 cloves garlic minced
- 1 cup carrots peeled and diced
- 1 cup potatoes peeled and diced
- 2 tablespoons tomato paste
- 1 tablespoon Worcestershire sauce or soy sauce
- 1 teaspoon dried thyme
- 1 teaspoon fine sea salt or to taste
- ½ freshly ground black pepper or to taste
- 2 tablespoons all-purpose flour
- 2 cups low sodium beef broth
- 1 cup frozen peas
For the Biscuit Topping:
- 2 cups all-purpose flour spooned and leveled
- 1 tablespoon baking powder
- ½ teaspoon baking soda
- 6 tablespoons salted butter cold
- ¾ cup buttermilk
- ½ cup cheddar cheese shredded
Instructions
Make the Filling
- Preheat the oven to 400°F (200°C). Lightly grease a 9 x 13 baking dish. Set aside.
- In a large skillet, heat olive oil over medium heat. Add ground beef and cook until browned. Drain excess fat if needed.1 ½ pound lean ground beef, 1 tablespoon extra virgin olive oil
- Add onion and garlic, cooking for 2 minutes until fragrant. Add the carrots and potatoes, cooking for another 3 minutes while stirring. You’ll notice some caramelization appearing – that is from the natural sugars from the vegetables and adds depth of flavor.1 small yellow onion, 2 cloves garlic, 1 cup carrots, 1 cup potatoes
- Stir in tomato paste, Worcestershire sauce, thyme, salt, and pepper.2 tablespoons tomato paste, 1 tablespoon Worcestershire sauce, 1 teaspoon dried thyme, 1 teaspoon fine sea salt, ½ freshly ground black pepper
- Sprinkle flour over the mixture, stirring to coat. Slowly pour in beef broth while stirring. Simmer for about 5 minutes until thickened. Stir in peas and remove from heat.2 tablespoons all-purpose flour, 2 cups low sodium beef broth, 1 cup frozen peas
- Transfer the filling to the prepared casserole dish. Set aside.
Make the Biscuit Topping
- Whisk together flour, baking powder and baking soda in a medium bowl.2 cups all-purpose flour, 1 tablespoon baking powder, ½ teaspoon baking soda
- Using a pastry cutter or your fingers, work the cold butter into the flour until the mixture resembles coarse crumbs or flakes. Alternatively, grate the butter and stir to combine.6 tablespoons salted butter
- Pour in the buttermilk and stir until just combined (don’t over mix).¾ cup buttermilk
- Pat the biscuit dough gently into a ball and roll to desired thickness with a rolling pin. Cut out 6 to 8 biscuits (depending on size) with a floured cutter and place the dough over the beef filling, leaving some gaps for steam to escape.
- Sprinkle the cheddar cheese over the top of the biscuits.½ cup cheddar cheese
Bake & Serve
- Bake for 25 to 30 minutes, or until the biscuits are golden brown and cooked through.
- Let cool for 5 to 10 minutes before serving. Enjoy!
Notes
- Refrigerator: Store cooled leftovers in an airtight container in the refrigerator for up to 4 days. Reheat individual portions in the microwave or the whole dish in the oven at 350°F until warmed through.
- Freezer: You can freeze the baked pot pie for up to 2 months. Simply wrap in foil and place in large freezer safe ziploc bag. Or transfer portions to individual airtight, freezer safe bags.Thaw overnight in the fridge before reheating. To freeze before baking, assemble the filling in a baking dish but don’t add the biscuit topping yet. Cover tightly and freeze for up to 3 months. When ready to eat, thaw in the fridge overnight, top with fresh biscuit dough, and bake.
- Make Ahead: The filling can be made up to 2 days in advance and stored in the refrigerator. Add the biscuit topping just before baking for best results.
Please see post above for more information, step-by-step process photos, recipe tips and frequently asked questions.


Leave a Reply