↑
  • Dinner Recipes
  • Breakfast Recipes
  • Dessert Recipes
  • Side Dishes
  • Recipes
    • Dinners
    • Slow Cooker
    • Appetizers and Sides
    • Breakfast
    • Dessert
    • Beverages
    • Bread
    • Holiday Recipes
    • Kid-Friendly
  • Blog View
  • About
    • Disclosure/Privacy Policy
  • Facebook
  • Pinterest
  • Instagram
  • Twitter
  • Youtube
  • Blog View
  • About
  • Privacy Policy
  • Advertise/PR
  • DISNEY
  • DINNERS
  • DRINKS
  • DESSERTS

Mom On Timeout

Serving up real food for real families!

  • Home
  • Recipes
    • Slow Cooker
    • Appetizers and Sides
    • Breakfast
    • Entree
    • Dessert
    • Beverages
    • Holiday Recipes
      • Christmas Recipes
      • Thanksgiving Recipes
      • Valentine’s Day Recipes
      • St. Patrick’s Day Recipes
      • Easter Recipes
      • Halloween Recipes
    • Bread
    • Kid-Friendly
  • 5 Ingredients
  • Appetizers
  • Favorites


free email course!

5 SECRETS TO GETTING DINNER ON THE TABLE...FAST!

You are here: Home / Holiday Crafts / Christmas Crafts / Gift-Wrapped Gallery

Gift-Wrapped Gallery

December 8, 2011

  • 9
Gift Wrapped Gallery
Last year we went on vacation the week after Thanksgiving. The hotel that we stayed at was busily transforming their lobby by wrapping all the art work in Christmas paper. 
 The kids just loved it. 
When we got home I did the same thing. I wrapped each frame in a different paper and it was just so much fun. This year I only used two different papers but I love the effect. 
It’s so easy to do and really transforms a room. It is sad to cover up all my pretty pictures but then by the time I get them all wrapped up (and dusted!) – the boys are super excited and the room looks so festive! 
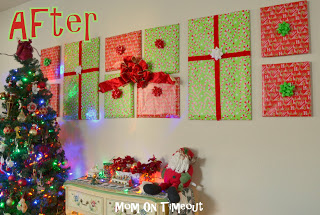
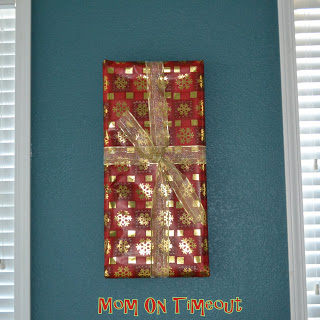
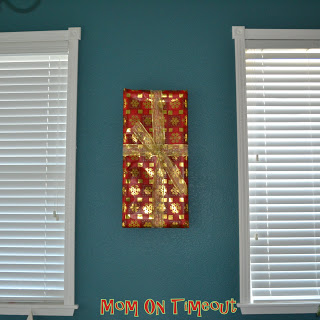
Don’t have a gallery? Wrap up a single frame. Metallic paper is especially fun and catches the glow of Christmas lights. Wrapping a frame adds a festive flair to any room in the house…
A couple of tips:
1. Make sure you are using tape that adheres well to the back of your frame. Some frames are wood, others are plastic, and so on.
2. When wrapping, make sure to not cover the hanger on the back of the frame.
3. Take this opportunity to dust your frames – or is that just me?

Connect with me!

Facebook | Twitter | Pinterest | Google+ | RSS

 Linking up here, Home Stories A2Z, and My Repurposed Life.

A Bowl Full of Lemons
free email course

5 SECRETS TO GETTING DINNER ON THE TABLE...FAST!

enjoy!
  • 9

By Trish - Mom On Timeout December 8, 2011 Christmas Crafts, Crafts, Sidebar

Previous article:
« How To Make Your Own Pom Poms {Tutorial}
Next article:
Pom Pom Snowman Ornament Tutorial »

Comments

  1. Naturally Me Creations says

    December 19, 2011 at 8:41 AM

    This is SUCH a cute idea!! Too bad i didn’t see this sooner… 🙂 Plus I don’t have enough frames to cover to make an impression….hmmmm….

    Reply
  2. Melanie @ bear rabbit bear says

    December 19, 2011 at 7:26 AM

    Very cute and unique idea. Thanks for linking to Things I’ve Done Thursday!

    Melanie
    http://www.bearrabbitbear.com

    Reply
  3. Kerryanne @ Shabby Art Boutique says

    December 18, 2011 at 11:56 AM

    What a fun and very creative idea Trish.

    I’d love it if you could add this project to my Christmas inspiration party at ~ http://shabbyartboutique.blogspot.com/2011/12/inspiration-friday_16.html

    Reply
  4. Chatty Chics says

    December 18, 2011 at 11:54 AM

    Very cute! I keep clicking on your projects at Linky parties! Great job!
    Melody
    chattychics.com
    PS Please come link up at Wild Wednesdays at my blog starting this week, the 21st!

    Reply
  5. CSI girl says

    December 17, 2011 at 9:52 AM

    I love this and I always enjoy your projects.
    I am looking for people to do tutorials for January and I am actually looking for new people. It will be a new year after all.
    Email me if you are interesed in doing a tutorial on the CSI Projct
    http://www.thecsiproject.com
    dee@thecsiproject.com
    I have Jan 2nd and 4th open
    and Jan. 10th and 11th
    of course, then you will have the chance to do a tutorial every month after because I will add you to the list.

    Let me know!
    Dee, The CSI Girl

    Reply
  6. Camille says

    December 16, 2011 at 9:54 PM

    Oh my gosh- such a great idea!!! I love how it makes your whole room look so decorated for Christmas. I love it! Thanks so much for linking up to Strut Your Stuff Saturday! We hope that you will join us tomorrow!
    Camille @
    SixSistersStuff.blogspot.com

    Reply
  7. Robyn Rasmussen says

    December 16, 2011 at 9:46 PM

    Super cute idea! Love it! Stopping by from the Weekend Wrap up link party.
    -Robyn from http://tipsfromtheheart.blogspot.com

    Reply
  8. Allison {A Glimpse Inside} says

    December 16, 2011 at 8:52 PM

    Such a cute idea!
    Thanks so much for linking up to this week’s Catch a Glimpse party! I have included this in today’s features!

    Reply
  9. WhyCuzICan says

    December 15, 2011 at 6:55 AM

    What a cute way to add color to your wall 😀

    Visiting from Crafty, Scrappy, Happy linky party,
    Smiles and thanks for sharing,
    ~Suzanne in NW IL

    Reply
  10. Angela says

    December 15, 2011 at 6:24 AM

    How creative!!
    Angela

    Reply
  11. Lori says

    December 14, 2011 at 10:47 PM

    Genius…what a great idea! I’m a new follower. Warm wishes

    Reply
  12. Judy says

    December 14, 2011 at 6:09 PM

    What a clever idea. I would have never thought to do that. Thanks for sharing at DIYbyDesign’s Fall into Fall party.

    Reply
  13. Partycraft Secrets says

    December 14, 2011 at 2:11 PM

    fabulous!

    Reply
  14. Valerie@Occasionally Crafty says

    December 14, 2011 at 12:57 PM

    This is a great idea! It’s so festive!

    I’ll be featuring this tomorrow on my blog for Three Things Thursday- I hope you’ll stop by and check it out!

    Valerie- http://www.occasionallycrafty.blogspot.com

    Reply
  15. K. @ Craft Wannabe says

    December 14, 2011 at 8:56 AM

    What a great idea! I love wrapping presents too, so this definitely is something I will have to do!

    Reply
« Older Comments
Newer Comments »

Leave a Reply Cancel reply

Your email address will not be published. Required fields are marked *

Recipe Rating


This site uses Akismet to reduce spam. Learn how your comment data is processed.

Hi, I’m Trish!

Welcome to Mom On Timeout where I’m serving up real food for real families! Dinners, desserts, and everything in between!
Read More…

categories

archives

Popular Posts

white bowl with handles filled with zuppa toscana soup and topped with cheese. Kale, sausage and bacon can be seen in the soup.
crockpot chili in a ladle held above the crockpot and the rest of the chili.
chicken-stir-fry
best-tater-tot-casserole-recipe-hamburger-green-beans

Some of my favorites…

mini cheesecakes sitting on a gray plate topped with whipped cream, raspberries and mint leaves.
cake made with cinnamon rolls on a white cake stand and topped with cream cheese frosting and mini cinnamon rolls.
one slice of lemon meringue cheesecake sitting on a white plate with the rest of the cheesecake seen in the background next to a small bottle of milk. lemon slices near the front of the plate.
Three creamsicle cookies stacked with the top cookie has a bite taken out of it.
top down view of three coconuts scones stacked on top of each other and topped with coconut icing and chocolate shavings.

Copyright ©2023, Mom On Timeout. All Rights Reserved.
Design by Pixel Me Designs
  • Facebook
  • Twitter
  • Pinterest