
Here is the first pom pom craft as promised! So I’m hoping that you’ve had time to practice your pom pom skills…no?!? Well grab a skein of yarn and get busy! You can refer back to my tutorial here.
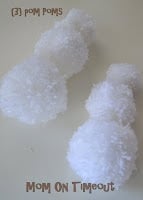
This snowman requires three pom poms in graduating sizes – a 1 finger, a 2 finger, and a 3 finger. Does that sound strange to anyone? It does to me and I came up with the terminology – sorry!
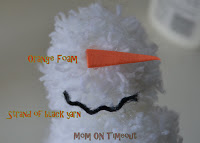
Let’s start with the nose and mouth. Cut out a triangle from an orange piece of foam. Hot glue the carrot nose onto the middle of the smallest pom pom. For the mouth, I cut a piece of black yarn and pulled the strands apart and then glued it on with Elmer’s Glue All.
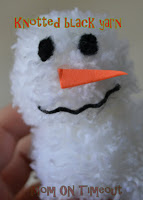
Next comes the two eyes made out of coal. Obviously this is not Frosty because I opted for a carrot nose instead of a button but you could totally use a button. For the eyes I knotted up some black yarn and kept tying more knots until I got the size I was looking for. These I glued on with hot glue.
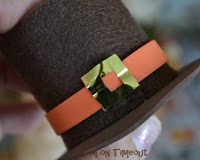
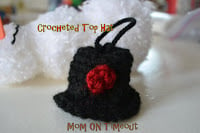 For the hat I decided to stick with the yarn theme and crochet him a little hat. For those of you who don’t crochet, another fun way to do this would be to make the hat using the technique that I outlined here. Just make the hat black and hot glue some sort of hook to the top of the hat. (If you do crochet and are interested in the pattern just leave me a comment. I just kind of made it up on the fly but I can recreate 😉 )
So here he is all cute with his little hat but he’s looking a little chilly. I thought about crocheting a scarf – next time! I used a ribbon instead and I think he looks adorable!

Two great things about this snowman:
1. He weighs hardly anything and so even on a fresh tree he doesn’t weigh down the limb – love that!
2. Can’t be broken!!!! Super awesome especially since Bryce was swinging his blankie around two nights ago and shattered an ornament – ouch!


Connect with me!
Facebook | Twitter | Pinterest | Google+ | RSS
Linking up here, Home Stories A2Z, and My Repurposed Life.


Carol says
I love your pom pom snow man but would love to know how you crocheted his hat. Please send me the pattern.
Thank you.
Carol
Carol says
I don’t have a website so if you don’t see the e-mail address on here please put the pattern for the hat one this site. Thank you.
Carol
Trish - Mom On Timeout says
I didn’t have a pattern but if you crochet just make a circle, set aside. Make a rectangle and slip stitch at the end to create a tube. Crochet a small circle for the top of the hat and attach. It would be much easier to make one of the hats from this post: https://www.momontimeout.com/2011/11/pilgrim-turkeysgobble-gobble.html Have fun!
Carol says
Thank you Trish. I do crochet so will do the hat. Will have it done today. Can’t wait to see how it all comes out.
Carol
Lynn says
LOVE, LOVE, LOVE!!! Have made 2 snowmen tonight. Keeping 1 and gifting the other. Will be trying to copy the top hat this weekend. Thanks for sharing!
Trish - Mom On Timeout says
That is so awesome! Have a great weekend Lynn!
Lynn says
I would LOVE to have the crochet directions for the hat! I’m going to try and make one of the snowmen for an ornament exchange at school. These are adorable!!!!
gail says
I love handmade Christmas ornaments. Your snow man is adorable!
gail
Trish - Mom On Timeout says
Thank you so much Gail!
Marilyn says
This snowman is ssssssoooooo cute!
Trish - Mom On Timeout says
Thank you Marilyn! He was a lot of fun to make 🙂
Amanda says
Do you have a crochet pattern for the top hat?
Trish - Mom On Timeout says
No I don’t Amanda 🙁 If I recall correctly, I made a small rectangle and stitched it together. Then I crocheted a small circle and stitched it for the top of the hat. Then I crocheted a larger circle for the base of the hat and stitched that together. Hope that helps!
The Sunshine Crew says
Stopping by from Sunday Showcase! Hope that you will pop by my blog to say hello!
Am going to add this to my Pinterest Snowman board! So cute!!! Love this craft!
http://sunriselearninglab.blogspot.com/2011/12/pine-cone-fun-elves-trees-and-scenery.html
Happy holidays!
Colleen
craftedbymama says
Visiting form some what simple…I can’t wait to do this with the kids tomorrow
Ruby Jean says
Just put it up on my FB… Thank you again for stopping in and Linking up… 🙂 http://www.facebook.com/pages/Ruby-Jean/247671615249847?ref=tn_tnmn#
Mindie Hilton says
Featuring on this week at Bacon Time. Happy holidays.
Amanda says
Just stopping by to let you know that I have featured your project on Fun Family Crafts! You can see it here
http://funfamilycrafts.com/pom-pom-snowman/
If you have other kid friendly crafts, I’d love it if you would submit them 🙂 If you would like to display a featured button on your site, you can grab one from the right side bar of your post above.
DeeDee says
So VERY ca-ute! I love it! 🙂