↑
  • Christmas
  • Thanksgiving
  • Recipes
    • Entree
    • Slow Cooker
    • Appetizers and Sides
    • Breakfast
    • Dessert
    • Beverages
    • Bread
    • Holiday Recipes
      • Christmas Recipes
      • Thanksgiving Recipes
    • Kid-Friendly
  • Blog View
  • About
    • Disclosure/Privacy Policy
  • Facebook
  • Pinterest
  • Instagram
  • Twitter
  • Youtube
  • Blog View
  • About
  • Privacy Policy
  • Advertise/PR
  • DISNEY
  • DINNERS
  • DRINKS
  • DESSERTS

Mom On Timeout

Serving up real food for real families!

  • Home
  • Recipes
    • Slow Cooker
    • Appetizers and Sides
    • Breakfast
    • Entree
    • Dessert
    • Beverages
    • Holiday Recipes
      • Christmas Recipes
      • Thanksgiving Recipes
      • Valentine’s Day Recipes
      • St. Patrick’s Day Recipes
      • Easter Recipes
      • Halloween Recipes
    • Bread
    • Kid-Friendly
  • 5 Ingredients
  • Appetizers
  • Favorites


free email course!

5 SECRETS TO GETTING DINNER ON THE TABLE...FAST!

You are here: Home / Crafts / How To Make Your Own Pom Poms {Tutorial}

How To Make Your Own Pom Poms {Tutorial}

December 5, 2011

  • 98
Every wonder how to make a pom pom?  I learned this trick years ago and have adapted it to what I call the finger method. I learned a much more difficult way that involved cutting out two circles and making slits and it was just so cumbersome. The way I am going to share takes three things: your fingers, yarn, and scissors. Easy peasy right?
So obviously pom poms can be a variety of sizes. I am going to show you three using one, two, or three fingers. I even have a craft coming up later this week that requires a four finger pom pom (gasp!).
Let’s go through this step by step. Take your time and know in advance that you will need to practice this two or three times before you become a POM POM MASTER!  Patience my young Jedi.


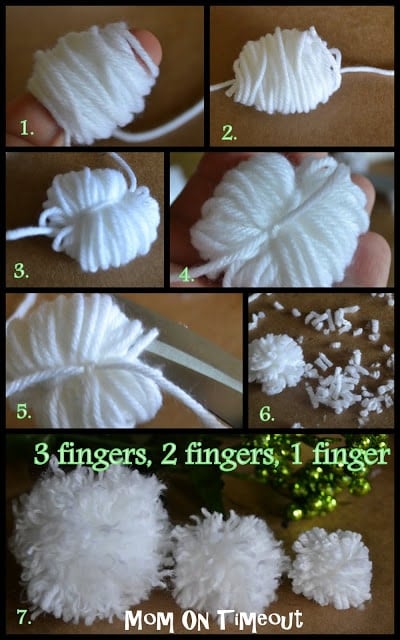
1. Cut a length of yarn (about 12 inches) and lay it on a flat surface.  Now start wrapping  yarn around your finger(s). Make sure you wrap loosely enough that you can slide the yarn off your fingers when you are done and are NOT cutting off your circulation.  If you are using one finger, wrap 75-100 times. If you are using two fingers, wrap 100-125 times. If you are using three fingers, wrap 125-150 times. Now this is all approximate because every finger is a different size and yarn can have varying thicknesses. If you make your first one and it’s not full enough (make sure you count!) add another 10-20 wraps next time. 

2. Pull the yarn off your finger(s) and lay the bundle carefully on top of the cut piece of yarn – making sure to center it both horizontally and vertically.

3. Tie the piece of yarn around your bundle TIGHTLY. THIS IS THE MOST IMPORTANT STEP. If you do not make this knot tight – your pom pom WILL fall apart. Hence step 4.

4. Turn your bundle over. Pull up the pieces of yarn on either side and tie again TIGHTLY. (Repeat this step again if you feel it’s necessary.

5. Cut the loops of yarn on your bundle make sure it cut each and every one. Just slide the scissors up and under the loops and cut making your way around.

6. Make your pom pom into a ball by rotating it around and cutting off any pieces of yarn that are outside your perfect sphere.

7. Go crazy with your pom poms! Can’t think of anything to do? Stay tuned – I’ve got three pom pom crafts coming up that are tons of fun.

*******************************
Okay. I could stop here but I won’t. I’m now going to show you how to get a fluffy pom pom. See picture 7 above? Look at the 3-finger pom pom and the 1-finger pom pom. See the difference? The 3 finger pom pom is FLUFFY! Here’s how…

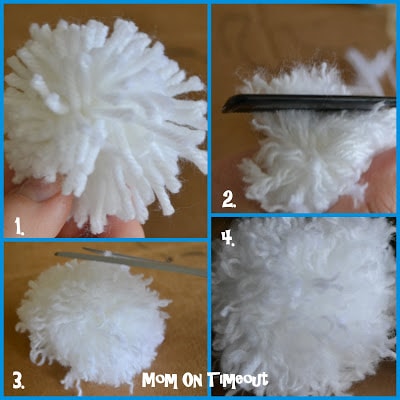
1. Complete steps 1-5. Don’t bother trimming your pom pom at this point because you’re just going to mess it up.

2. Take a comb or any other tool with teeth or bristles and comb through the yarn. IMPORTANT:  Hold the pom pom super tightly so that the pieces of yarn don’t pull out. Now that being said, I usually still lose 2 or more piece of yarn while combing. No biggie!

3. Keep on combing until you achieve your desired look. The more you comb and separate the fibers of the yarn, the fluffier and poofier (apparently not a word) your pom pom will get.

4. Now it’s time to trim. Just work your way around until it looks nice and spherical.

Now you’ve got a fluffy pom pom!
More Tips and Tricks

1. You can always make your pom pom smaller by trimming it down. You can never make it bigger.
2. Try using multiple colors. Wrap half with one color and half with another. Or go crazy and try three colors.


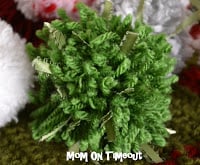
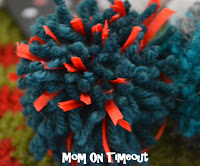
3. Add in texture and shine by using some ribbon. Halfway through wrapping, wrap the ribbon around your fingers as many times as you want and then continue with the yarn. When you cut the loops you can see how cool it will look.

4. I think this would make a fun cat toy 🙂
5. When combing the yarn, hold the yarn at the base of the strand so it doesn’t pull out. Kind of like when you are combing tangled hair.

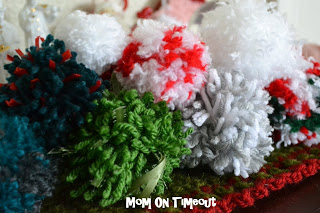
6. Pom poms can be used on hats & scarves and are a wonderful addition to lots of craft projects.
7. Once you’ve mastered the basic technique you will be able to see how you can change it up to make more unique pom poms.

Linking up here and Home Stories A2ZTutorials and Tips 

  • 98
free email course!

5 SECRETS TO GETTING DINNER ON THE TABLE...FAST!

By Trish - Mom On Timeout December 5, 2011 Crafts, DIY

Previous article:
« Marshmallow & Chocolate Cookies
Next article:
Gift-Wrapped Gallery »

Comments

  1. josie allman says

    February 15, 2018 at 7:18 PM

    Is there a step by step instrustion list on the bunnies.
    My 9 yr.old grandaughter would love making these for her friends
    That can print out. Thanks to to cute…Thanks
    P.S. love all your recipes…

    Reply
  2. CarmelaX says

    August 16, 2017 at 3:50 PM

    I see your website needs some fresh articles. Writing
    manually takes a lot of time, but there is tool for this
    time consuming task, search for: unlimited content Wrastain’s
    tools

    Reply
  3. Megam says

    March 11, 2017 at 5:11 PM

    How do i cover up the tie in the middle? My pom pom is splitting in half where you can see the tie

    Reply
    • Trish - Mom On Timeout says

      March 20, 2017 at 4:25 PM

      When you comb out the yarn it will cover up the tie.

      Reply
  4. kim muhle says

    September 3, 2015 at 7:59 PM

    Awesome. I just Love it. Thank You for sharing. It is brilliant

    Reply
  5. Emily says

    October 23, 2014 at 7:18 AM

    We are running into a roadblock with the pom-poms. Every time I cut the loops (in step 5) the pom pom is tall and very misshapen. Is there a certain place where it is best to cut? We are using these to make snowflakes! Thanks so much

    Reply
    • Trish - Mom On Timeout says

      October 30, 2014 at 8:26 AM

      Hi Emily! You need to cut the loops right in the center of the loop – halfway. Also make sure that in step 3 when you are tying the loop around your bundle that you are tying it exactly in the center – that’s what makes it a ball-shape. Hope that helps!

      Reply
  6. Chris Humphreys says

    December 31, 2013 at 11:04 AM

    Can you use synthetic yarns & wool mixes for combing when fluffing out pom poms ir do you have to use pure wool?

    Reply
    • Trish - Mom On Timeout says

      January 2, 2014 at 8:12 PM

      Synthetics will work too Chris! Have fun!

      Reply
  7. Alison @ Oopsey Daisy says

    February 29, 2012 at 7:56 PM

    Ha. My favorite line “Don’t trim at this point. You’re just going to mess it up!” LOL! There are so many color options here. And so much texture! Thanks for sharing at oopsey daisy!

    Reply
  8. Rebekah Greiman says

    January 11, 2012 at 6:28 AM

    I remember doing these in grade school-but had forgotten how! Thanks for the tutorial. Can’t wait to make a few of these for myself. Very cute.
    Found you through Trendy Treehouse. Have a great Wednesday!

    Reply
  9. Trish - Mom On Timeout says

    January 1, 2012 at 10:49 PM

    @ReMadeSimple Kristina Exactly! I love that this takes nothing but yarn and scissors – cheap and easy is my kind of craft 🙂

    Reply
  10. ReMadeSimple Kristina says

    January 1, 2012 at 9:45 PM

    Never knew about this! Thanks for the tip-have heard about pom pom makers in craft stores, but this seems easy and you’d save money 🙂

    Reply
  11. Katy Lunsford says

    January 1, 2012 at 11:43 AM

    Thank you so much for posting this, I’ve tried several times but they came apart – I know the secret thanks to you! Thanks again.

    Reply
  12. Trish - Mom On Timeout says

    December 31, 2011 at 10:23 AM

    @Kirby Dunton Carespodi Oh my gosh – that’s awesome! Thanks for sharing 🙂

    Reply
  13. Kirby Dunton Carespodi says

    December 31, 2011 at 5:45 AM

    Flashbacks! Back in the 1970s, we used to make green and white ones for our cheerleading shoes. Now I feel like I am near-death. 1970s. Sheesh.

    Reply
    • Rebecca says

      December 21, 2017 at 9:03 AM

      Yes I do remember that and even on your skates too.

      Reply
  14. amanda @ mommyiscoocoo says

    December 19, 2011 at 7:47 AM

    LOVE this! Thank you for the great tutorial. I will be attaching these to my daughters, shoes, hats, pretty much anything. Thank You! My grandma used to make these and attach a small bell in the middle. VERY CUTE!!!

    ps from one coocoo momma, i love your blog name.

    Reply
  15. The Mommies Made Me Do It says

    December 17, 2011 at 10:29 AM

    These are so cute and look like something I could do! Thanx for sharing.
    New follower/fan here from Sunday Showcase Linky 🙂

    Reply
  16. Shiloh says

    December 15, 2011 at 7:31 PM

    I love the ribbon in the middle! That is such a cool idea that I’m really going to try.

    Reply
  17. Rachel says

    December 14, 2011 at 8:53 AM

    This looks like a great holiday craft for kids! I remember making pom poms when I was little – I loved them!

    Reply
  18. Michelle says

    December 14, 2011 at 12:51 AM

    Love pom poms, thanks for sharing the tutorial 🙂

    Reply
  19. Suburbia Momma says

    December 12, 2011 at 7:46 AM

    Very cool! Thank you for sharing!

    Reply
  20. Trish@MomOnTimeout says

    December 11, 2011 at 6:51 PM

    @Meg Thanks Meg!

    Reply
  21. Meg says

    December 11, 2011 at 6:42 PM

    Cute! I love the comb idea! Brilliant.

    Reply
  22. Tenille says

    December 9, 2011 at 6:53 PM

    These are so cute. Thanks for sharing this tutorial. I am going to have to make these. I would love it if you could link this up to our linky party going on right now. http://junkintheirtrunk.blogspot.com/2011/12/link-it-up-wednesday-6.html

    Reply
  23. Michaela says

    December 9, 2011 at 6:29 PM

    You are a life saver! I spent half the afternoon with some choice language for the whole cardboard ring method of making pom poms. I was going nuts! After giving up on that madness, I found your amazing method! I knew there had to be an easier way! Now there’s hope for me to make cute little poms for Christmas decorating!. Thanks again!

    Michaela @ coveredinmodpodge.blogspot.com

    Reply
  24. Trish@MomOnTimeout says

    December 9, 2011 at 6:13 PM

    @Keri
    That’s hilarious! Well then you’re a pro already! I’ve got some fun crafts coming up using pom poms.

    Reply
  25. Keri says

    December 9, 2011 at 6:03 PM

    Wow, weird… I just learned how to do this Tuesday at our moms group, which is called TimeOut! 😀

    Reply
  26. Kela Bela says

    December 9, 2011 at 3:34 PM

    Your tutorial is explained so well. I’ll be trying this tonight once the kids go down! Found you through a linky-party 🙂
    Michaela from: http://monkeymanandlogeybear.blogspot.com/

    Reply
  27. Melanie @ bear rabbit bear says

    December 9, 2011 at 9:46 AM

    I’ve always wondered how to make these! Thanks for sharing! Thanks for linking to Things I’ve Done Thursday!

    Melanie
    Sew Rugged @ bear rabbit bear
    bearrabbitbear.blogspot.com

    Reply
  28. Crafty Mischief says

    December 8, 2011 at 1:08 PM

    I love how you added ribbon in the last one. I would never have thought of that. It turned out so cute! I found you through Someday Crafts. Thanks for sharing!

    Reply
  29. Lori says

    December 8, 2011 at 11:40 AM

    You are a genius! This is so simple and adorable too. Thanks for sharing. I’m a new follower too. Stop by and enter my Christmas giveaway if you get a chance.

    Reply
  30. Rachel says

    December 8, 2011 at 7:38 AM

    How cute! and they don’t look to hard to make – I may attempt it!
    Rachel
    adventuresofadiymom.blogspot.com

    Reply
  31. Chatty Chics says

    December 7, 2011 at 12:33 PM

    So cute! Love the idea!
    Melody
    chattychics.com

    Reply
  32. Our Delightful Home says

    December 7, 2011 at 6:34 AM

    Great tutorial!

    ~Mrs. Delightful
    ourdelightfulhome.blogspot.com

    Reply
  33. Shelley says

    December 6, 2011 at 4:06 PM

    Cool. I have a feeling my kids are fixing to get tired of seeing pompoms. Thanks for the information.

    Reply

Leave a Reply Cancel reply

Your email address will not be published. Required fields are marked *

Recipe Rating


This site uses Akismet to reduce spam. Learn how your comment data is processed.

Hi, I’m Trish!

Welcome to Mom On Timeout where I’m serving up real food for real families! Dinners, desserts, and everything in between!
Read More…

categories

archives

Popular Posts

one-pot-olive-garden-zuppa-toscana-soup
chili-recipe-crockpot
chicken-stir-fry
best-tater-tot-casserole-recipe-hamburger-green-beans

Some of my favorites…

roast turkey breast sheet pan thanksgiving dinner collage showing all elements of the recipe
cheesy potatoes on a white plate with casserole dish in background
overhead look at mashed potatoes recipe in bowl with spoon
top down view of almond bear claw on cake pedestal with blue napkin underneath squared
the best banana pudding recipe served on a white plate garnished with whipped cream and nilla wafers

Copyright ©2021, Mom On Timeout. All Rights Reserved.
Design by Pixel Me Designs
  • Facebook
  • Twitter
  • Pinterest