↑
  • Dinner Recipes
  • Breakfast Recipes
  • Dessert Recipes
  • Side Dishes
  • Recipes
    • Dinners
    • Slow Cooker
    • Appetizers and Sides
    • Breakfast
    • Dessert
    • Beverages
    • Bread
    • Holiday Recipes
    • Kid-Friendly
  • Blog View
  • About
    • Disclosure/Privacy Policy
  • Facebook
  • Pinterest
  • Instagram
  • Twitter
  • Youtube
  • Blog View
  • About
  • Privacy Policy
  • Advertise/PR
  • DISNEY
  • DINNERS
  • DRINKS
  • DESSERTS

Mom On Timeout

Serving up real food for real families!

  • Home
  • Recipes
    • Slow Cooker
    • Appetizers and Sides
    • Breakfast
    • Entree
    • Dessert
    • Beverages
    • Holiday Recipes
      • Christmas Recipes
      • Thanksgiving Recipes
      • Valentine’s Day Recipes
      • St. Patrick’s Day Recipes
      • Easter Recipes
      • Halloween Recipes
    • Bread
    • Kid-Friendly
  • 5 Ingredients
  • Appetizers
  • Favorites


You are here: Home / DIY / DIY Garden Planter Box Tutorial

DIY Garden Planter Box Tutorial

May 11, 2012

  • 118

Anyone can make this DIY Garden Planter Box!

diy-planter-box-tutorial

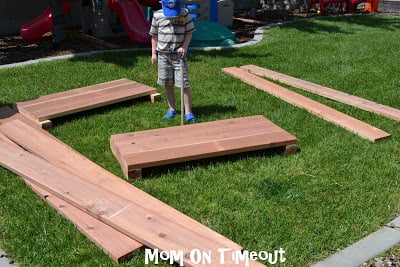
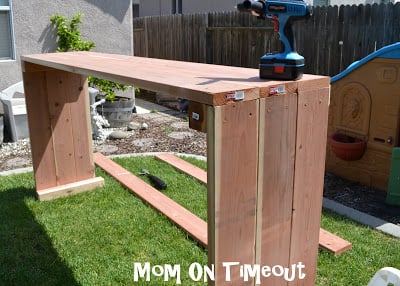
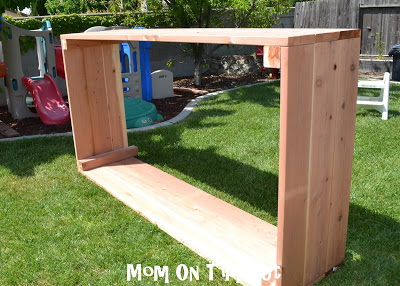
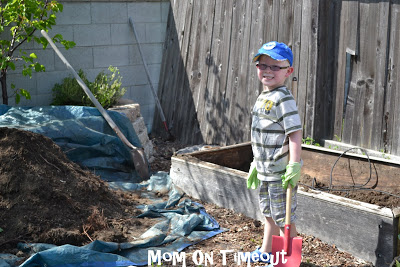
I’m so excited to share my new planter box with you! This was sooooo easy to do! Honestly, anyone can make this planter AND you can do it in just a couple of hours! Maybe less if you don’t have 5 and 3 year old helpers 😉 
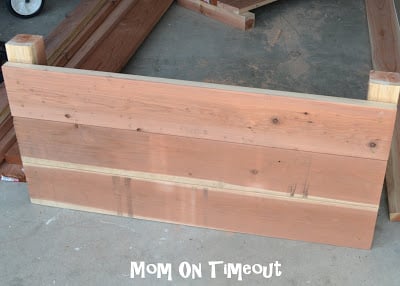
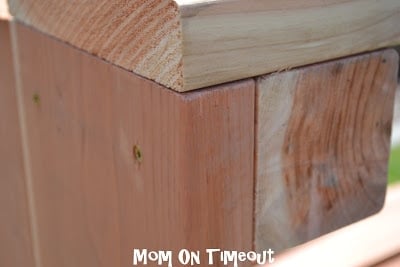
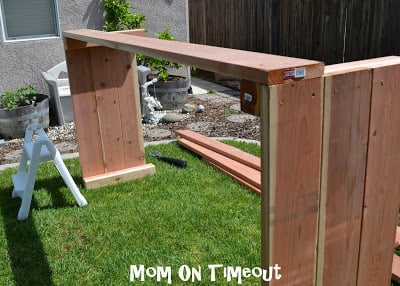
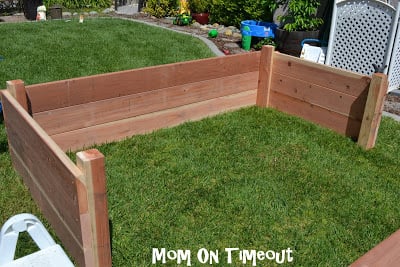
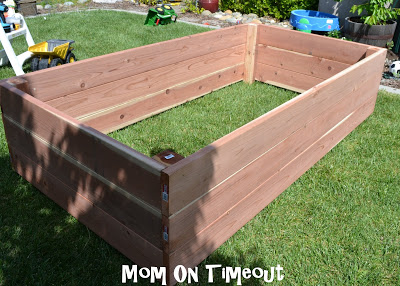
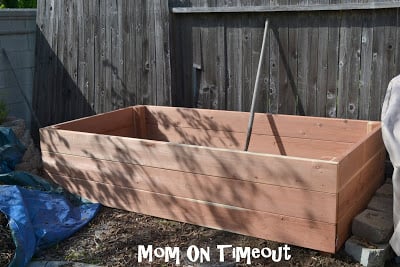
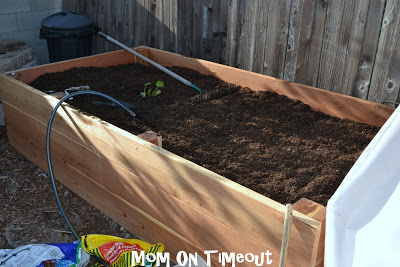
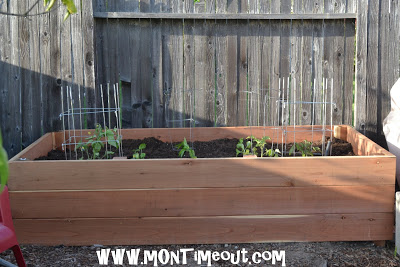
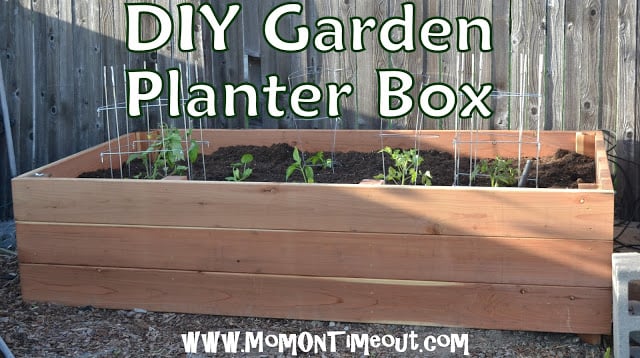
Last year we decided that we would build a new planter box this year because we were having a hard time growing veggies in our current planter boxes. They just weren’t deep enough! We have clay soil so once the roots hit the clay – well, let’s just say it isn’t pretty. A couple ideas were tossed around and we finally decided on the following design:

I am not an artist by any means but hopefully the illustration helps. The planter box is 8ft x 4ft and is built of redwood. You don’t HAVE to use redwood but it’s a great material to use for a planter box. The planter box requires the following materials:
(6) 2″x8″x8′
(2) 2″x8″x12′ – cut to 4 ft lengths, resulting in (6) 2″x8″x4′
(1) 4″x4″x8′ redwood posts
Screws – 3 1/2″ exterior, self-drilling, screws

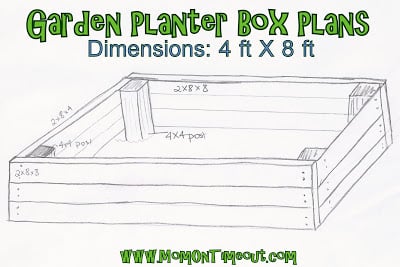
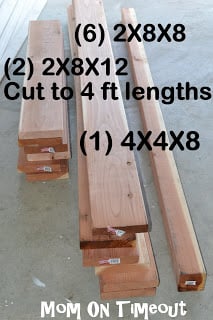
We purchased the materials at Lowes and it came to just under $170 including tax which I think is a fair price for a planter box this large. Too big for your space?? Redwood too expensive? This design can easily be modified to any size planter you desire and you can use lumber that works for your budget. For example:

free email course

5 SECRETS TO GETTING DINNER ON THE TABLE...FAST!

4 ft x 4 ft  planter would require a total of 48 linear feet of wood, 16 ft for each level
3ft x 6 ft planter would require a total of 54 linear feet of wood, 18 ft for each level
Go to your local home improvement store and price out the different lengths of lumber and do the math to make sure you aren’t wasting anything. Make sure you get your money’s worth!

We had the Lowes associate cut down our 12 ft board into (3) 4 ft lengths. They are not able to cut the 4×4 post so we used a circular saw at home to do that. We cut the 8 ft post in half, and then in half again so we had four equal lengths.

Next we began assembling the planter box. We started with a short end making sure that the pieces were squared up on both sides. We used two screw per board, per side. So four screws in each board.

Here is what the completed “short” side looks like with all three boards in place:


We repeated this process for the other short side and then moved the operation to the back yard. We could tell that we weren’t going to be able to easily move the entire planter to the backyard once it was completely built. We made Reece carry everything 😉

The next step definitely requires two or more people. It’s crucial that each corner is squared up at this point.

Holding up the two short sides, lay an 8 ft board across to create the long side of the planter. Making sure the first one is PERFECT makes the other two boards a breeze to install.

Here is the planter with three sides completed:

Flipping it over and onto the ground was when I realized how big this planter was – soooo exciting! This is a good view of the posts. You can see that they are a couple of inches longer than the height of the planter. These will go into the ground, stabilizing the planter box. Considering the size of this planter, it will be holding about 64 cubic feet of material. The planter isn’t going to move anywhere but it would be  a good idea for smaller boxes. 

 Next step – the final side!!

Now that the planter is done – we have to move the old one! Empty first…thanks Reece!

We removed the old planter and put the new one in it’s place. Our old planter was 3 ft x 6 ft so this one is much larger. We made sure that the planter was nice and level before we started filling with soil.

A week later we finally had it filled and started planting…

Building the planter only took a couple of hours and I think it’s just GORGEOUS! We chose not to stain, paint, or line it to eliminate those chemicals in our soil. We are just going au natural and I will enjoy this beautiful color while it lasts. We have been busy planting seeds and plants and I walk out everyday and enjoy my beautiful planter.
What do you think? Do you have planter boxes or do you garden right in the ground?

DIY Garden Planter Box Tutorial | MomOnTimeout.com

Mom On Timeout Signature

Connect with me!


Linking up here, Home Stories A2Z, Savvy Southern Style, and My Repurposed Life.

  • 118

By Trish - Mom On Timeout May 11, 2012 DIY, Garden

Previous article:
« Simple Ways to Celebrate Earth Day With Your Family
Next article:
Tips for Top-Notch Tomatoes »

Comments

  1. Our Delightful Home says

    May 24, 2012 at 5:35 AM

    WOW! I am so looking forward to making mines.

    Mrs. Delightful
    http://www.ourdelightfulhome.blogspot.com

    Reply
  2. Deidre says

    May 23, 2012 at 2:53 AM

    Great new box! Wow it looks so easy too:)Enjoy your planting!

    Reply
  3. Kim says

    May 22, 2012 at 10:33 PM

    That came out great! I love it!

    Reply
  4. Lisa @ Mom, Dad, 2 Girls, & Brutus says

    May 22, 2012 at 9:57 PM

    I am totally digging this!!! You make it look so easy with your instructions that I now have the courage to get mine done haha..THANKS!!! I’m a new follower via Pine Creek Link Up!!!! Love your stuff!!!!

    Lisa momdad2girlsandbrutus.blogspot.com

    Reply
  5. Liz - Imageremix says

    May 22, 2012 at 5:17 PM

    So happy you gave this tutorial. I need to make a planter and even found some wood in my travels around town hunting for junk. I’ll have to see what I can come up with thanks to your direction. Stop and see me at Quirky Vistas!
    Liz

    Reply
  6. Kara @ Simplistically Sassy says

    May 22, 2012 at 3:14 PM

    My husband is wanting to build garden boxes. What a perfect tutorial! I’m excited to find your blog.

    Reply
  7. TidyMom says

    May 19, 2012 at 8:41 AM

    what a great tutorial!!
    thanks for linking up! I featured you post on my wrap up http://tidymom.net/2012/12-cool-ideas-for-summer/

    Have a great weekend!

    Reply
    • Trish - Mom On Timeout says

      May 19, 2012 at 4:15 PM

      Thanks so much Cheryl! Hope you’re enjoying your weekend!

      Reply
  8. twelve-O-eight says

    May 18, 2012 at 11:24 PM

    Wow this looks so great, and the kids helping too! Getting me thinking about cleaning up our backyard and enlisting the kids in helping 🙂 Tanya

    Reply
  9. Jessie@saavysavings says

    May 18, 2012 at 9:48 AM

    This turned out really great – and LOVE your little helpers! I’ve too been planning to build one of these this summer … more motivation to actually get out there and do it! 🙂
    xo Jessie

    Reply
  10. the cape on the corner says

    May 18, 2012 at 6:37 AM

    this is great! one day i would like to have a garden area, but tell me, is the bed so the soil is different, or to keep pests out-otherwise, why can’t one just plant in the regular ground? is that a no no?

    Reply
    • Trish - Mom On Timeout says

      May 18, 2012 at 6:49 AM

      If you have great soil – go for it! I have clay – like really, really, hard clay. Nothing (except for weeds!) grows in our ground. We have to install raised beds and planters for our plants. Great questions!

      Reply
    • patricia says

      June 20, 2015 at 6:33 PM

      I imagine it would have fewer weeds ; )

      Reply
  11. Melanie @ bear rabbit bear says

    May 17, 2012 at 6:52 AM

    I’ve been wanting one of these! Oh, well- maybe soon! Thanks for sharing at Things I’ve Done Thursday this week.

    Reply
  12. Leah Koenig says

    May 17, 2012 at 3:44 AM

    What a great project! My favorite part is that you don’t have to be so bent over in to work in your garden! This would also make growing and picking potatoes a cinch! Thanks for sharing!
    Found you on Bear Rabbit Bear
    Visiting from Well Rounded
    leahkoenig.blogspot.com

    Reply
    • Trish - Mom On Timeout says

      May 18, 2012 at 9:00 AM

      Great point! I’ve always wanted to plant potatoes – now’s my chance! Thanks for stopping by!

      Reply
  13. B says

    May 16, 2012 at 7:48 PM

    This looks great! I would love a couple of these – might just shoot this through to Mr Cool… I am the brains, he is the brawn…

    Great post – so clear! Thanks!

    Visiting from Domessblissity…

    Reply
    • Trish - Mom On Timeout says

      May 16, 2012 at 8:25 PM

      Oh thank you! We are really, really enjoying it! Thanks so much for stopping by!

      Reply
  14. Chrissy Taylor says

    May 14, 2012 at 11:31 AM

    Looks great! Did it take alot of dirt to fill?

    Reply
    • Trish - Mom On Timeout says

      May 16, 2012 at 8:26 PM

      Oh yes! We used what we had in our two existing planters and then hit the store to fill the rest. It’s not filled all the way to the top but still it takes a lot!

      Reply
  15. Erika says

    May 11, 2012 at 10:35 PM

    Thank you for sharing this tutorial, I have plans to do a veggies garden as well in our house, and did not know well where to start, this has been very helpful, I’m definitely going to try it.

    Reply
    • Amy says

      June 27, 2017 at 5:38 PM

      I think this is the bomb! WeAre going to combine this with the pvc hoop top to make ours and i am so excited! Thanks for the plans!

      Reply
Newer Comments »

Leave a Reply Cancel reply

Your email address will not be published. Required fields are marked *

Recipe Rating


This site uses Akismet to reduce spam. Learn how your comment data is processed.

Hi, I’m Trish!

Welcome to Mom On Timeout where I’m serving up real food for real families! Dinners, desserts, and everything in between!
Read More…

categories

archives

Popular Posts

white bowl with handles filled with zuppa toscana soup and topped with cheese. Kale, sausage and bacon can be seen in the soup.
crockpot chili in a ladle held above the crockpot and the rest of the chili.
chicken-stir-fry
best-tater-tot-casserole-recipe-hamburger-green-beans

Some of my favorites…

Carrot cake bar on white round plate with bite taken. Cream cheese frosting on top with green sprinkles.
Two mint chocolate chip cookies with one half cookie on top with melty chocolate. Cookies are green with chocolate chips. Green cake stand can be seen in the background.
Homemade mint patties stacked five high with the top one split in half. A green cake stand in the background has more patties on it.
Single funfetti cookie with bite out of it sitting in front of glass of milk.
Orange pound cake with end cut off sitting on wood board topped with a glaze.

Copyright ©2026, Mom On Timeout. All Rights Reserved.
Design by Pixel Me Designs
  • Facebook
  • Twitter
  • Pinterest