
I often feel bad for Thanksgiving. It seems that it is often overlooked in the rush of excitement to get to Christmas. Thanksgiving is an important holiday for families and I love that there is not much stress involved in the planning and preparation. It’s a holiday that can be enjoyed by everyone and a chance to express what we are thankful for in our lives.
To help my children experience the true meaning of Thanksgiving and to place more emphasis on this sometimes forgotten holiday, I made a Thanks Giving Tree. I put it up right in our entry hall so we will all pass by it many times a day reminding us of all that we have to be thankful for.
This tree would be awesome for any Thanksgiving guests you are having. Have each guest write down one or two (or more!) things that they are thankful for in their lives and watch the tree grow right before your eyes. Just a fantastic way to visualize and represent how much we all have to be thankful for.
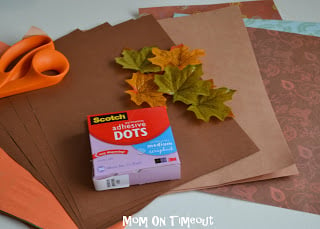 Materials:
brown and fall colored paper
leaf template
scissors
glue dots, adhesive putty, or tape
Instructions:
I made the tree out of brown paper. Just cut out a trunk and some branches and stick it to your wall. I used glue dots but adhesive putty or even tape would work just fine.

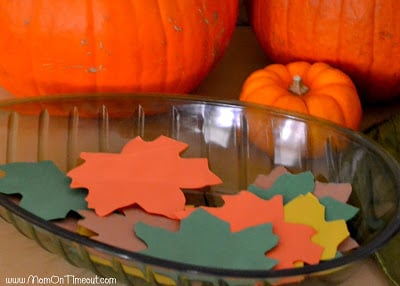
Once your tree is looking good, it’s time to cut out some leaves. I traced the leaf onto four different colors of paper and cut them out. You can use the template here. Make sure you cut out plenty so that when you want to add a leaf to the tree you don’t have to cut more out.

I supplemented the paper leaves with some leaves that I got at the dollar store. I don’t have any fancy machines but I printed out “Give Thanks” in a font and size that I liked. Cut it out and put it above the tree.
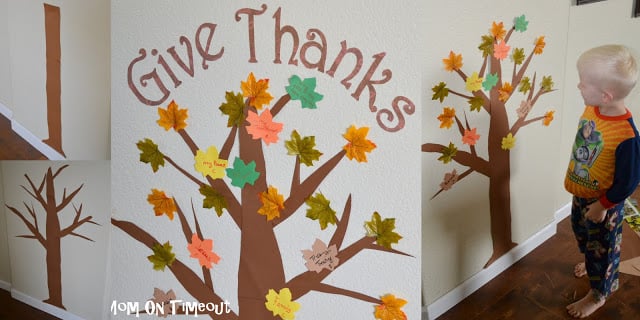
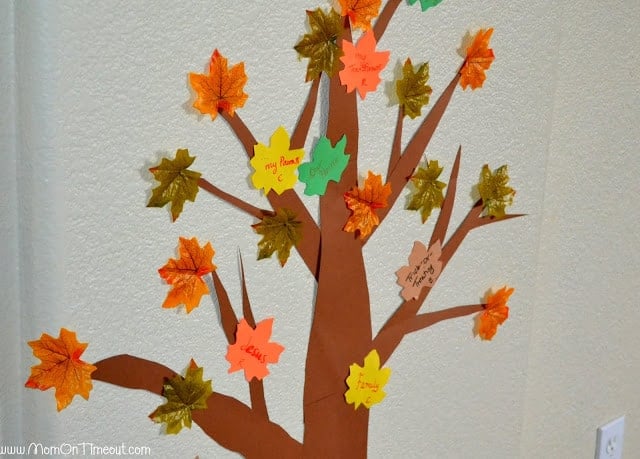
Each person in our family has different color leaves and anytime we are feeling thankful for something, we can write it down on the leaf and add it to the tree. As we realize how much we have to be thankful for, our tree continues to grow.


Connect with me!


Jackie says
This is wonderful idea. It is a great way to get kids to start thinking about what they are thankful for. I will have to try this idea with my family. Thanks for sharing.
At The Picket Fence says
I love it and really want to do something like this with our kiddos this year too! Thanks so much for sharing this creative idea with us at Inspiration Friday this week!
Vanessa
Katie says
This is too cute. I think I want to do this with my Almost three year old!! I’m you newest follower from the TGIF linky Party! Stop by my blog when you get a chance!
Amy says
Featured this today on One Artsy Mama! Stop by and grab a button if you like!
oneartmama.blogspot.com
Janet says
What a wonderful idea! I love that the tree is small enough that it can be reached.
SusieQTpies says
I love this tree and how it is at eye level with your little guy.
I’d love for you to come link up this post in my Holiday Tips, Crafts & Recipes link up! Here it is: http://cafescrapper-scrapsoflife.blogspot.com/2011/11/crock-pot-pizza-soup.html
Thanks! Susie
Anonymous says
Super cute – new favorite of the week =-) Hopping over from TGIF Linky Party.
MEg
Beth (www.livinglifeintentionally.blogspot.com) says
I just followed you back =-)
Our Side of the Mountain says
What a sweet tree! Stopping by from TGIF!
Amy says
What a fabulous idea! I agree with you, poor Thanksgiving just gets overlooked but it’s so important to stop and be grateful for all that we have! Would you share this at my holiday party?
http://oneartmama.blogspot.com/2011/11/our-home-for-holidays-party.html
Kristie says
Very nice! I like the idea of making a leaf ANY time someone feels thankful!
Michelle says
Love this! So cute!
Kristy says
We love to do this! Last year we used apple shaped post it notes instead of leaves for an easy and different option. Thanks for reminding me to pull mine out! Saw your link at Ladybird Ln.
Charley says
I am also planning this for my preK kids. I really like it for home, too. I’m going to get to work today!
Karen Greenberg says
I am going to do this in my classroom! With 70 students I bet we will have a very full and beautiful tree.