
The BEST Cream Cheese Mints recipe you’ll ever try! This incredibly easy recipe makes the most delicious, luscious, melt-in-your-mouth cream cheese mints around! Make them in any color you like! Perfect for Easter, baby showers, weddings and more!
Looking for more treats for Easter? Make sure to try my Bunny Bait Easter Snack Mix, Coconut Cream Pie and my Nana’s Carrot Cake!

Cream Cheese Mints Recipe
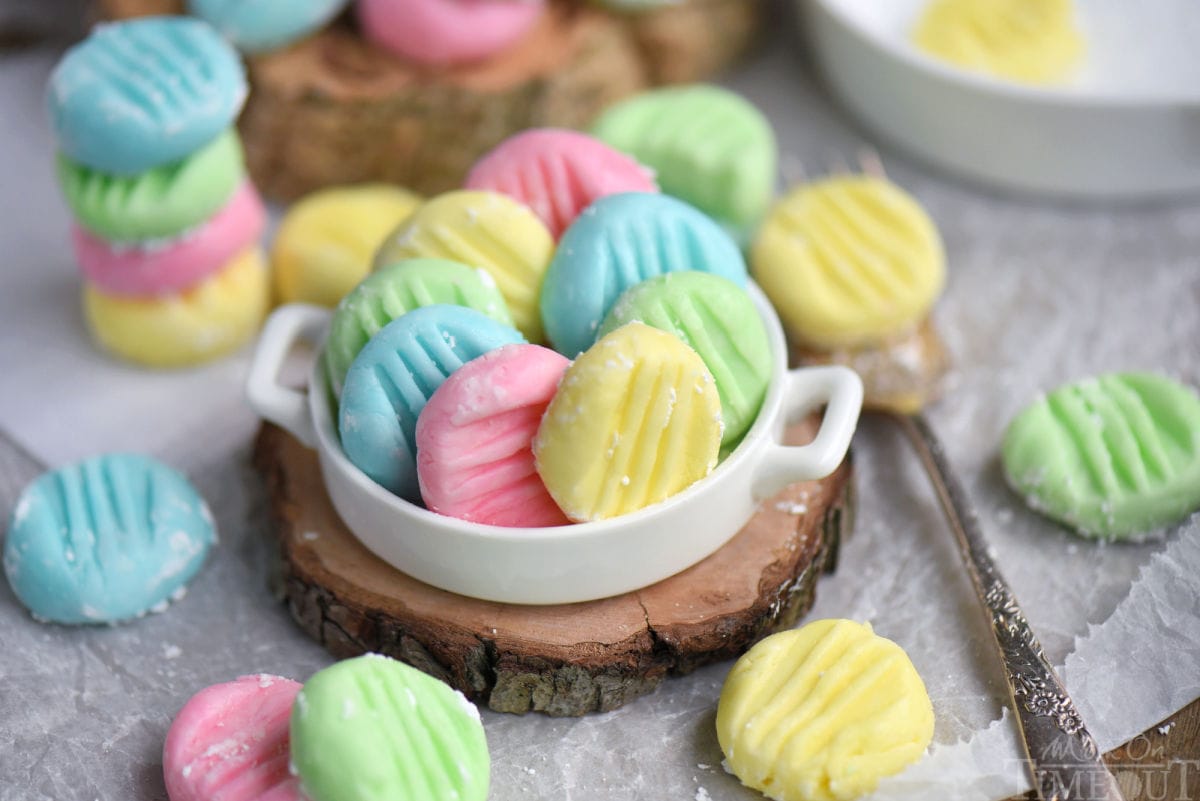
These Cream Cheese Mints are a classic, nostalgic treat that never go out of style! Smooth, creamy, and perfectly sweet with just the right touch of mint (or peppermint!), these little candies practically melt in your mouth. They’re a staple at weddings, baby showers, and holiday gatherings – and once you try them, you’ll see why!
Many of you have called these cream cheese butter mints, wedding mints, baby shower mints, and it’s true, they go by many names. I have always called them cream cheese mints because in my recipe, cream cheese is the prominent ingredient.
There are lots of recipes out there for these mints that call for only 3 or 4 ounces of cream cheese. I use an entire brick. The reason? These candies will literally melt in your mouth they’re so creamy and delicious. That’s what makes them the BEST Cream Cheese Mints around!
Made with just a handful of ingredients, this recipe for cream cheese mints is surprisingly easy to make and totally customizable with colors and shapes to match any occasion!

Why You’ll Love These Cream Cheese Mints
We love making these cream cheese mints for Easter and Christmas, but also they are fantastic for baby showers, weddings, and just parties in general. They’re so easy to make and since you can make them ahead of time… well, let’s just say that’s awesome.
- Simple Ingredients: Simple pantry staples come together in minutes to make these mouth-watering ,delicious cream cheese wedding mints.
- Perfect For Any Occasion: Great for showers, parties, holidays, or even gifting, these cream cheese mints are so well received and appreciated for their flavor and nostalgic qualities.
- Make-Ahead Friendly: These mints store beautifully and freeze well too! You can make these mints ahead of time in store in the refrigerator for up to 2 weeks or in the freezer for several months making them idea for the busy holiday season.
- Super Customizable: Not only can these mints be made in any color you like, they can be made in any flavor too! Simply swap in you favorite extract! We’ve tried lemon, cherry, peppermint and mint – all are delicious!
Ingredient Breakdown
Let’s take a closer look at what makes these mints so delicious:
- Cream Cheese: The base of the recipe, cream cheese gives these mints their signature creamy texture and tangy richness.
- Butter: Adds smoothness and helps the mixture hold its shape. Make sure it’s softened for easy mixing! I used salted butter in this recipe.
- Powdered Sugar: Sweetens the mints and gives them structure. It’s also used for rolling to prevent sticking.
- Mint or Peppermint Extract: Just a small amount gives that fresh, cool flavor. Peppermint or spearmint both work great.
- Gel Food Coloring: Totally optional, but fun! Add festive colors to match your event or holiday. I used this gel food coloring set.
How To Make Cream Cheese Mints
These easy Cream Cheese Mints are smooth, sweet, and melt-in-your-mouth delicious! Made with just a handful of ingredients, they’re perfect for weddings, baby showers, holidays, or anytime you need a sweet little bite.
Let’s take quick look at how to make this recipe and, as always, you can find the full printable recipe card at the end of this post.
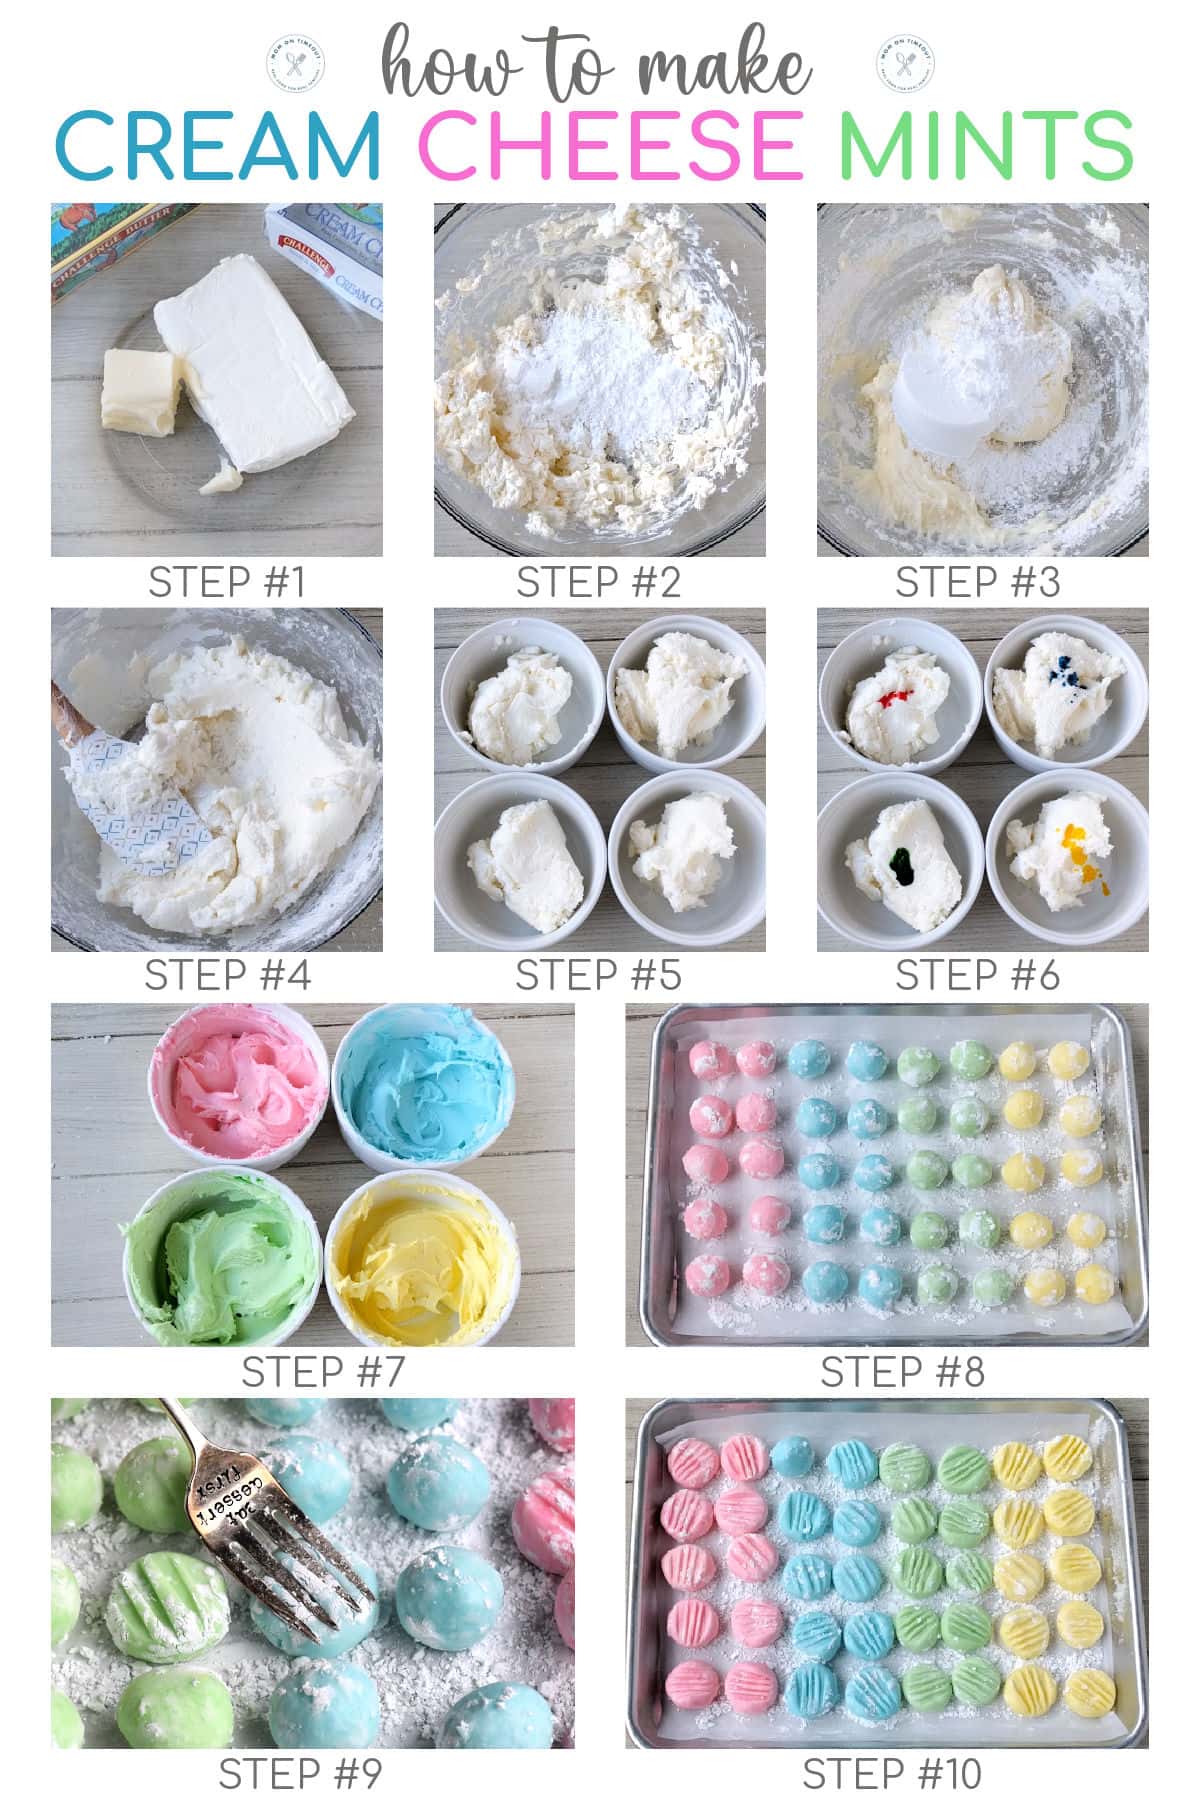
- Combine cream cheese and butter in a large mixing bowl. Mix until smooth.
- Add 1 cup of powdered sugar and mix until smooth. Stir in the mint extract.
- Gradually add the remaining powdered sugar.
- Separate into four separate bowls, or however many different colors you want.
- Add a small amount of food color to each bowl.
- Stir until the color is uniform.
- Cover and refrigerate for 2 hours or until firm enough to handle.
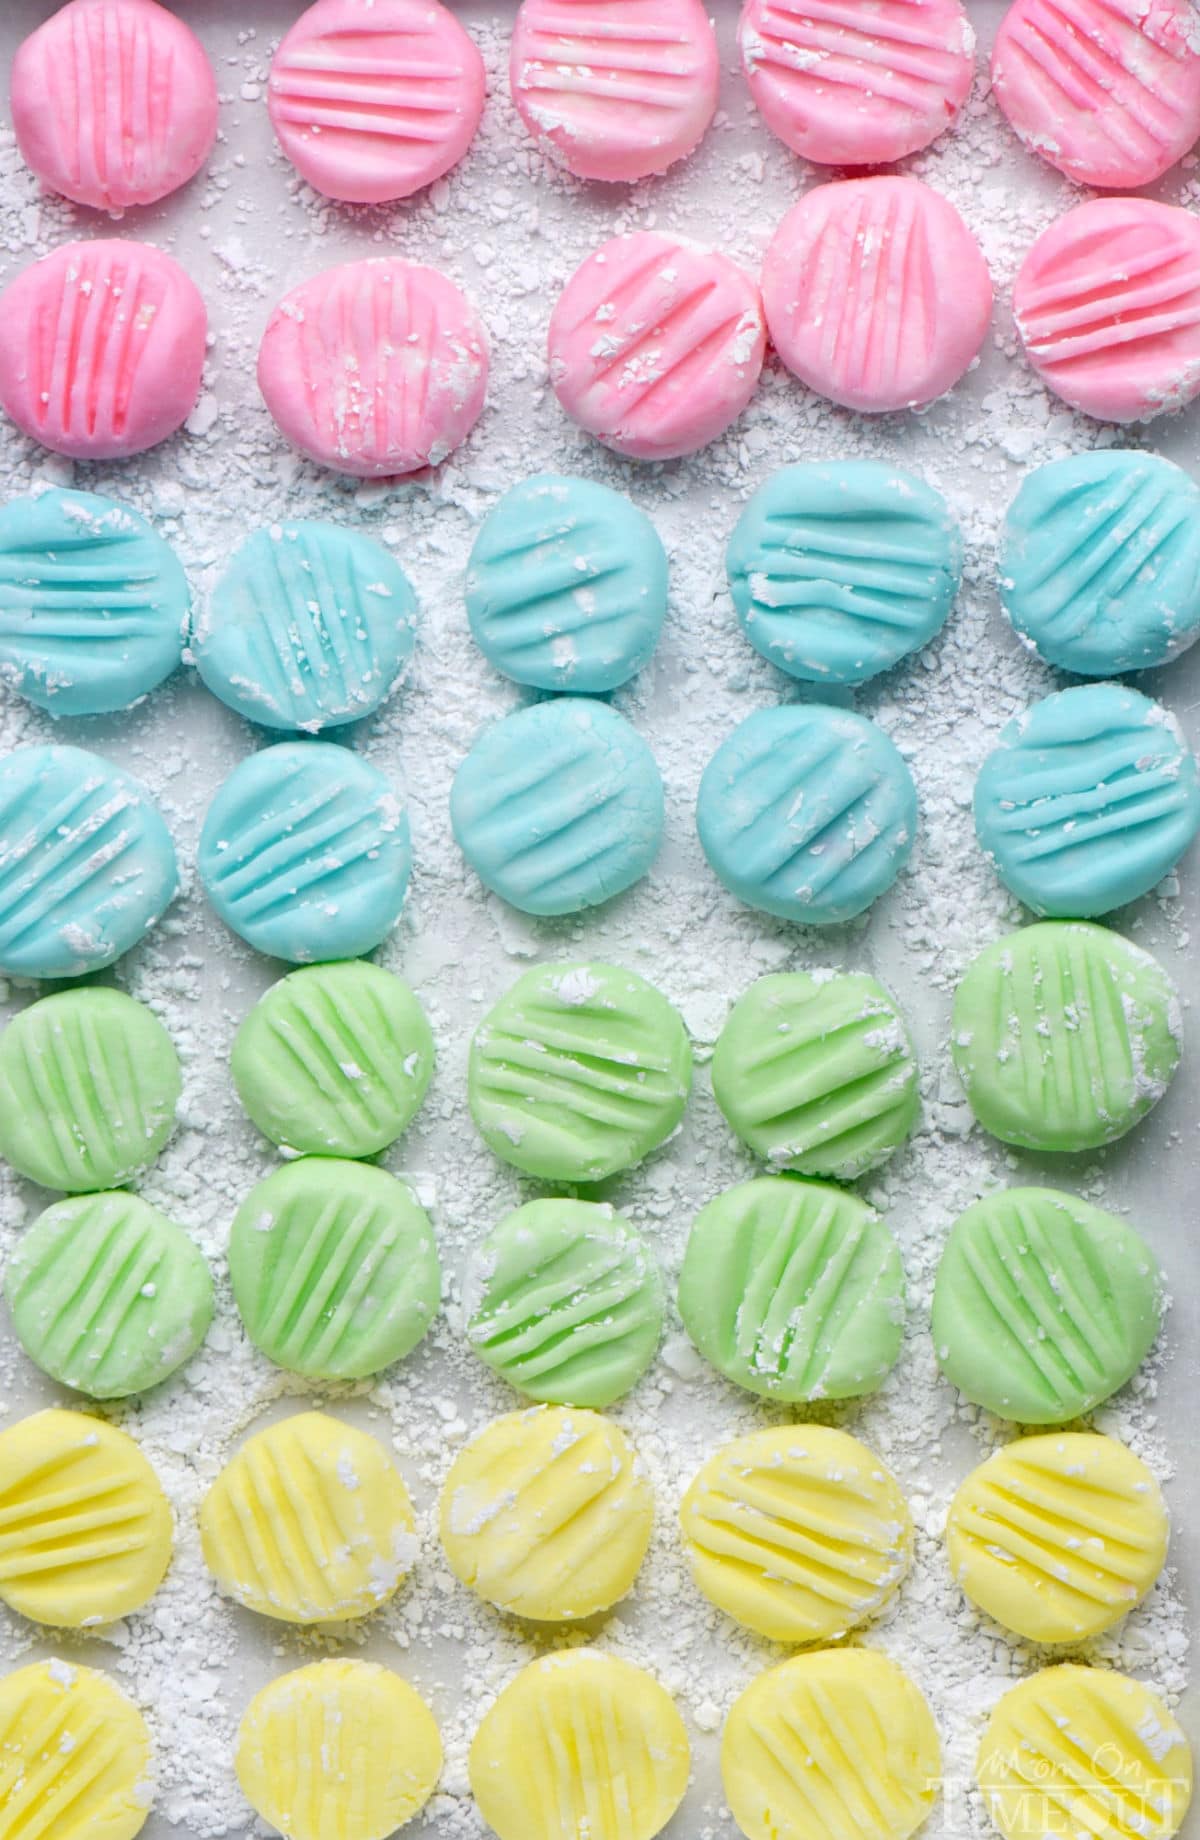
- Pinch off small amounts of the dough and form into a 1-inch balls. Roll in powdered sugar and place on prepared sheet pans.
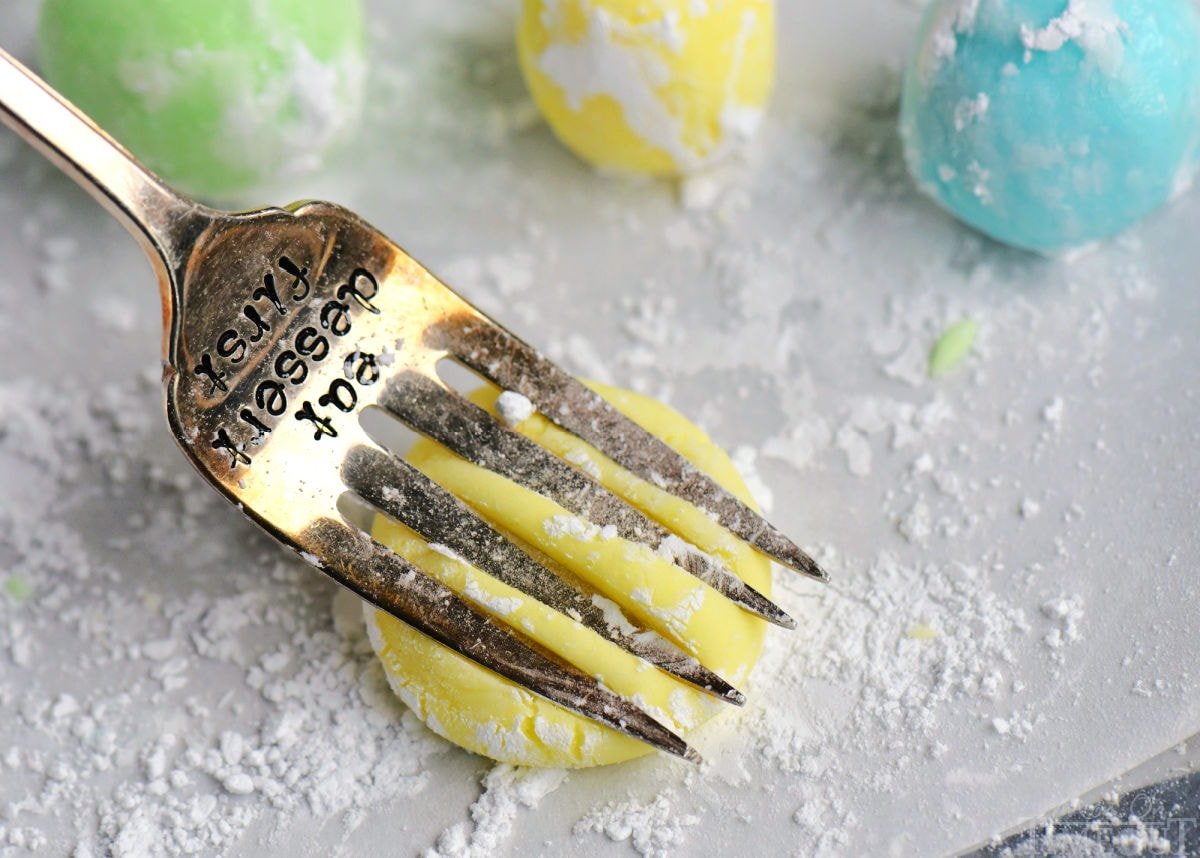
- Press the tines of a fork into the top of each ball.
- Sit out for at least 4 hours or until the mints are firm.
Storage Information
Cream Cheese Mints are perfect for making ahead of time!
- Refrigerator: Store in an airtight container for up to 2 weeks. Layer with waxed or parchment paper to prevent sticking.
- Freezer: Freeze in a single layer first, then transfer to an airtight container. Use parchment between layers. Freeze for up to 2 months. Let mints come to room temperature before serving for the best texture.
Variations To Try
These mints are incredibly delicious! Here are some fun ways to customize this recipe:
- Swap in a different flavored extract. Try vanilla, almond, or lemon extract instead of mint. Virtually any flavor extract will work!
- Use small candy molds or cookie cutters for fun shapes. You can also roll into a log and cut into squares – like butter mints.
- Have fun with the colors OR omit the food coloring entirely. Red and green for Christmas, pastels for Easter, pink and blue for baby showers and fun and festive!
Can I make these cream cheese mints in advance?
The candies need to dry to harden. So you’ll want to make at least 1 day in advance. The powdered sugar that they are rolled in will absorb into the mint – so don’t worry about the white. The cream cheese mints can be frozen or refrigerated if you’d like to make well in advance.
How did you get those pretty pastel colors?
Easy! I used these Wilton gel food colors – they’re my favorite! Use any colors you like though – these mints are so pretty in a variety of colors.
Should I use peppermint extract or mint extract in the recipe?
I used mint – as in spearmint. Many of you prefer peppermint and trust me, they’re good that way too. In fact, last month when I shared the Chocolate Mint Cream Cheese Buttons, so many of you made it with peppermint extract instead of mint and said it was the best thing you’d ever had! So, bottom line, use whichever you prefer.
And while we’re on that subject… you can use any flavor of extract you want. Cherry, root beer, lemon, orange – any flavor you want!
Can I use a candy mold with this recipe?
Absolutely! Simple pinch off a small amount of the dough, roll into a ball and then roll in granulated sugar and press into your mold. Pop out the mold and repeat! I do love that you can achieve really adorable and beautiful mints with just a simple fork though!
Can I dip these mints into chocolate?
Absolutely! These are delicious dipped in chocolate. You can dip them completely like we did with this chocolate covered mint patties or just dip halfway.
More Easy Candy Recipes
- Divinity Candy
- Penuche Recipe
- Buckeyes
- Martha Washington Candy
- Saltine Cracker Toffee
- Better Than Anything Toffee Recipe
- Raspberry Truffles

The BEST Cream Cheese Mints
Ingredients
- 8 ounces cream cheese, full fat, softened
- 4 tablespoons salted butter softened
- 2 pounds powdered sugar
- ½ to 1½ teaspoons mint extract or peppermint extract
- gel food coloring optional
- ½ cup powdered sugar for rolling mints
Instructions
- Combine cream cheese and butter in a large mixing bowl and mix until smooth.8 ounces cream cheese,, 4 tablespoons salted butter
- Add 1 cup of powdered sugar and mix until smooth.2 pounds powdered sugar
- Add the mint extract and mix until combined.½ to 1½ teaspoons mint extract
- Gradually, add the remaining powdered sugar until smooth and consistent. You can do this with a stand mixer, hand mixer, food processor or by hand. The dough will get quite stiff towards the end.
- Separate the mixture into four separate bowls, or however many different colors you want.
- Add a small amount of food color to each bowl and stir in until the color is uniform.gel food coloring
- Cover and refrigerate for 2 hours or until firm enough to handle. You don’t want it sticking to your hands.
- Line two quarter sheet pans with parchment paper and liberally dust with powdered sugar. Set aside.
- Pinch off small amounts of the dough and form into a 1-inch balls.
- Roll each ball in powdered sugar and place on prepared sheet pans.½ cup powdered sugar
- Gently press the tines of a fork into the top of each ball. (You can also use the bottom of a shot glass if you don't want the lines. Just dip the bottom of the glass into powdered sugar to keep it from sticking.)
- Let stand, uncovered, for at least 4 hours or until the mints are firm. If the bottoms have any moisture, flip over and let stand again until the bottoms of the mints are also firm.
Video
Notes
Tools and Equipment (affiliate links): Glass Mixing Bowls | Quarter Sheet Pans | Parchment Sheets | Electric Mixer (Hand Mixer or Stand Mixer)
Please see post above for more information, recipe tips and frequently asked questions.
Nutrition
Originally published March 25, 2017.


Robin Grohens says
I only used one lb and they were way to sweet I would like a little more of a cream cheese taste any suggestions?
Cupoftea says
I agree. I put the 2 lbs of sugar and it completely dissolved any cream cheese taste…all sugar. I will try it again with less
Dawn says
When you divide it into the 4 bowls to add the color can you at that time put in the flavoring so each one would taste different
Shawna says
How long can you freeze these and when you go yo thaw them out fo you do it by the refrigerator or at room temprature?
Pierina DiRisio says
Hi Trish i’m just wondering what temp. for the oven and how long to cook them
Dale says
WHAT? where does it say what temp to cook? Honey you must be looking at another recipe. Don’t ruin the mints by heating them How is this, Trish, I followed your lead to be kind and patient. Keep up the good work. Kindness wins out every time.
Beverly says
Can’t wait to try these for a shower, thanks Trish! btw…your patient replies to some of the questions have CRACKED me up today! I needed a good laugh. Keep on being patient and kind. The world needs so much more of that.
Trish - Mom On Timeout says
Lol! You are too sweet Beverly. I do try 😉
Brooke says
Thanks for such a great recipe, I just made regular mint ones for a shower this weekend, my 4 year old wanted to eat them all. We will definitely have to try other flavors for events in the future.
Trish - Mom On Timeout says
So much fun! There are so many flavors that work well! Enjoy!
Leonor says
Thank you for the recipe. What other flavors have you use. I’m thinking of using these for a kids treat in a party favor. Oh and you are quiet nice to answer all the repetitive questions. ?
Trish - Mom On Timeout says
Lol! I realize that not everyone takes the time to see if their questions have been asked before 😉 So I have tried cherry, root beer, lemon, lime, orange – you name it! I find I like fruit flavors the best but I have heard that rum extract is also delicious, although maybe not appropriate for a kids party lol!
Kimberly says
I just made it with the food coloring that came with an egg decorating kit, and they turned out great! Much more affordable than buying food coloring just for this, since I don’t make a lot of things that need food coloring.
Trish - Mom On Timeout says
That’s wonderful Kimberly! Thanks for letting us know!
Doria Garza says
Not sure what I did wrong but my mint mixture is really sticky.
Trish - Mom On Timeout says
Add some more powdered sugar then until it’s manageable.
suzy says
Hi, I may be asking a dumb question, but what is gel food coloring. Can I use regular food coloring?
suzy harmsen says
FORGOT TO ASK, HOW LONG CAN THESE BE KEPT IN FREEZER. WANT TO MAK THEM FOR GRAND DAUGHTERS GRAD, IN 4 WKS, IS THAT TO LONG TO HAVE THEM IN FREEZER
Rosa says
Hi, I’m wanting to make these, but question was if I could mix it all & when you say set in fridge for 2 hours if it’s ok to leave overnight than make the 1 inch balls tomorrow?
Angela says
That was going to be my question as well. If I make the recipe up the night before, then make them into molds the next morning. Will the dough be fine to refrigerate overnight and make the next day?
Trish - Mom On Timeout says
Yes – that would be fine! The dough can be refrigerate for several days in advance. You will need to let it sit out a bit before it’s soft enough to handle though.
mARNA-rAE Walters says
How many cups of powder sugar do I need for this recipe. It calls for 2 lbs of powder sugar
Trish - Mom On Timeout says
About 7 cups.
Elaine says
can this recipe be cut in half? ty
Trish - Mom On Timeout says
Absolutely!
Barbara says
Hi. I just made the mints. They look beautiful. Can you tell me how long these mints can be left out to set? You state at least 4 hours. Thanks for the recipe!
Trish - Mom On Timeout says
They can be left out for a couple weeks but the outside will get slightly harder. I like to let them set out until completely firm on the outside and then store in an airtight container.
Renee says
Love this recipe.
I went just a bit further with taking the easy way out. I did not refrigerate my dough and put it into my cake decorator. With the widest tip available you can squeeze your dough right out onto wax paper lined sheets -sprinkle with 10x or granulated sugar and let sit overnight. When the mints are set I just picked up the wax paper and popped the mints off!
We made four colors and four flavors and had so much fun doing it. This recipe is perfectly proportioned. Thanks!
Trish - Mom On Timeout says
Wonderful Renee! I love your way! So glad you enjoyed the recipe!
Terry says
Brilliant! Thanks for posting!!
Lizeth says
Did you freeze or refrigerate them after ???