Stained Glass Fall Leaves – This easy and stunning craft is a perfect Fall craft for the kids.

Fall is in the air…well, not quite yet – but here’s to wishful thinking! Fall is my favorite time of year with the beautiful multi-colored leaves and the fresh, crisp air. Today’s craft is all about celebrating the beauty of this marvelous and colorful season. I love this craft because children of all ages can help construct their own leaves. A few small helping hands can turn this project into a memory-making event.

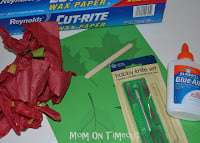 Materials Needed:
Glue
Tissue Paper (fall colors)
waxed paper
popsicle stick for spreading glue (or your favorite tool)
Fall Leaves Template #1 (or draw your own)
Fall Leaves Template #2
Craft knife
Paper (green, red, yellow, or orange)
Directions:
 Have your children help you tear the tissue paper into small pieces – the smaller the better. This is loads of fun for the little ones and frees you to print out the template and cut out the leaves.
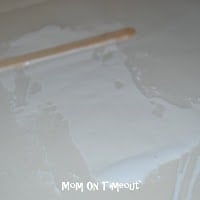
Tear off a piece of waxed paper that is double the width of your leaf template (so roughly 18″ long).
Apply glue to a small area of the waxed paper and then layer the tissue paper pieces on top, one at a time. It’s okay if they overlap a little – the goal is to cover all the glue.
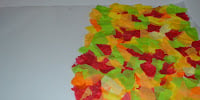 Continue working until half of the waxed paper is covered in tissue paper.

Now spread a thin layer of glue on the remaining half of the waxed paper on the opposite side.
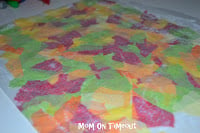
Fold the waxed paper over and lightly smooth the surface making sure that the glue is fully in contact with the tissue paper. Let dry.
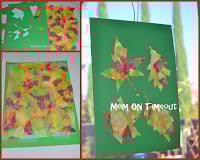 There are a couple of ways to enjoy the Stained Glass Fall Leaves. You can simply tape the dried stained glass behind the cut-out template and hang it on a window…
OR
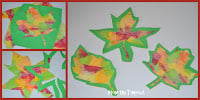
..you can individually cut out the leaf shapes, gluing the border of the leaf to the top of the stained glass. Stick them to a window using tape, or hang them from a suction cup. Make sure the window gets some sunlight so you can enjoy the stained glass effect.

Connect with me!


Melanie @ bear rabbit bear says
These are awesome. Thanks for sharing your template, also. Thanks for linking to Things I’ve Done Thursday.
Melanie
bearrabbitbear.blogspot.com
Nicole@Thrifty Decorating says
Thanks so much for linking! I posted your link on my FB page tonight! 🙂
Elizabeth says
Found you through Lines Across My Face link party – love your blog and these leaves are super cute!
Tonia @ TheGunnySack.com says
I remember making stained glass butterflies in school as a child! So much fun!! Thanks for this sharing this at last Monday’s “What In The Gunny Sack?” link party!
raising4princesses says
I’d forgotten about these. I did this as a kid. Thanks for the inspiration! I started a link party at my blog and I’d love for you to link this up. If you’re interested it’s http://caribbeanmissionarywife.blogspot.com/ Have a lovely day, Maria
Joyce says
I just found your post through the Sunday Showcase. I wish I would have seen it sooner because this would have definitely been apart of our fall bucket list. We’ll still do it, I’m sure. I love making stain glass art and I can’t believe I forgot about it. Yours look absolutely wonderful, and the template option is great! Thank you so much for sharing!
Aimee from Classified: Mom says
This is such a cute idea! Thank you for linking up to The Sunday Showcase!
Mindie Hilton says
cute, thanks for sharing at bacon time
Mel the Crafty Scientist says
This is so fun and so gorgeous! I love these and can’t imagine how fun they’ll be with light from each time of day and weather! I’m your newest follower – looks like you have some amazing projects I’m excited to check out! : )
-Mel the Crafty Scientist
Joni Nickrent says
Love this idea…the perfect fun fall craft! POP ART MINIS
Kristin says
These are really gorgeous! Found you at TJ 🙂
Carrie says
Thanks again for linking, love these!
Jamie @ hands on : as we grow says
I love this idea – what a great method! Please come share it on our playdate — It’s Playtime!
Beverly @ FlamingoToes.com says
These are really fun!! And what a great craft to make with kids. I like the stained glass effect!
~stopping by from TT&J! 🙂
sarah says
I just found your site and am loving browsing through it. (I think I may finally be brave enough to cook my own bacon, now, so thanks!) I just wanted to share that when my boys make “stained glass” we put the torn tissue directly onto clear contact paper, eliminating the need for gluing. Happy Fall!