We all know that certain produce is significantly less expensive during the summer. I love taking advantage of both the fantastic prices and the fresh flavors by buying in bulk and freezing.
Today I am going to show you how I roast my bell peppers and also a freezer storage technique that will give you fresh roasted red bell pepper flavor all winter long. These taste so much better than the jarred version in the store and you know exactly what’s inside them. It is so convenient to pull them out of the freezer and use them in soups, on top of bruschetta, cornbreads, casseroles, and of course roasted red pepper dip.
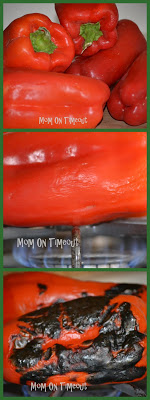 Start off with some fresh red bell peppers. Bell peppers are in season right now so it’s a good time to stock up with the lower prices.
Set your flame to low to medium heat. Lay the peppers on their side and let the flame slowly roast the pepper. This process takes some time and you don’t want to rush it by turning your flame up higher and then setting your bell peppers on fire.
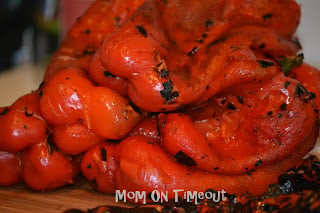
Check your peppers every few minutes and rotate them over the flame until all sides are nicely charred. You can even set your peppers on the ends over the flame if you burner grate will allow for it.
The peppers don’t need to be babysat but stay in the room in case there are any flare-ups.
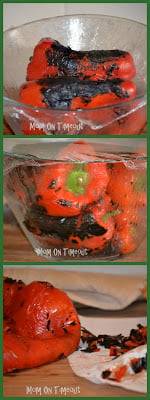
Place the charred peppers into a glass bowl and cover with plastic wrap. It is absolutely okay to do these peppers in batches. Just add the peppers into the bowl as they finish.
You will see the condensation on the side of the bowl build up as the heat is released from the peppers. It is during this time that the skin will become loose. This makes it really easy to peel the skin off of the peppers in the next step.
Remove the skin by peeling it off with your fingers or by using a paper towel. If the peppers are ready, the skin will come off easily.
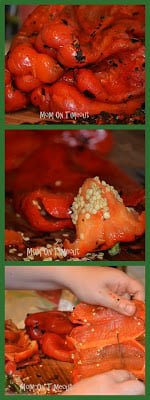
Now you’ve got all your beautiful roasted red bell peppers peeled. The next thing to do is remove the stems and the seeds. You can do this however is easiest for you.
I typically just yank on the stem and it comes right out (with lots of seeds attached). Then I tip the pepper upside down and give it a little shake and most of the remaining seeds will fall right out.
Cut (or tear) the pepper open and removed the remaining seeds by scraping the interior of the pepper. I am so not on the committee of “make sure you remove every little seed“. If you are – great! Me, I’m more like “get as many as you can and call it good“. You pick.
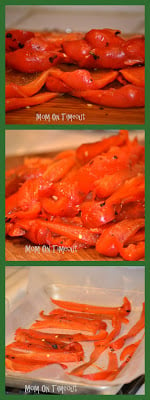
Lay out those beauties and take a sigh of relief. We’re nearly done now!
Cut the peppers into strips. Strips are what work best for me because they are easy to flash freeze and fit into a quart size freezer bag with no problems. If you prefer a different size or shape (say hearts or diamonds) – do what works for you.
So now that they are all cut into strips, it’s time to flash freeze the peppers. Line a baking sheet with parchment or waxed paper (I prefer parchment but waxed will work).
Lay the strips out in a single layer making sure they peppers aren’t touching each other. Why are we doing this Trish? Well, I’ll tell you why. Flash freezing these peppers preserve freshness and flavor. In addition, we are making the peppers easier to use in the future. You will be able to pull out a handful of pepper slices or just one or two because they won’t be frozen into a big chunk. Flash freezing individually freezes each piece so you can use exactly the amount you need. (Think of frozen peas. You open the bag and pour out what you need – this is the same idea.)
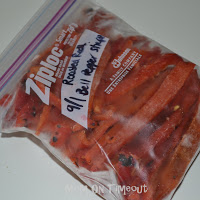
What’s left? Just bag ’em and tag ’em. I’ve got a super duper Roasted Red Pepper Dip recipe that I am going to be sharing with you next week that is just absolute perfection. Super creamy and full of flavor – it’s the perfect dip for any party.
Linking up here.


Jennifer says
Normally FLASH FREEZING is done w DRY ICE. That’s not what you’re doing correct? Yours are individually freezen in a house frige on trays, to store in bags, right?
Bashayer says
Great Idea!
I’m just wondering, Do you leave it out to defrost by itself, microwave it, or boil it?
Which one is the best option?
Trish - Mom On Timeout says
I let them defrost in the fridge usually. If I’m in a big hurry, I let them defrost on the counter. Have a great weekend!
Trish - Mom On Timeout says
@Paula The flash freezing really preserves the taste better so give it a try. Thanks for stopping by!
Paula says
I love peppers – deydrated are great for munching. This looks great – I’ve always just frozen them without doing much more than washing them and cutting – can’t wait to try this and see how they taste.
Thanks for sharing!
Tonia @ TheGunnySack.com says
Great idea! I love having things in the freezer so they are ready to go! Thanks for sharing!
Lindsay says
You have the best tips for the rest of us! I am so happy to read things like this, I didn’t know half of it before. 🙂 I am so glad you shared this at Show & Share!
Vivienne @ the V Spot says
Love it! Thanks for the tip!
Jennifer says
I came across your blog on Tip Junkie and I love your post! Awesome step by step of how to make your own roasted peppers!
I would love it if you would come by my blog and link up to Fusion
Fridays with your favorite or most recent recipes, handmade crafts, diy
projects, tips & tricks, and how to’s! { open through Wednesday! }
http://janedeereblog.blogspot.com
I would love it if you would come by Friday and link up!