
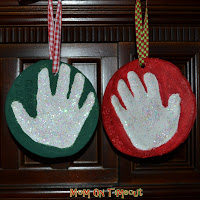
 So we made some more, and then ended up making a fourth batch so we could make these hand print ornaments. The kids love painting them (even the burned ones) so it wasn’t a complete loss. I’ll give you a brief rundown of how to do it and if you have any questions you can refer to my original salt dough tutorial here.
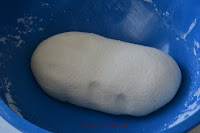 Make your dough using 1 c flour, 1/2 c salt, and about 1/2 c of warm water. (I usually double this.) Combine the flour and salt and then slowlly add in enough water to form the dough. If you are wanting to make hand prints out of your salt dough – you will add more water because you need a looser dough. You want to be able to easily press your hand into the dough so make sure it is nice and soft. (You can also add food color to the dough if you want it all the same color.) Knead the dough for 10 minutes and then let rest for another 40 minutes.
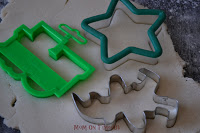
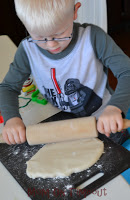 Roll out the dough until it’s 1/4 inch thick. My third batch this year I actually split the dough and rolled it out on two cutting boards so each of my boys could do what they wanted with “their” dough. Cut out the shapes using cookie cutters or even a knife will do. For the hand prints I used the top to a pitcher – it just happened to be the right size and worked great!
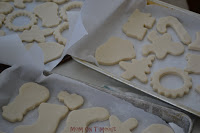
If are making ornaments be sure to poke a hole where you will be hanging the ornament from. Make sure it goes all the way through and that any extra dough is removed. Place the ornaments on a parchment-lined baking tray and bake for 4-6 hours (or until hard) at 200 degrees. You can also air dry but plan on several extra days for that.
Once the ornaments are hard and dry it’s time to decorate! Paints, glue, glitter, ribbon – you name it! I just let the kids go crazy and do whatever they want (plus I had lots of extras!) Let the paint and glue dry.
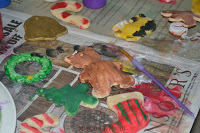
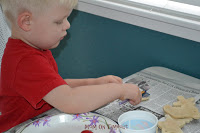
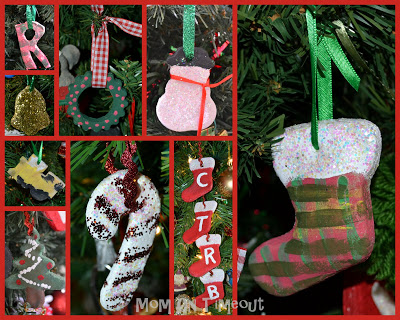
I used a polyurethane spray on the ornaments to seal them so that they will keep beautifully but this step is optional. Hang up your fabulous creations with a pretty ribbon and enjoy! I just love this project because it’s super affordable and you can make it using whatever you have on hand. There’s no need to run out and buy a whole bunch of supplies. Here are some of our creations…


Salt Dough! says
Awwwww so sweet! http://saltdough.weebly.com/
The Sunshine Crew says
Have lost track how many neat ideas I have pinned from your blog onto my Pinterest boards today.
Would you like to be featured my Sunrise Learning Lab blog – under the section Pinterest Mama?
Would feature you in January.
Have a nice holiday weekend!
Colleen
Carrie says
Oh no about the ones you burned! So sad. Love the ones that did work out, though.
Thanks for linking to Refresh Your Nest Friday, hope you join us again tomorrow!
Stephanie L. says
Thank you for such great instructions! I followed them word for word because I was making these for the first time for an activity for my MOMS Club (i.e. they HAD to turn out because I had a whole group planning on decorating them the next morning) and the children all had fun decorating them. They are as fun as sugar cookies to decorate with no corresponding sugar high for the children!
Trish@MomOnTimeout says
@Tammy I honestly don’t know Tammy. I’ve always kneaded it first. As long as you combined the ingredients really well I would hope it turns out. Good luck!
Lindsi B says
Love these. Salt ornaments are so fun!!! Would you please share this with our readers for Fun Stuff Fridays? http://www.toysinthedryer.com/2011/12/fun-stuff-fridays-4-3-weeks-long-for.html
Tammy says
What happens if you don’t knead it and let it rest? I was in such a hurry to try this out that I didn’t read all the directions! I hope it turns out o.k.
Stone Cottage Adventures says
What sweet memories! Thank you for sharing. -Marci
Aimee from Classified: Mom says
I can’t believe that I did not do this this year! Yours turned out super cute!
Jennifer @ The Brilliant Crafty Type says
My first attempt at salt dough handprint ornaments was a flop. I will give it another go this week. Your flour to salt ratio is different… maybe my first recipe was bogus {we’ll go with that…}. Thanks for sharing.
shopannies says
so many great things to do with salt dough I love making new ornaments each year and we have so many from over the years come see me at http://shopannies.blogspot.com
Mom Daughter Style says
very creative and festive
the little hands are so cute
http://momdaughterstyle.blogspot.com/
Trish@MomOnTimeout says
@Anonymous Hi there! They don’t have to hold their hand still at all. It’s a dough not liquid so you just need to make an impression. Let me know if you need any more explanation!
Anonymous says
How long do they have to hold their hand still to do the handprint ornament? Could you provide more detailed instruction? Thank you :~}
Beth (www.livinglifeintentionally.blogspot.com) says
These look gorgeous! I love the color contrast you did!
Beth =-)
TGIF