↑
  • Dinner Recipes
  • Breakfast Recipes
  • Dessert Recipes
  • Side Dishes
  • Recipes
    • Dinners
    • Slow Cooker
    • Appetizers and Sides
    • Breakfast
    • Dessert
    • Beverages
    • Bread
    • Holiday Recipes
    • Kid-Friendly
  • Blog View
  • About
    • Disclosure/Privacy Policy
  • Facebook
  • Pinterest
  • Instagram
  • Twitter
  • Youtube
  • Blog View
  • About
  • Privacy Policy
  • Advertise/PR
  • DISNEY
  • DINNERS
  • DRINKS
  • DESSERTS

Mom On Timeout

Serving up real food for real families!

  • Home
  • Recipes
    • Slow Cooker
    • Appetizers and Sides
    • Breakfast
    • Entree
    • Dessert
    • Beverages
    • Holiday Recipes
      • Christmas Recipes
      • Thanksgiving Recipes
      • Valentine’s Day Recipes
      • St. Patrick’s Day Recipes
      • Easter Recipes
      • Halloween Recipes
    • Bread
    • Kid-Friendly
  • 5 Ingredients
  • Appetizers
  • Favorites


free email course!

5 SECRETS TO GETTING DINNER ON THE TABLE...FAST!

You are here: Home / Holiday Crafts / Christmas Crafts / Crocheted Christmas Table Runner

Crocheted Christmas Table Runner

December 2, 2011

  • 16
Crocheted Christmas Runner
I love to crochet. My Nana taught me to crochet when I was eight or nine years old. It’s something that I enjoy and I haven’t been making time for it these past few years. I decided to make the kids some ornaments and do a few other projects this season and thought that I could use a table runner.
I’ve made a similar runner before but not a Christmas one. It’s very simply and consists of single and double crochet stitches. This runner is very flexible and you can add stitches to increase the dimensions should you choose to.

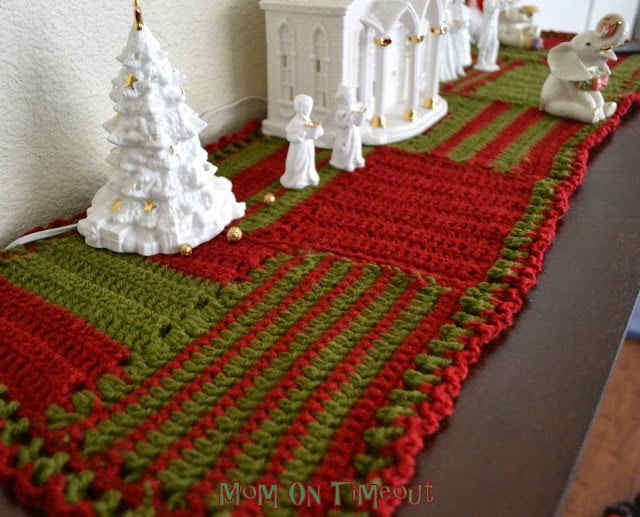
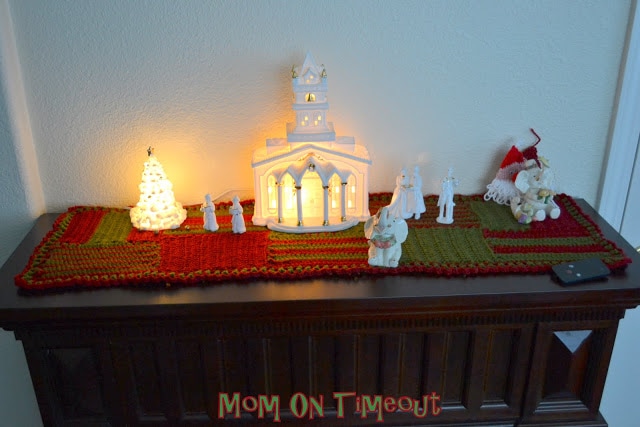
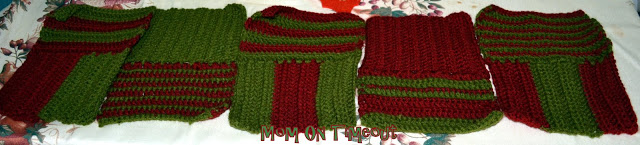
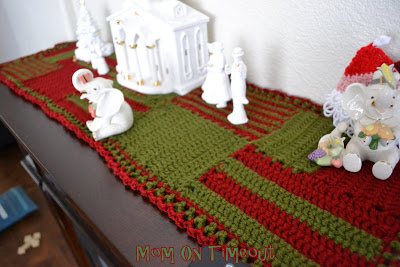
This runner is a perfect weekend project. It came together very quickly and is great for beginner crocheters. I ended up making 5 blocks total but you can make as many blocks as you need to get the length you are looking for.

Materials Needed:
1 skein of red (or the colors of your choice)
1 skein of green
Hook Size J (you can go up or down a size if you want)
Finished measurements: 38.5″x12″

Instructions:
Block 1
Section A:
Ch 20 in the color of your choice. (To make your runner wider, add more chains here.)
Row 1: Dc in 3rd ch from hook (counts as dc) and in each ch across. Row should have 19 dc.
Row 2-7: Ch 3, turn, dc in each dc across. At the end of row 7,  fasten off. These rows can be done in the same color or in both colors in any pattern you choose. I did each block differently myself.

Section B:
Join with either color with sl st in one corner on the right side. You will be working along one of the sides where the previous rows ended or began.
Row 1: With either color, ch 3, work dc evenly spaced along side. (I had 26 dc). *First row of dc.
You will need a total of 6 rows of dc and 6 rows of sc. (12 total rows on Section B.)
Row 2: With color choice, ch 1, turn, sc in each st across.
Repeat Rows 1 and 2 six times. It is not necessary to alternate rows with dc and sc – you just need a total of 12 rows, 6 of each (dc and sc).
Fasten off.

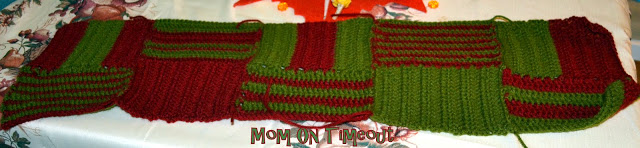
Make 4 more blocks varying the pattern. Sew blocks together to form the runner.

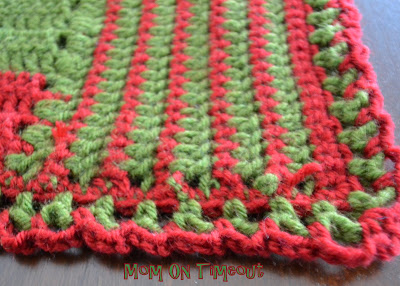
Edging: With color of your choice, join with sl st anywhere on the outside edge with the right side facing you. Row 1:Work sc evenly spaced around the edge of the runner. Join with sl st in beg st. Fasten off.
Row 2: Chain 3 (with your choice of color) and skip 1 sc and sc in the second sc.. Chain 3, skip 1 sc and sc in the second sc. Repeat around the runner.
Row 3:  Chain 3 (with your choice of color) and sc in the loop that the chain 3 created in row 2. Repeat around the runner. Fasten off.
Row 4 (optional): Repeat Row 3 if desired.
Weave in ends.

I put this runner on top of our “fireplace”. It looks very beautiful and I am quite happy with it. Now I’ve got to get going on my other crochet projects 🙂
Connect with me!

Facebook | Twitter | Pinterest | Google+ | RSS
 Linking up here, Home Stories A2Z, and My Repurposed Life. 
free email course

5 SECRETS TO GETTING DINNER ON THE TABLE...FAST!

enjoy!
  • 16

By Trish - Mom On Timeout December 2, 2011 Christmas Crafts, Crafts

Previous article:
« Tooth Fairy Traditions
Next article:
Marshmallow & Chocolate Cookies »

Comments

  1. Debi @ Adorned From Above says

    November 28, 2012 at 11:02 PM

    Great runner.. I would love to have you share this with this weeks Wednesday’s Adorned From Above Blog Hop. The link to the party is
    http://www.adornedfromabove.com/2012/11/washi-tape-idea-book-and-wednesdays.html#
    I hope to see you there.
    Have a great week.
    Debi @ Adorned From Above

    Reply
  2. Polly @ Helping Little Hands says

    December 12, 2011 at 6:37 PM

    Very cute! I need to learn to crochet. 🙂

    Reply
« Older Comments

Leave a Reply Cancel reply

Your email address will not be published. Required fields are marked *

Recipe Rating


This site uses Akismet to reduce spam. Learn how your comment data is processed.

Hi, I’m Trish!

Welcome to Mom On Timeout where I’m serving up real food for real families! Dinners, desserts, and everything in between!
Read More…

categories

archives

Popular Posts

white bowl with handles filled with zuppa toscana soup and topped with cheese. Kale, sausage and bacon can be seen in the soup.
crockpot chili in a ladle held above the crockpot and the rest of the chili.
chicken-stir-fry
best-tater-tot-casserole-recipe-hamburger-green-beans

Some of my favorites…

mini cheesecakes sitting on a gray plate topped with whipped cream, raspberries and mint leaves.
cake made with cinnamon rolls on a white cake stand and topped with cream cheese frosting and mini cinnamon rolls.
one slice of lemon meringue cheesecake sitting on a white plate with the rest of the cheesecake seen in the background next to a small bottle of milk. lemon slices near the front of the plate.
Three creamsicle cookies stacked with the top cookie has a bite taken out of it.
top down view of three coconuts scones stacked on top of each other and topped with coconut icing and chocolate shavings.

Copyright ©2023, Mom On Timeout. All Rights Reserved.
Design by Pixel Me Designs
  • Facebook
  • Twitter
  • Pinterest