↑
  • Dinner Recipes
  • Breakfast Recipes
  • Dessert Recipes
  • Side Dishes
  • Recipes
    • Dinners
    • Slow Cooker
    • Appetizers and Sides
    • Breakfast
    • Dessert
    • Beverages
    • Bread
    • Holiday Recipes
    • Kid-Friendly
  • Blog View
  • About
    • Disclosure/Privacy Policy
  • Facebook
  • Pinterest
  • Instagram
  • Twitter
  • Youtube
  • Blog View
  • About
  • Privacy Policy
  • Advertise/PR
  • DISNEY
  • DINNERS
  • DRINKS
  • DESSERTS

Mom On Timeout

Serving up real food for real families!

  • Home
  • Recipes
    • Slow Cooker
    • Appetizers and Sides
    • Breakfast
    • Entree
    • Dessert
    • Beverages
    • Holiday Recipes
      • Christmas Recipes
      • Thanksgiving Recipes
      • Valentine’s Day Recipes
      • St. Patrick’s Day Recipes
      • Easter Recipes
      • Halloween Recipes
    • Bread
    • Kid-Friendly
  • 5 Ingredients
  • Appetizers
  • Favorites


You are here: Home / Crafts / Coin-Covered Cross – Paid In Full {Easter Craft}

Coin-Covered Cross – Paid In Full {Easter Craft}

March 19, 2012

  • 506

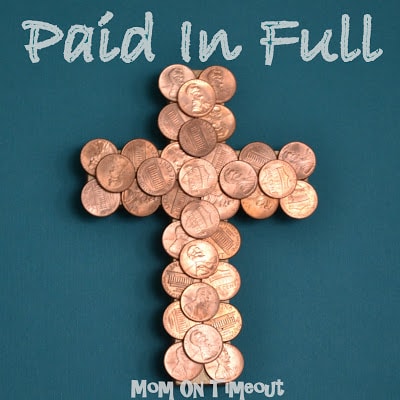
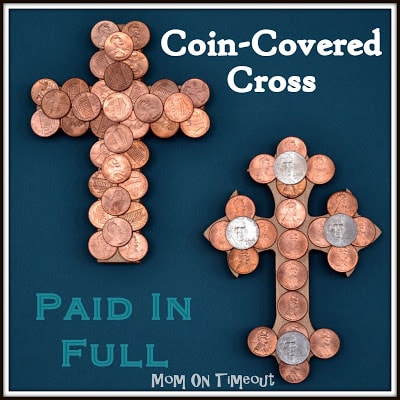
Wooden crosses are covered in coins – “Paid In Full” Easter Craft.
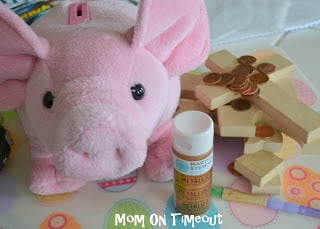
Coin_Covered_Cross

 Easter is less than three weeks away and the boys are getting so excited as I take out Easter baskets, plastic eggs, and other fun decorations. Easter crafts are so much fun and I love to involve Reece and Bryce in making our home beautiful and fun for Easter.
It’s easy to get caught up in the chocolate bunnies and egg hunts so I like to remind the boys early on about what we are REALLY celebrating – the death, burial, and resurrection of Jesus Christ. When Jesus died on that cross, he paid the penalty for all our sins and by doing so, he purchased eternal life for all who believe in him. These Coin-Covered Crosses are a beautiful way to illustrate the price he paid and the variations are endless. Because the coins are metallic, the Coin-Covered Cross looks so beautiful when the sun shines on it.

Materials Needed:
Copper paint (or your choice of metallic paint)
Wood cross (I ordered mine from Mr. Woody’s Etsy shop )
paint brush
coins (your choice)
glue

The first thing I did was raid my children’s piggy banks – literally. I was trying to find “pretty” pennies and those are apparently hard to come by in our house. This was an excellent opportunity for me to explain what this craft and Easter was all about to Reece and Bryce.

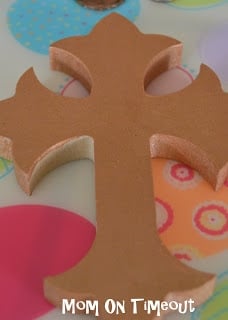
Next step was painting the crosses. You can paint them any color you want. I knew I was going to be using pennies, so I used a Martha Stewart copper metallic paint that worked beautifully.
They really only needed one coat but I had to wait for the first area to dry before I finished painting. Since this is multi-dimensional, should anyone be viewing it from the side it will look cohesive.

free email course

5 SECRETS TO GETTING DINNER ON THE TABLE...FAST!

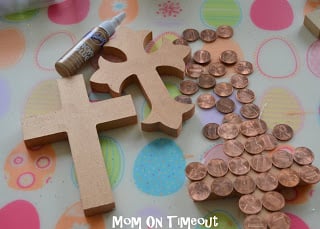
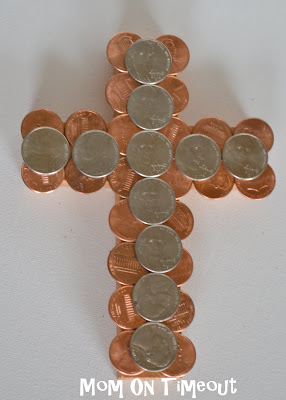
The next step is to lay out your coins. Figure out if you want heads or tails showing, or both. If you want all of one type of coin or different colors.

Once you have the coins laid out you can start gluing them on. Having the cross painted allows you the option to not cover the entire surface should you desire.

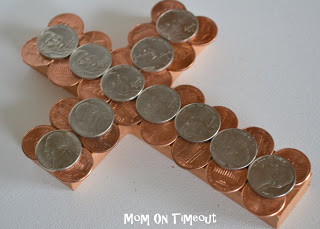
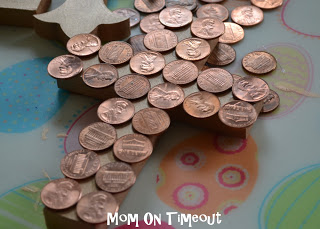
I really liked the look of the copper pennies by themselves but you can add dimension and color by adding another layer of a different coin – I used nickels.

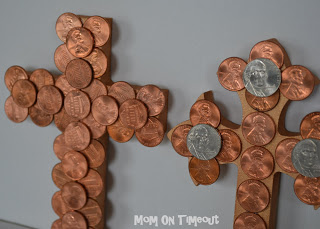
I think these turned out really beautiful and I love the symbolism.

 
 Paid In Full. I am so thankful for that.

For all appetizer recipes, go HERE.
For all dessert recipes, go HERE.
Sign up to get emails when I post new recipes!
For even more great ideas follow me on Facebook – Pinterest – Instagram – Twitter – Bloglovin’.

Have a great day!

  • 506

By Trish - Mom On Timeout March 19, 2012 Crafts, Easter, Easter Crafts, Holiday Crafts

Previous article:
« Braided, Yarn-Wrapped Easter Eggs
Next article:
5 Cheese Roasted Red Pepper Spread »

Comments

  1. Ami w/AliLilly says

    March 21, 2012 at 9:27 AM

    I ABSOLUTELY love this!! I just did a post on Faith Based Easter crafts! It was pretty hard to find crafts like this! If you don’t mind I would LOVE to add this to it. If that’s ok?

    http://alililly.blogspot.com/2012/03/10-faith-based-kids-crafts-for-easter.html

    Reply
  2. Free Pretty Things For You says

    March 21, 2012 at 9:15 AM

    I REally LOVE THIS!!! How WOnderful!

    Reply
  3. Jenny Melrose says

    March 21, 2012 at 6:00 AM

    Trish — These came out great and I’m sure the boys loved getting to spend time with you to help with the decorating for an important holiday. Thank you for sharing at Whimsy Wednesdays.

    Reply
  4. Tiff says

    March 21, 2012 at 4:20 AM

    Wow… incredibly awesome way to teach our children about Who and How Jesus paid our sin debt. I will definitely be making these this weekend. Thank you and God bless..
    Abiding in Him,
    Tiff

    Reply
  5. Eva Marie says

    March 20, 2012 at 8:55 PM

    So awesome!! I can’t wait to make them with my kids.

    Reply
    • Trish - Mom On Timeout says

      March 21, 2012 at 7:35 AM

      That’s wonderful Eva! Thanks for stopping by 🙂

      Reply
  6. Becky says

    March 20, 2012 at 6:29 PM

    That is beautiful!

    Reply
  7. sara @ applestone drive says

    March 20, 2012 at 5:35 PM

    Hi! Visiting from the party at Ginger Snap Crafts – I love what you did with these crosses! Such a neat idea!

    sara @ applestonedrive.blogspot.com

    Reply
    • sara @ applestone drive says

      March 20, 2012 at 5:36 PM

      Oops – I meant the party at Clean & Scentsible. 🙂

      Reply
  8. Laura says

    March 20, 2012 at 10:34 AM

    love this!! just pinned it:)

    Reply
  9. Mama Jodi says

    March 20, 2012 at 7:51 AM

    Love this. I’ve pinned it and hope to do it. Thanks so much. I’ll link back.

    Reply
  10. Ann @ Suburban Prairie Homemaker says

    March 20, 2012 at 6:41 AM

    A great idea and a great message! Thanks for sharing!

    Reply
  11. LeighAnn says

    March 20, 2012 at 6:27 AM

    Cute idea Trish!

    Reply
  12. Carrie says

    March 19, 2012 at 4:38 PM

    They look amazing! I definitely want to try this.

    Reply
    • Trish - Mom On Timeout says

      March 19, 2012 at 4:42 PM

      It looks really amazing on the wall – give it a try!

      Reply
  13. Trish - Mom On Timeout says

    March 19, 2012 at 2:12 PM

    Thanks Jennifer! They come together really quickly – AFTER you’ve found your pretty pennies 🙂

    Reply
  14. Jenifer Harrod says

    March 19, 2012 at 2:11 PM

    this looks so cool! I think I want to do this now. Great Idea!

    Reply
  15. Kristin says

    March 19, 2012 at 1:50 PM

    Love your thoughts on this craft!

    Reply
    • Trish - Mom On Timeout says

      March 19, 2012 at 1:56 PM

      Thank you Krisin!

      Reply
Newer Comments »

Leave a Reply Cancel reply

Your email address will not be published. Required fields are marked *

Recipe Rating


This site uses Akismet to reduce spam. Learn how your comment data is processed.

Hi, I’m Trish!

Welcome to Mom On Timeout where I’m serving up real food for real families! Dinners, desserts, and everything in between!
Read More…

categories

archives

Popular Posts

white bowl with handles filled with zuppa toscana soup and topped with cheese. Kale, sausage and bacon can be seen in the soup.
crockpot chili in a ladle held above the crockpot and the rest of the chili.
chicken-stir-fry
best-tater-tot-casserole-recipe-hamburger-green-beans

Some of my favorites…

Carrot cake bar on white round plate with bite taken. Cream cheese frosting on top with green sprinkles.
Two mint chocolate chip cookies with one half cookie on top with melty chocolate. Cookies are green with chocolate chips. Green cake stand can be seen in the background.
Homemade mint patties stacked five high with the top one split in half. A green cake stand in the background has more patties on it.
Single funfetti cookie with bite out of it sitting in front of glass of milk.
Orange pound cake with end cut off sitting on wood board topped with a glaze.

Copyright ©2026, Mom On Timeout. All Rights Reserved.
Design by Pixel Me Designs
  • Facebook
  • Twitter
  • Pinterest