↑
  • Dinner Recipes
  • Breakfast Recipes
  • Dessert Recipes
  • Side Dishes
  • Recipes
    • Dinners
    • Slow Cooker
    • Appetizers and Sides
    • Breakfast
    • Dessert
    • Beverages
    • Bread
    • Holiday Recipes
    • Kid-Friendly
  • Blog View
  • About
    • Disclosure/Privacy Policy
  • Facebook
  • Pinterest
  • Instagram
  • Twitter
  • Youtube
  • Blog View
  • About
  • Privacy Policy
  • Advertise/PR
  • DISNEY
  • DINNERS
  • DRINKS
  • DESSERTS

Mom On Timeout

Serving up real food for real families!

  • Home
  • Recipes
    • Slow Cooker
    • Appetizers and Sides
    • Breakfast
    • Entree
    • Dessert
    • Beverages
    • Holiday Recipes
      • Christmas Recipes
      • Thanksgiving Recipes
      • Valentine’s Day Recipes
      • St. Patrick’s Day Recipes
      • Easter Recipes
      • Halloween Recipes
    • Bread
    • Kid-Friendly
  • 5 Ingredients
  • Appetizers
  • Favorites


You are here: Home / Crafts / Hershey’s Kisses Roses – A Sweet Valentine’s Day Bouquet

Hershey’s Kisses Roses – A Sweet Valentine’s Day Bouquet

January 19, 2012

  • 166

Hershey's Kisses Roses from MomOnTimeout.com | Perfect for weddings, Valentine's Day, anniversaries and more! #ValentinesDay #craft

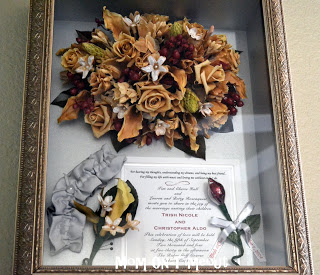
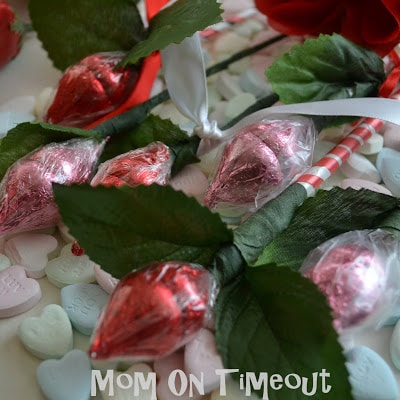
Hershey’s Kiss Roses are a simple and sweet craft to make for Valentine’s Day. My Mom was the one that introduced these to me many years ago. She helped me make the roses as favors for my wedding so they definitely have special meaning to me. While I was on my honeymoon my Mom had this made for me:
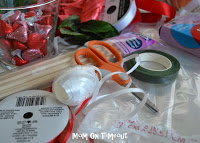
You can see the Hershey’s Kiss Rose on the bottom right. The ribbon had our names and the wedding date printed on it. This hangs in my bedroom on my side of the bed so I see it every night and every morning. (I had the most beautiful wedding!)
Hershey's Kisses Roses from MomOnTimeout.com | Perfect for weddings, Valentine's Day, anniversaries and more! #ValentinesDay #craft
They are really a breeze to make and you can have a “sweet” bouquet for the love of your life in no time.

Materials:
Hershey’s Kisses
floral tape
wood dowels or floral sticks
glue dots or double-sided tape
clear or tinted cellophane
ribbon (optional)

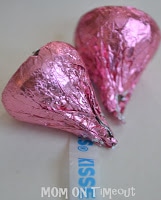
Pull out the white paper from the top of the candy. It may pull out easily or it may tear off. Just make sure no paper is showing at the top. If the foil gets loose around the top of the kiss – just push it back together.

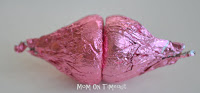
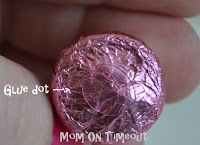
Use the glue dots or double-sided tape to attach the bottom of the kisses together.

free email course

5 SECRETS TO GETTING DINNER ON THE TABLE...FAST!

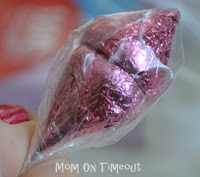
Wrap the kisses with a square piece of cellophane (about 3″x3″), drawing the edges together at the bottom.

Insert the stick into the base of the rose to create the stem. (Be careful not to push the stick into the Hershey’s Kiss. Wrap the cellophane tightly around the stick.

Use the floral tape to secure the rose to the stem and continue taping down the stem. Wind the tape diagonally down the stem.

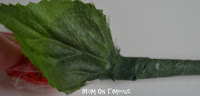
Add in some rose leaves as you are taping. I used 1-2 per stem and placed them near the rose but you can place them anywhere along the stem.

Finish wrapping the floral tape along the length of the stem. Cut the tape and press tightly to make sure the tape doesn’t come off.
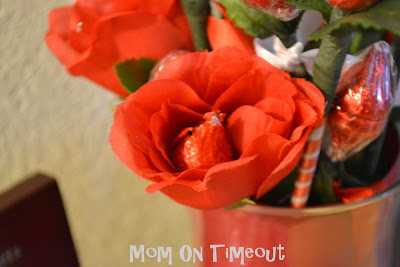
If you make up a bouquet, add in some floral roses and place a Hershey’s Kiss inside each rose:

Add a bow…

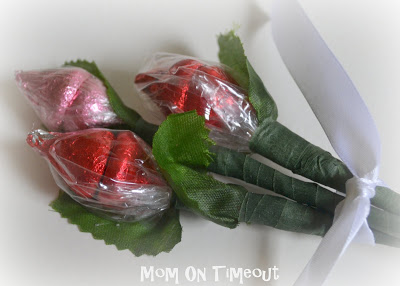
or ribbon to the stem…

Hershey's Kisses Roses from MomOnTimeout.com | Perfect for weddings, Valentine's Day, anniversaries and more! #ValentinesDay #craft

Connect with me!

Facebook | Twitter | Pinterest | Google+ | RSS

Linking up here, Home Stories A2Z, and My Repurposed Life.

  • 166

By Trish - Mom On Timeout January 19, 2012 Crafts, Valentine's Day

Previous article:
« Let It Snow Plaque
Next article:
Spiced Oatmeal Raisin Cookies {Recipe} »

Comments

  1. Christina says

    January 24, 2012 at 12:08 PM

    Think it would work to use valentine’s day pencils for the stems? Thinking of making these a gifts for my daughter’s classmates and the pencils would make an added gift to the candy.

    Reply
    • Trish - Mom On Timeout says

      January 24, 2012 at 12:40 PM

      Hi Christina! That would totally work and would be super cute – great idea!

      Reply
  2. Anonymous says

    January 24, 2012 at 11:52 AM

    Awesome! I am going to make these to give away at church. Thanks for sharing such a great idea?
    Elaine
    sestweety@yahoo.com

    Reply
    • Trish - Mom On Timeout says

      January 24, 2012 at 12:40 PM

      Thanks for stopping by Elaine. That’s a terrific idea!

      Reply
  3. Anonymous says

    January 24, 2012 at 11:32 AM

    These are adorable! My kids and I will enjoy making them! thanks for sharing!
    Melissa Becerra
    TheBuzzGal@yahoo.com

    Reply
    • Trish - Mom On Timeout says

      January 24, 2012 at 12:40 PM

      Thanks for visiting Melissa!

      Reply
  4. Anonymous says

    January 24, 2012 at 11:31 AM

    these look so cute and easy to make thanks for the idea

    Reply
  5. Anonymous says

    January 24, 2012 at 9:39 AM

    Thanks for sharing, love it

    Reply
  6. kate says

    January 24, 2012 at 9:39 AM

    Soooo cute, this is gonna b part of my teens valentines gift :0)

    Reply
  7. Jill says

    January 23, 2012 at 7:32 PM

    Oh these are just beautiful! What a great idea – and thanks for the clear how to as well!!

    I would love if you came over and linked this project to my weekly Round Tuit party at:
    http://jembellish.blogspot.com/
    Have a great week!
    Jill @ Creating my way to Success

    Reply
  8. Cooking for My Kids says

    January 23, 2012 at 7:40 AM

    What a great idea. These kiss roses are just precious!

    Reply
  9. cheapcraftymama says

    January 23, 2012 at 6:55 AM

    Those are so cute! I would love for you to link up at my new Valentine Party at http://www.cheapcraftymama.com!

    Reply
  10. Anita Stafford says

    January 22, 2012 at 5:43 PM

    These roses are so pretty! I’ll have to make some of these for my “sweeties”.

    Reply
  11. TheSewingLoft says

    January 22, 2012 at 5:39 PM

    Clever, Clever!! Thanks for sharing.
    ~Heather

    Reply
  12. Erin says

    January 22, 2012 at 9:57 AM

    These have been on my to do list for a couple of years but I never seem to make them. They are so darn cute!!! Yours turned out fantastic!!!

    Reply
  13. Kara at Petals to Picots says

    January 21, 2012 at 6:26 PM

    I love those candy roses, Trish! What a great idea. Thanks for sharing at my party. I can’t wait to see what you have next week!

    Reply
  14. Janet says

    January 21, 2012 at 6:24 PM

    This is so fun! I bet my kids would love making these. That was so nice of your mom to put together the wedding case for you, what a wonderful keepsake.

    Reply
  15. A Mother and A Daughter says

    January 21, 2012 at 10:41 AM

    Very cute idea! ~ Barbara

    Reply
« Older Comments
Newer Comments »

Leave a Reply Cancel reply

Your email address will not be published. Required fields are marked *

Recipe Rating


This site uses Akismet to reduce spam. Learn how your comment data is processed.

Hi, I’m Trish!

Welcome to Mom On Timeout where I’m serving up real food for real families! Dinners, desserts, and everything in between!
Read More…

categories

archives

Popular Posts

white bowl with handles filled with zuppa toscana soup and topped with cheese. Kale, sausage and bacon can be seen in the soup.
crockpot chili in a ladle held above the crockpot and the rest of the chili.
chicken-stir-fry
best-tater-tot-casserole-recipe-hamburger-green-beans

Some of my favorites…

Strawberry Cake Roll with one slice cut off at the end sitting on wood board topped with powdered sugar and fresh strawberries.
Slice of hummingbird cake recipe on a white round plate sitting in front of cake stand with rest of cake on it.
Top down look at croissant french toast bake in baking dish made with blueberries and topped with a dusting of powdered sugar.
Top down view of recipe for cream cheese mints on parchment paper flattened with the tines of a fork. Four pastel colors are shown: pink, blue, green and yellow in a symmetrical grid layout.
Close up of Strawberry danish with cream cheese topped with a glaze and fresh strawberries.

Copyright ©2025, Mom On Timeout. All Rights Reserved.
Design by Pixel Me Designs
  • Facebook
  • Twitter
  • Pinterest