↑
  • Dinner Recipes
  • Breakfast Recipes
  • Dessert Recipes
  • Side Dishes
  • Recipes
    • Dinners
    • Slow Cooker
    • Appetizers and Sides
    • Breakfast
    • Dessert
    • Beverages
    • Bread
    • Holiday Recipes
    • Kid-Friendly
  • Blog View
  • About
    • Disclosure/Privacy Policy
  • Facebook
  • Pinterest
  • Instagram
  • Twitter
  • Youtube
  • Blog View
  • About
  • Privacy Policy
  • Advertise/PR
  • DISNEY
  • DINNERS
  • DRINKS
  • DESSERTS

Mom On Timeout

Serving up real food for real families!

  • Home
  • Recipes
    • Slow Cooker
    • Appetizers and Sides
    • Breakfast
    • Entree
    • Dessert
    • Beverages
    • Holiday Recipes
      • Christmas Recipes
      • Thanksgiving Recipes
      • Valentine’s Day Recipes
      • St. Patrick’s Day Recipes
      • Easter Recipes
      • Halloween Recipes
    • Bread
    • Kid-Friendly
  • 5 Ingredients
  • Appetizers
  • Favorites


You are here: Home / Holiday Crafts / Christmas Crafts / Gift-Wrapped Gallery

Gift-Wrapped Gallery

December 8, 2011

  • 9
Gift Wrapped Gallery
Last year we went on vacation the week after Thanksgiving. The hotel that we stayed at was busily transforming their lobby by wrapping all the art work in Christmas paper. 
 The kids just loved it. 
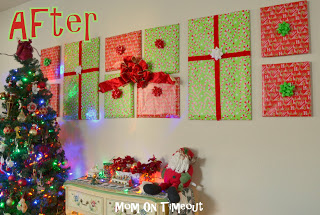
When we got home I did the same thing. I wrapped each frame in a different paper and it was just so much fun. This year I only used two different papers but I love the effect. 
It’s so easy to do and really transforms a room. It is sad to cover up all my pretty pictures but then by the time I get them all wrapped up (and dusted!) – the boys are super excited and the room looks so festive! 
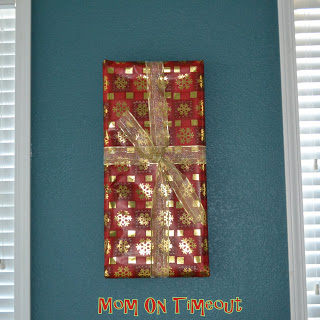
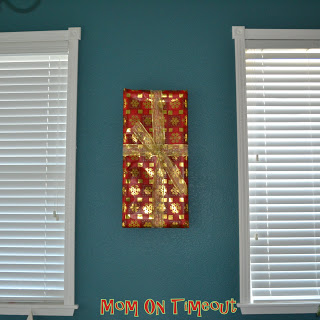
Don’t have a gallery? Wrap up a single frame. Metallic paper is especially fun and catches the glow of Christmas lights. Wrapping a frame adds a festive flair to any room in the house…
A couple of tips:
1. Make sure you are using tape that adheres well to the back of your frame. Some frames are wood, others are plastic, and so on.
2. When wrapping, make sure to not cover the hanger on the back of the frame.
3. Take this opportunity to dust your frames – or is that just me?

Connect with me!

Facebook | Twitter | Pinterest | Google+ | RSS

 Linking up here, Home Stories A2Z, and My Repurposed Life.

A Bowl Full of Lemons
  • 9

By Trish - Mom On Timeout December 8, 2011 Christmas Crafts, Crafts, Sidebar

Previous article:
« How To Make Your Own Pom Poms {Tutorial}
Next article:
Pom Pom Snowman Ornament Tutorial »

Comments

  1. Kara at Petals to Picots says

    December 10, 2011 at 9:56 AM

    I’m over visiting from the Family Ever After link party. This is such a clever idea!

    ~Kara (your newest google follower 🙂
    http://www.petalstopicots.com

    Reply
  2. Liz @ thequickjourney.blogspot.com says

    December 9, 2011 at 9:39 PM

    That is one of the most creative ideas I have seen! I would love for you to come join us at Find Your Craft Friday!

    http://thequickjourney.blogspot.com/2011/12/find-your-craft-friday-features-and.html

    Reply
  3. Linda @ it all started with paint says

    December 9, 2011 at 6:22 PM

    That is so clever. I’m guessing it was a lot of work too. I’m just tired thinking about it!

    Reply
  4. Alecia says

    December 9, 2011 at 6:10 PM

    Such a cheap way to Christmas-ify a whole room! Thankd for sharing, stopping by from TT&J

    Reply
  5. Wanda says

    December 9, 2011 at 10:51 AM

    I love this idea. Thank you for sharing it.

    Reply
  6. Marvelous Mommy says

    December 9, 2011 at 9:05 AM

    Such a cute idea! I wish I had time to do this today!! Thanks for sharing! Visiting from Freestyle Friday!

    Reply
  7. karah says

    December 9, 2011 at 5:52 AM

    This is such a great idea, I do love it when I see it in hotels. Yours came out great! I’m sure lots of fun for the kids to see such big “presents” on the wall. 🙂
    Karah @ thespacebetweenblog

    Reply
  8. Pearl Maple says

    December 9, 2011 at 2:44 AM

    that is a cute idea!

    Reply
  9. cameronhomemade says

    December 8, 2011 at 9:27 PM

    Love it – if only I had hung things on my walls to wrap – we’ve only lived here for 18 1/2 months! Maybe after 5 years . . .

    Reply
  10. Kimberlee, The Spunky Diva says

    December 8, 2011 at 9:16 PM

    Very cute! I have got to go grab some paper and do this in our house. The girls would love it! Have a fabulous weekend! ~Kimberlee, The Spunky Diva

    Reply
  11. Latoya @ The Scott's Crib says

    December 8, 2011 at 8:33 PM

    That is super cute, I never would have thought of that:)

    Reply
  12. Bronwyn says

    December 8, 2011 at 6:13 PM

    This is such a great idea! i have a gallery of pictures in my front hall and they could use some “wrapping” for the holiday season. Thanks for the idea!

    Reply
  13. Lianne says

    December 8, 2011 at 3:04 PM

    What a fantastic idea!!

    I would love for you to link up more awesome stuff at my new link party starting every Monday and lasting throughout the week!

    snap, craft & blog till your heart’s {content} @ a content housewife {blog}

    -Lianne

    Reply
  14. Terry says

    December 8, 2011 at 1:38 PM

    I love how cute this looks. I am definitely pinning this.

    Reply
  15. Amanda @ Gratefully Growing in Grace says

    December 8, 2011 at 12:27 PM

    So cute! I love this idea. And it reminds me I should dust…

    Reply
Newer Comments »

Leave a Reply Cancel reply

Your email address will not be published. Required fields are marked *

Recipe Rating


This site uses Akismet to reduce spam. Learn how your comment data is processed.

Hi, I’m Trish!

Welcome to Mom On Timeout where I’m serving up real food for real families! Dinners, desserts, and everything in between!
Read More…

categories

archives

Popular Posts

white bowl with handles filled with zuppa toscana soup and topped with cheese. Kale, sausage and bacon can be seen in the soup.
crockpot chili in a ladle held above the crockpot and the rest of the chili.
chicken-stir-fry
best-tater-tot-casserole-recipe-hamburger-green-beans

Some of my favorites…

Carrot cake bar on white round plate with bite taken. Cream cheese frosting on top with green sprinkles.
Two mint chocolate chip cookies with one half cookie on top with melty chocolate. Cookies are green with chocolate chips. Green cake stand can be seen in the background.
Homemade mint patties stacked five high with the top one split in half. A green cake stand in the background has more patties on it.
Single funfetti cookie with bite out of it sitting in front of glass of milk.
Orange pound cake with end cut off sitting on wood board topped with a glaze.

Copyright ©2026, Mom On Timeout. All Rights Reserved.
Design by Pixel Me Designs
  • Facebook
  • Twitter
  • Pinterest