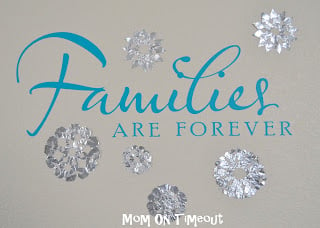
Today I want to share with you how to make foil snowflakes. A couple days ago I was trying to come up with a fun winter craft for the kids. Paper snowflakes are something we always enjoy making but I wanted to try something different. It occurred to me that foil snowflakes would be gorgeous – all shiny and silver! You can see from the picture above that we put some of our snowflakes on the wall. There are a couple other projects in the works using these pretty snowflakes as well…
My first few attempts where I folded the foil just as I would a paper snowflake were disastrous. I couldn’t separate the layers of foil without it tearing! I tried heavy duty aluminum foil and was marginally more successful. Then I realized that I just needed to separate the foil with paper while folding so that the foil wouldn’t stick together – that was the trick!
Materials Needed:
Aluminum Foil (Heavy Duty works best but you can use what you have on hand)
Scissors
Thin paper or newspaper
Instructions:
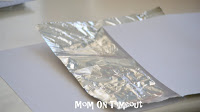
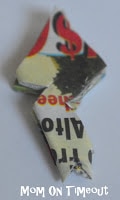
Tear off a piece of foil and slip it in between two sheets of paper. I am using standard printer paper to show how to do this but really thin paper such as cheap newspaper works best. The thicker the paper the harder it is to make precision cuts on your snowflake.
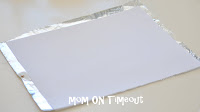
Line up one corner and then cut out a square. Any size will work and it’s a lot of fun to make a variety of sizes.
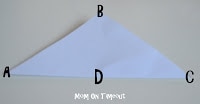
Fold the square in half to form a triangle. I have labeled the points of the triangle to make the explanation easier to follow. (This is how I make snowflakes – if you prefer a different method – go for it!)
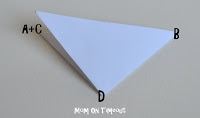
Fold the triangle in half, bring points A and C together, creating point D.

Fold point B and the right third of the triangle over.
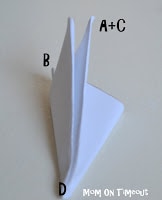
Fold point A+C and the left third over as far as it will go.
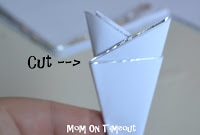
Cut off the two little triangles that formed with the folds from the two previous steps.
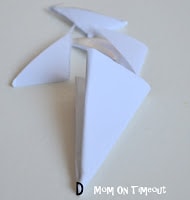
The final triangle is formed. Point D is the center of your snowflake so cutting here will make a hole in the center.
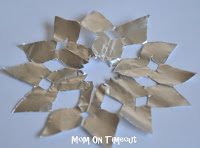
 So those are the basic instructions. Here are some cuts that I made to make my snowflakes. The cuts on the left result in the snowflake on the right. Cutting a triangle out of point D makes a star shape in the center of the snowflake.
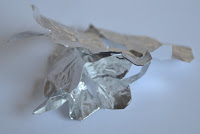
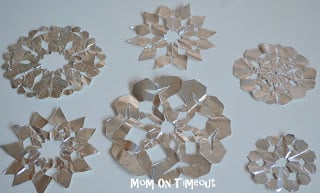
The more intricate your cuts are – the more intricate your snowflake. This is a very fun craft for the kiddos and it’s amazing to watch them make the connection between their cuts and the resulting snowflake. Here are some snowflakes that I made using aluminum foil.
- Be gently with your snowflakes – they tear easily.
- Use Heavy Duty Aluminum Foil if you have it. If you don’t, you can double up or standard foil.
- Use very sharp, precision type scissors for making those intricate cuts.
- To get the snowflakes to lay perfect flat, just press them between pages in a book.
- If you are planning on putting them on your wall like I did, take care in choosing where you want them. Once glued or taped – they will tear easily if you try to remove them.
- Have fun and get creative!


Jaime Lyn at Crafty Scrappy Happy says
what a very very cute idea!!!!! Thank you SO much for sharing!
Jaime
Meg@MegaCrafty says
Cute idea!
Ashley says
Those are cute! Love the silvery shimmer the foil creates.
HI THERE! says
Such a cool idea! I bet these look awesome when they are hung with the light reflecting off them! Thanks so much for linking up to The Creative Spark. I’ll be featuring them on my Facebook page today. Enjoy your Sunday!
Jenn 🙂
frugal-interior-design says
So clever, I’ve been saving my foil for a reason I suppose!
Tonia L says
These are awesome Trish! What a great idea to use a piece of paper along with the foil!
Christina A says
Wow so intricately done! 🙂
beansproutspreschool says
those are beautiful!
Robin says
What a great idea. I love it.
Ruth says
Your snowflakes are awesome. I love the idea of using foil. Thanks for all the tips.
Ruth
PlayDrMom says
These are beautiful. What a great and simple idea!
Pam - diy Design Fanatic says
Looks like a lot of fun!
Six Sisters says
Cute Cute Cute!! Thanks for linking up to “Strut Your Stuff Saturday.” We would love to have you come back next Saturday with more great ideas. -The Sisters
Sass - aka - Kathy says
What a great project! Won’t you consider sharing it with my readers at sassafrassalvation.blogspot.com/2012/01/architectural-salvage-jewelry.html. Thanks! Happy New Year!
Jessica @ O. Alouette says
Very cute! Such a good idea to make them out of foil!