
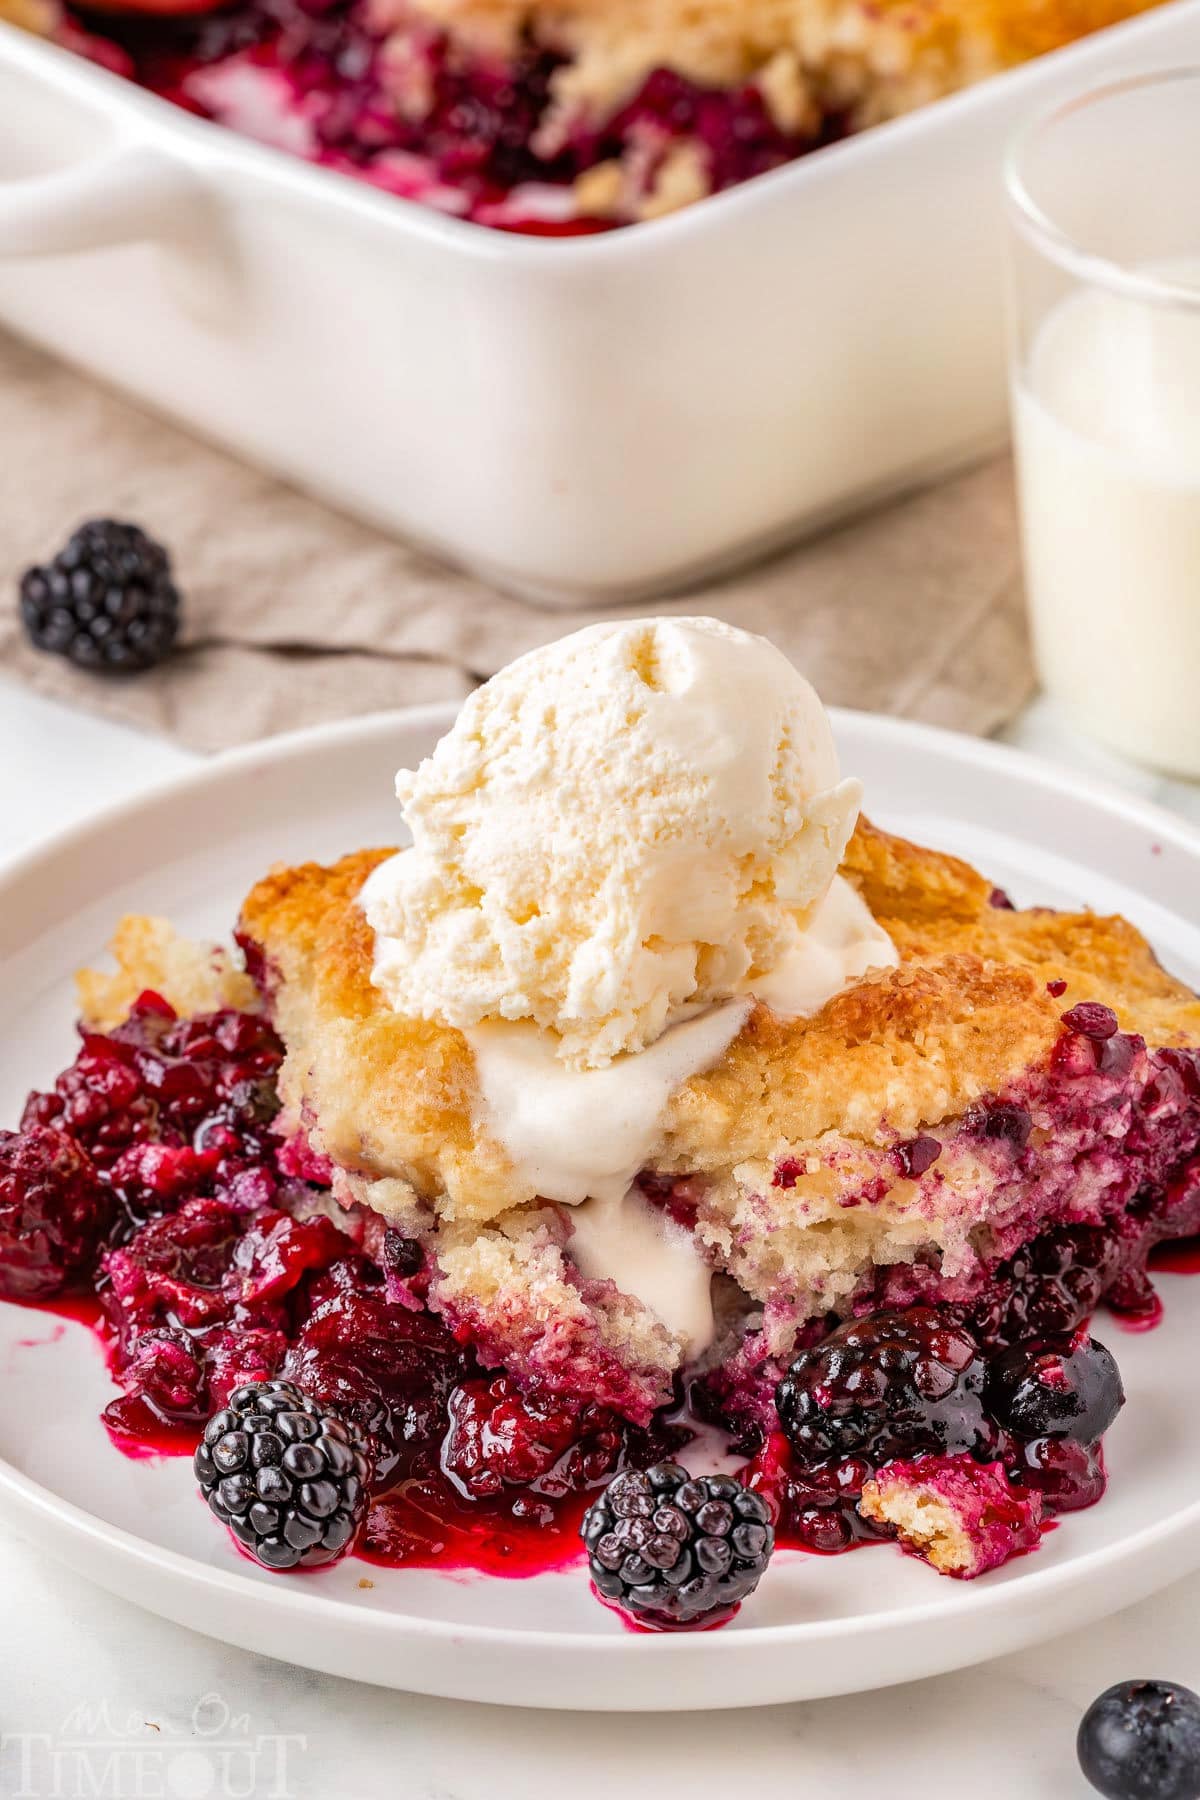
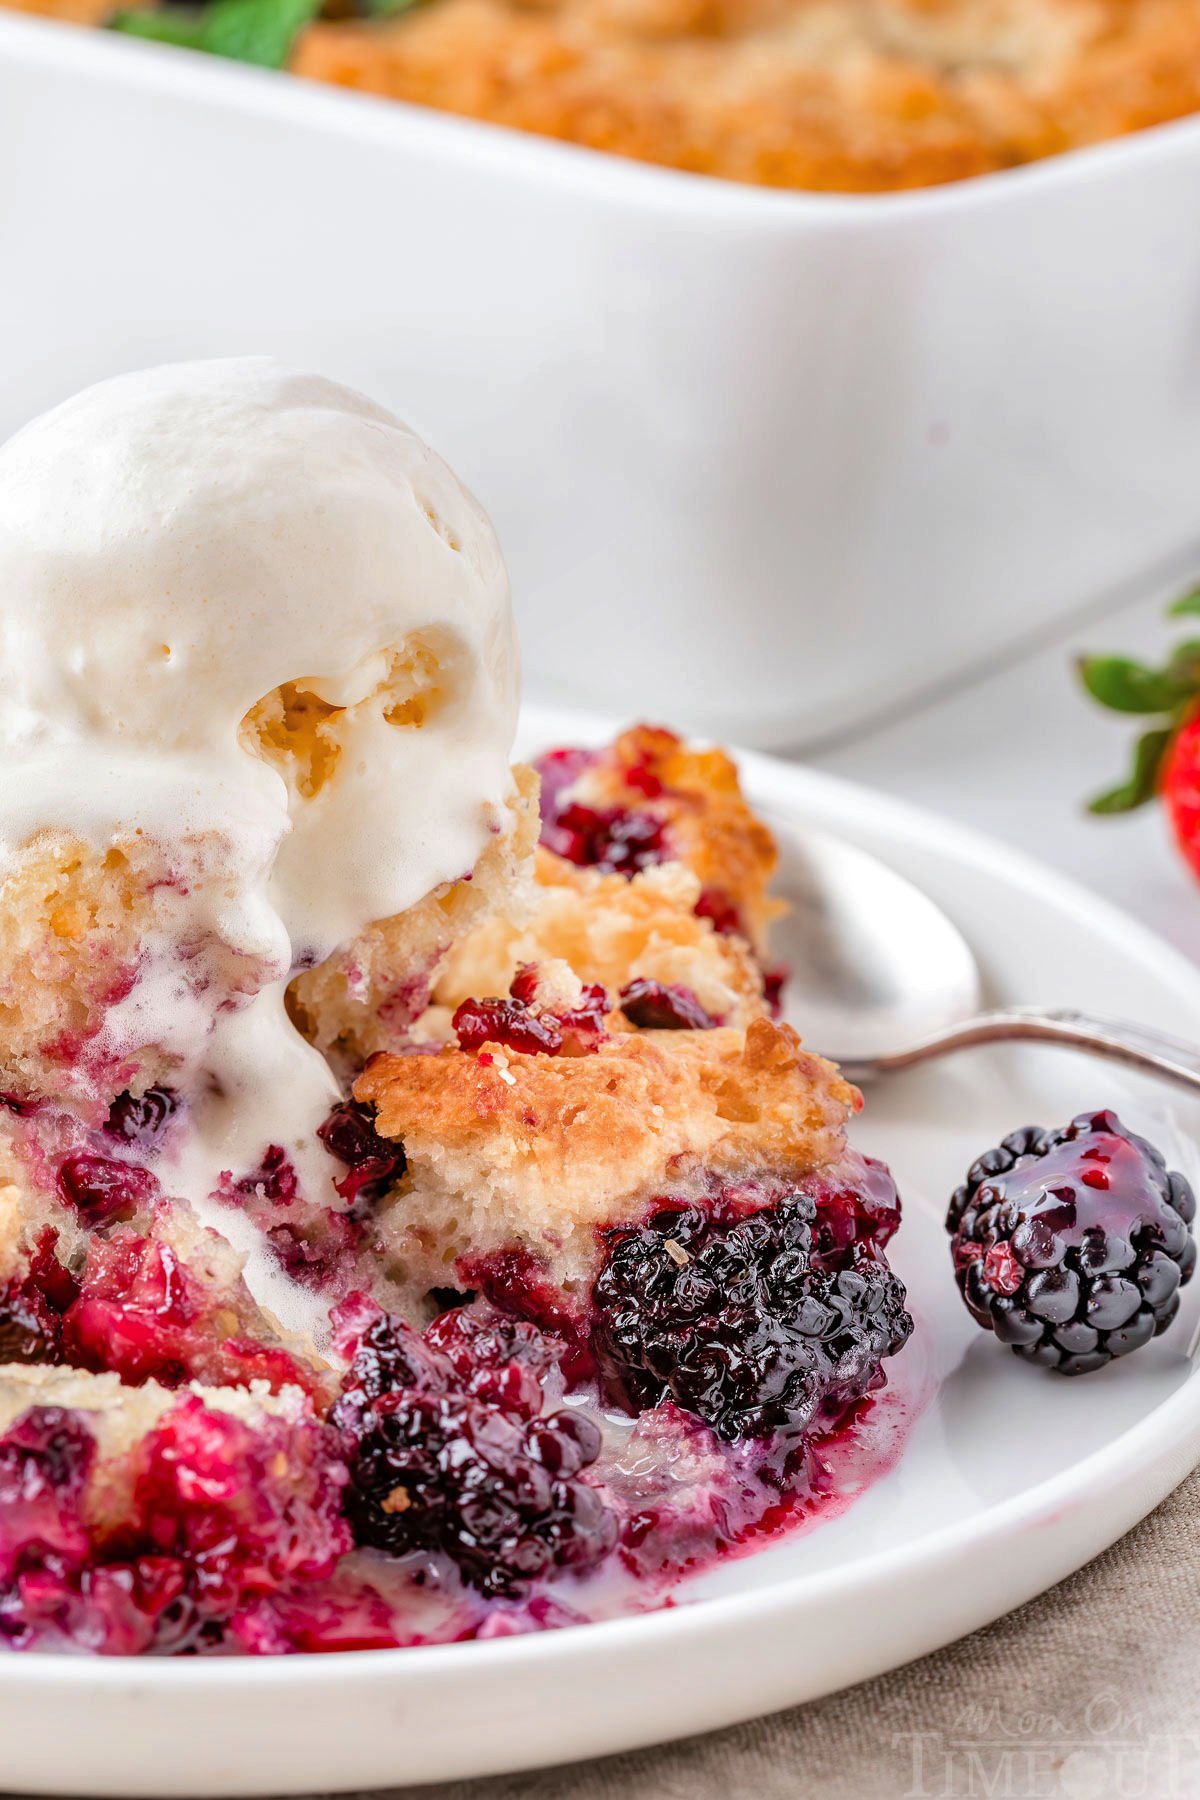
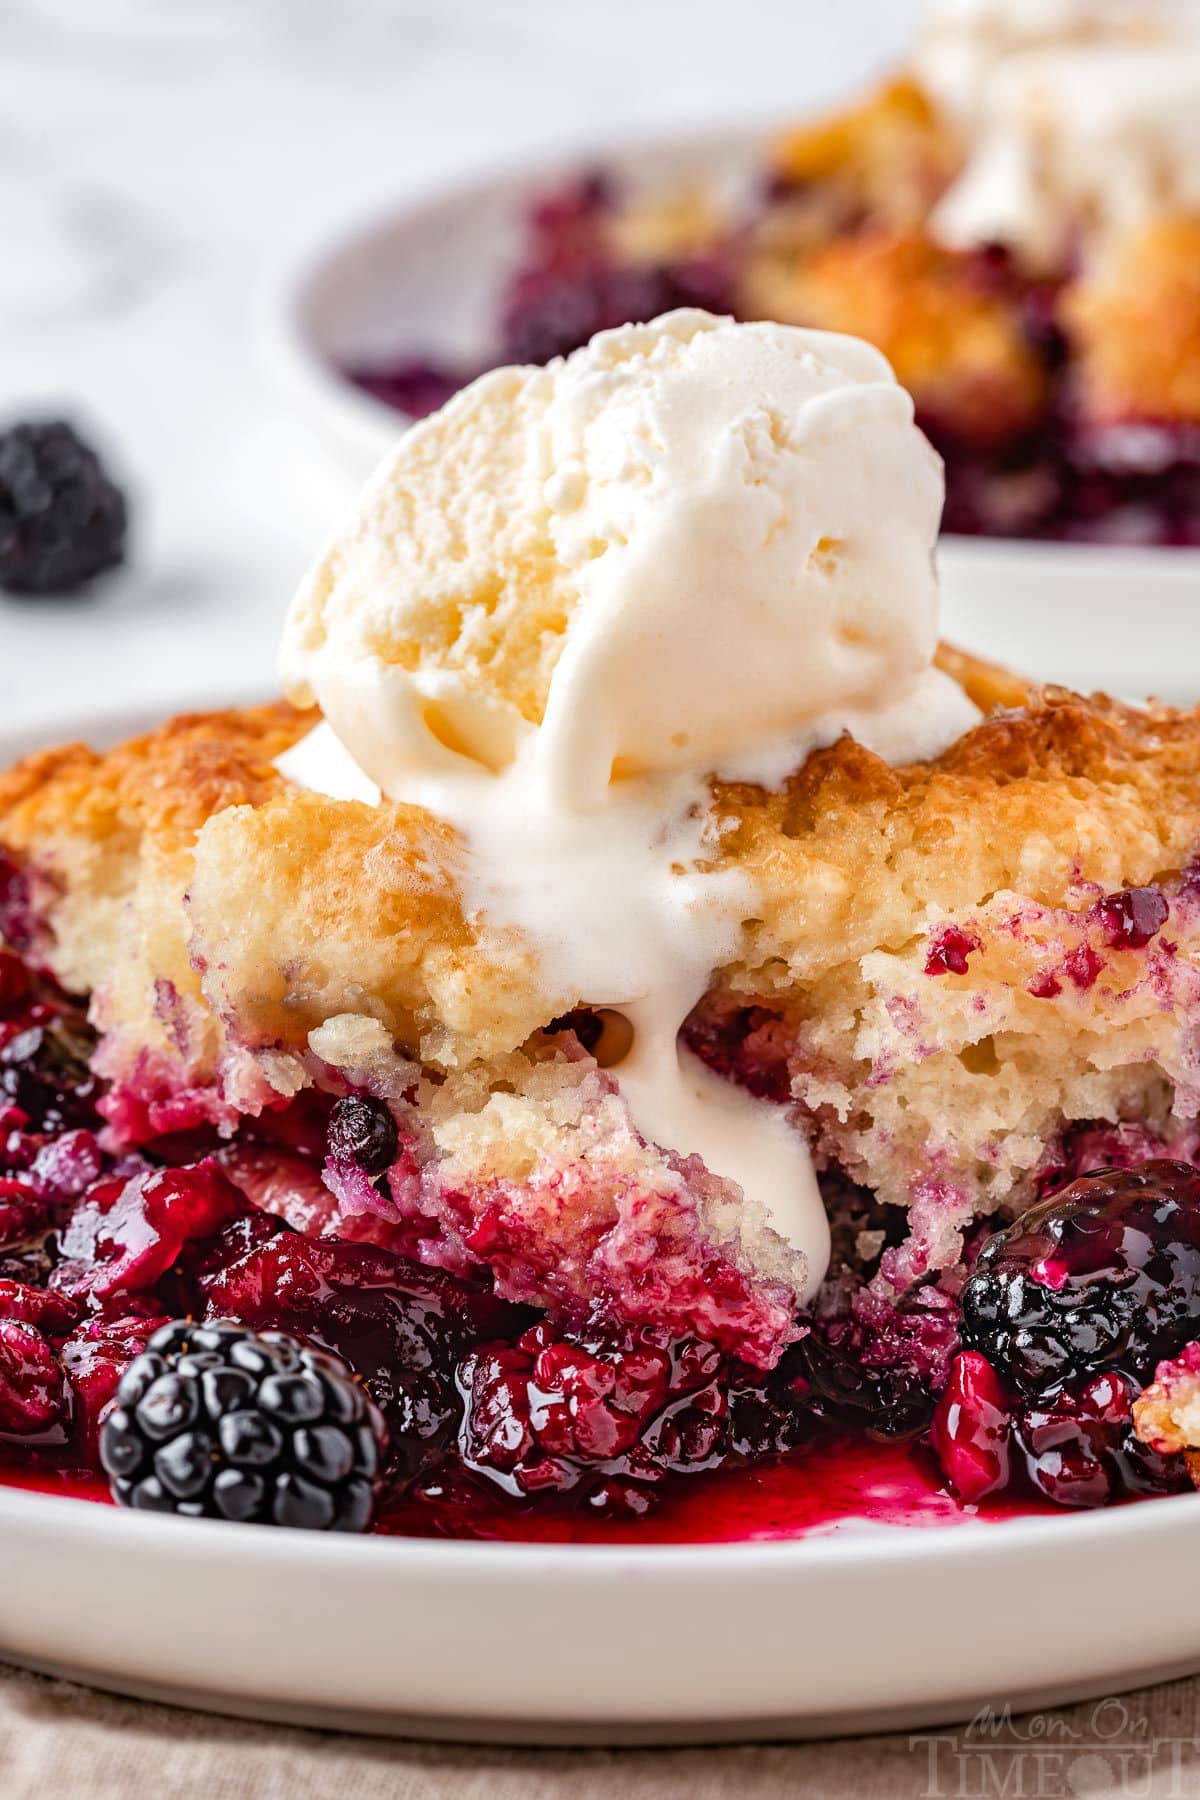
This easy Berry Cobbler recipe is loaded with sweet, juicy berries and topped with a buttery, tender biscuit topping for the ultimate summer dessert! Made with simple ingredients and perfect for serving with a scoop of vanilla ice cream or fresh whipped cream, it’s a crowd-pleaser every time. Whether you use fresh or frozen berries, this cobbler is a no-fuss favorite you’ll want to make all year long!
Looking for more summer favorites? Make sure to try my Blueberry Cobbler, Berry Crumble and Strawberry Shortcake Recipe!
Berry Cobbler Recipe
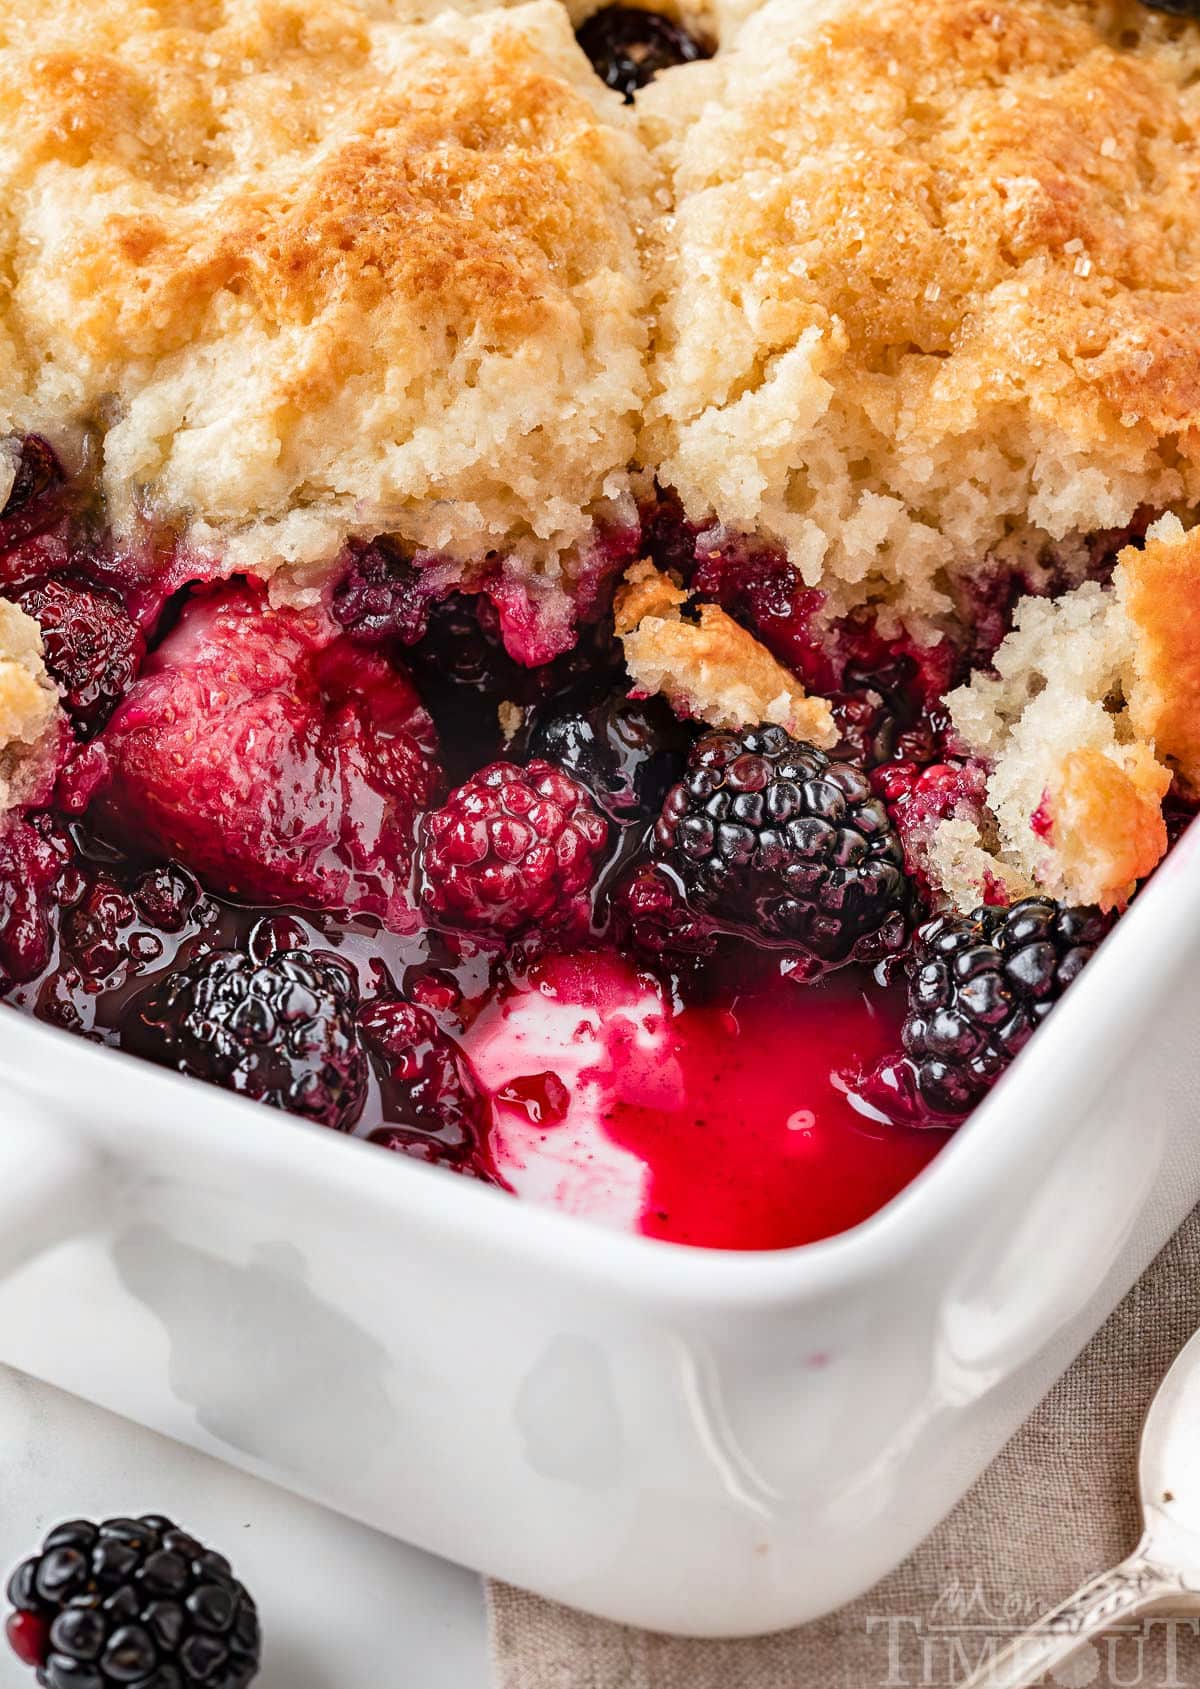
There’s just something magical about a warm, bubbly berry cobbler fresh from the oven. The combination of sweet, juicy berries and a tender, golden biscuit topping is pure comfort in every bite. Whether you’re using fresh summer berries or reaching into the freezer, this simple dessert is a year-round favorite that never goes out of style.
Perfect for potlucks, holidays, or a cozy family dinner, this easy berry cobbler recipe comes together quickly with pantry staples and a few minutes of prep. As it bakes, the berries bubble up and mingle with the crisp, tender crust to create a warm, jammy filling with a lightly crisped topping. Don’t forget a big scoop of vanilla ice cream or a dollop of whipped cream on top – so good!
Make this easy Berry Cobbler with frozen fruit for a treat that can be enjoyed year-round!
What Is The Difference Between a Cobbler, Crumble and Crisp?
All three of these desserts start with a delicious fruit filling – the difference lies primarily in the topping. A cobbler, like this one, has a biscuit or scone like topping. A crumble is historically a combination of sugar, butter and flour that gets “crumbled” over the top of the fruit filling. A crisp will usually have oats added to the topping and it gets sprinkled over the filling. It bakes up with a lovely crispy topping. All are amazing in their own right!
Why You’ll Love This Recipe
Sweet, tangy mixed berries and a soft, biscuit-like topping come together in this irresistibly easy Berry Cobbler recipe! Whether you’re entertaining guests, hosting a summer BBQ or holiday or just treating the family, this easy recipe is always a hit!
- Simple Ingredients – No complicated steps or fancy ingredients – just easy-to-find items that deliver big flavor.
- Versatile and Seasonal – Works with any mix of fresh or frozen berries so you can enjoy it year-round.
- Perfect Texture – The biscuit topping bakes up golden and fluffy, soaking up just the right amount of berry goodness underneath.
What You’ll Need
This recipe is really so incredibly simple. The berry filling comes together in minutes and then we’re making a combination of my biscuit recipe and lemon blueberry scones recipe for the biscuit topping. Let’s take a quick look at what you’ll need and, as always, you can find the full printable recipe card at the end of this post.

- Salted Butter: You can use unsalted butter if you prefer.
- Mixed Berries: Fresh berries are so good in this recipe if you’re making it during the summer! Making the Berry Cobbler with frozen berries is just as delicious because they’re picked at the peak of freshness and sweetness and flash-frozen for optimal flavor, so you can make this cobbler all year round.
- Granulated Sugar: Helps to further sweeten the berries and the biscuit topping.
- Cornstarch: Used to thicken the berry mixture, but you could also use all-purpose flour.
- Lemon: Adds brightness and freshness to this cobbler.
- All-Purpose Flour: You could swap this for self-rising flour and leave out the baking powder and salt.
- Baking Powder: This helps puff up the biscuit topping of this cobbler.
- Salt: Enhances the sweet flavors.
- Heavy Cream or Milk: You can use heavy cream, milk. buttermilk, or half and half in this recipe. Any fat content will work.
- Sanding Sugar: This is optional but adds a bit of crunch for added texture.
How To Make Berry Cobbler
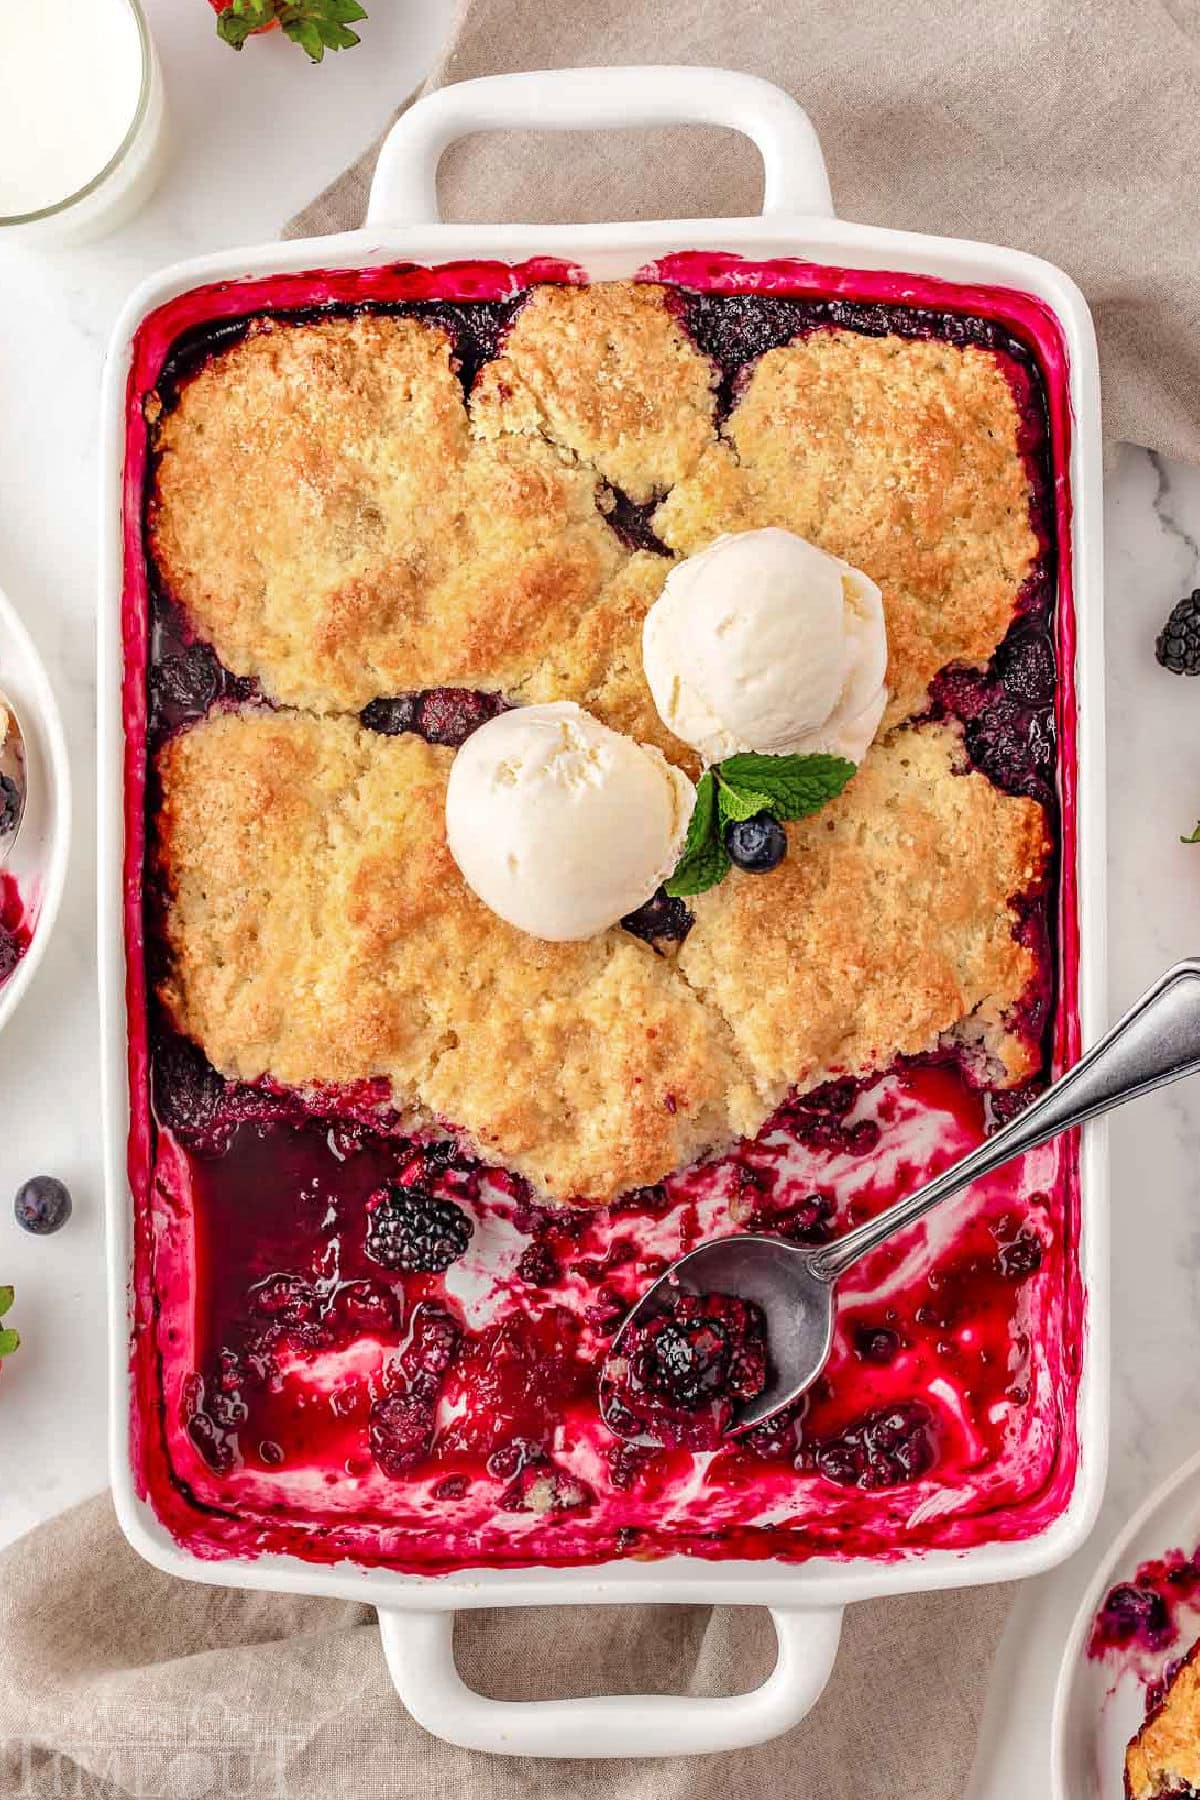
Loaded with juicy berries and topped with buttery, golden sweet biscuits, this Mixed Berry Cobbler recipe is everything you love about summer in one warm, comforting dish! Perfect with a scoop of vanilla ice cream, it’s a simple dessert that always impresses.
As always, you can find the full printable recipe with complete instructions in the recipe card at the end of this post.
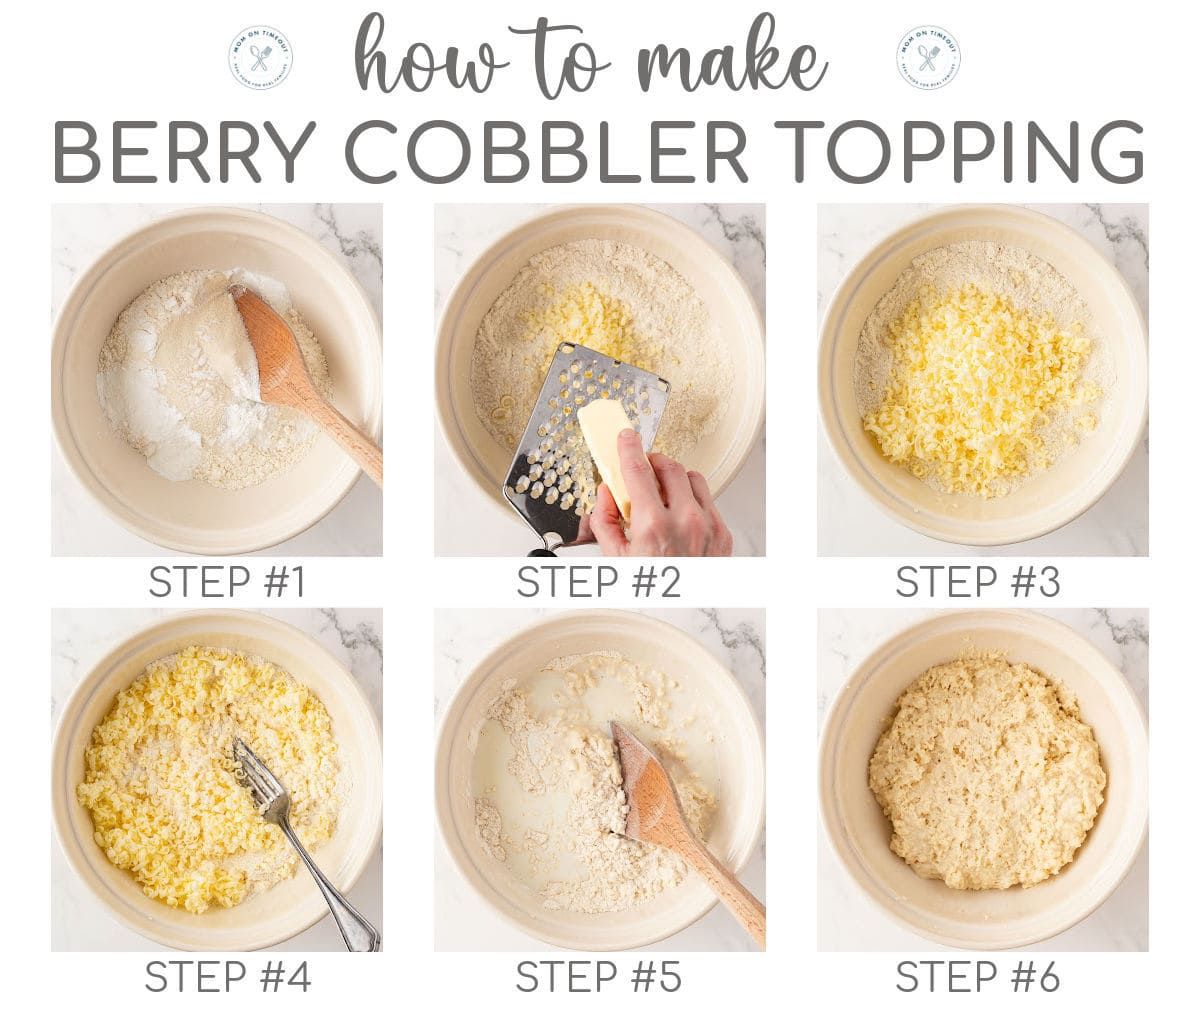
For The Cobbler Topping
- Whisk together flour, granulated sugar, baking powder and salt.
- Use a cheese grater to grate the butter.
- Add the butter to the flour mixture.
- Mix everything together with a fork or your fingers.
- Stir the cream and vanilla extract together. Pour cream mixture over flour mixture.
- Stir just until just combined.
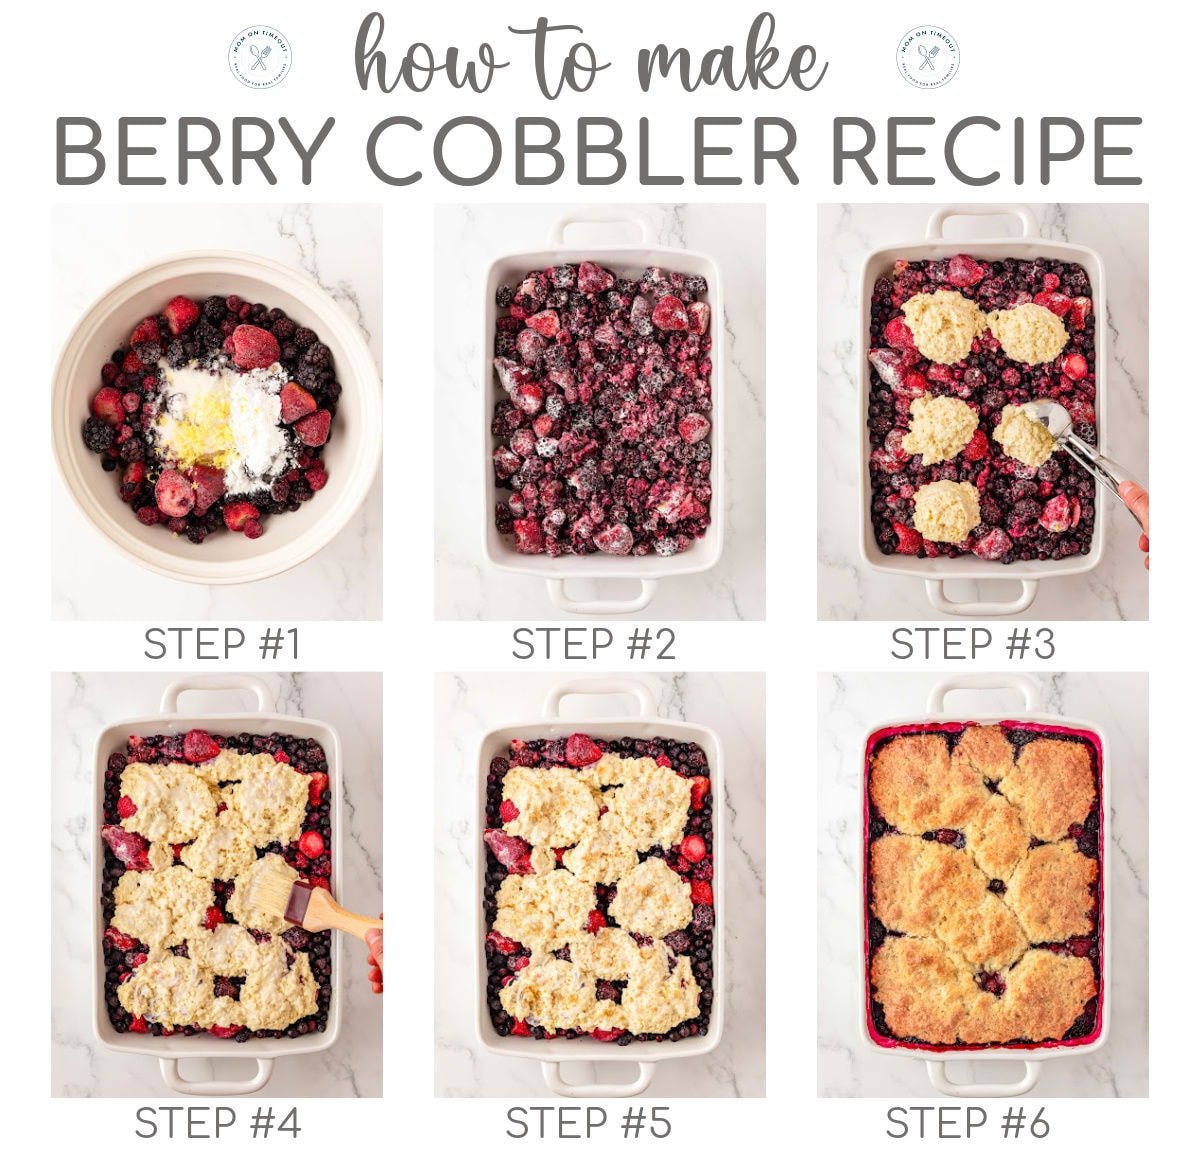
Berry Cobbler Assembly
- Combine berries, granulated sugar, lemon zest and corn starch. Stir to combine until the berries are fully coated.
- Transfer to prepared baking dish and set aside.
- Scoop out biscuits and place on top of the berries. Flatten slightly.
- Brush the heavy whipping cream over the top of the biscuits/
- Sprinkle with sanding sugar or turbinado sugar if using.
- Bake for 40 to 50 minutes or until the filling is bubbling and the biscuits are lightly golden brown and cooked through.
Berry Cobbler can be served warm or at room temperature. Enjoy with whipped cream or vanilla ice cream.
Storage Information
- Make Ahead: You can prep the filling and topping separately and refrigerate them for up to 24 hours before baking.
- Leftovers: Store cooled cobbler in an airtight container in the refrigerator for up to 4 days.
- To Reheat: Warm individual portions in the microwave or reheat the whole dish in the oven at 325°F until warmed through.
- Freezing: You can freeze the fully baked cobbler. Let it cool completely, then wrap tightly and freeze for up to 2 months. Thaw overnight in the fridge and reheat before serving.
Can I make this ahead of time and freeze it?
This recipe freezes and thaws well, making it the perfect addition to your freezer prep collection. Prepare as directed, but use a disposable 9×13 baking tray, and allow to cool completely. Cover the tray with foil and plastic wrap and keep in the freezer for up to 3 months. Thaw completely in the refrigerator before reheating (if desired) and serving. Reheat at 325°F until warmed through.
Variations To Try
- Add a pinch of cinnamon or nutmeg to the filling for added warmth.
- Swap in peaches, cherries, or apples for some or all of the berries.
- Use a 1:1 gluten-free flour blend in the topping to make this cobbler gluten free.
- Bake in ramekins or muffin tins for individual servings – great for entertaining!
- Use a couple of cans of berry pie filling instead of making your own filling to make this easy berry cobbler recipe even easier.
How do I store my mixed berry cobbler?
If you have leftover mixed berry cobbler, you can store it in the refrigerator. Allow the cobbler to cool completely and then transfer to an airtight container. Store in the refrigerator for 3-5 days. Reheat in the oven or microwave.
- Oven: Preheat the oven to 350°F and warm your cobbler for 25 minutes.
- Microwave: Heat individual servings for about 30 seconds on high power.
What do I serve with my mixed berry cobbler?
This mixed berry cobbler is delicious on its own or topped andserved with complementary items. Here are a few options that you’ll love:
- Vanilla ice cream: Topping this mixed berry cobbler with a generous scoop of vanilla ice cream will make this mouthwatering dessert even better. The combination of hot cobbler and cold ice cream is out of this world.
- Whipped cream: Whether you use your own whipped cream recipe or a dollop from the can (or tub), you’ll love the creamy topping with the slightly tangy berries.
- Fresh mint: Adding a sprig of fresh mint makes this simple berry cobbler recipe look and feel like a restaurant-worthy treat.
Why is my cobbler runny?
Cobblers are supposed to be a little runny and will be very runny when they come straight from the oven. The longer they sit, the thicker the filling becomes. To ensure you have a thicker filling, you can add up to one additional teaspoon of cornstarch.
Trish’s Tips
This recipe is simple to make and comes together quickly, but I still have a few tips for success every time.
- Freeze the butter before grating it into the biscuit mixture. This will help create pockets of steam in the dough, making it tender and flaky.
- Use very cold heavy cream or milk in the topping to keep the mixture cold for the fluffiest topping.
- The cream and sugar topping on the biscuit topping is optional, but it creates a delicious texture that takes this easy cobble recipe over the top.
- If the topping start to get too brown, tent the cobbler with foil until it finishes cooking.
- Make sure you let the cobbler cool for at least 10-15 minutes before serving. It will still be hot, but this will give the cornstarch extra time to firm up the filling so it’s less runny.
- Make the cobbler ahead of time and serve this cobbler room temperature.
- Properly measure the flour without a scale by using a spoon to fluff the flour in the container. Spoon the flour into your measuring cup and level the top with the back of a butter knife.
More Delicious Berry Desserts
- No Bake Berry Cheesecake
- Mini Strawberry Pies
- Blackberry Turnovers
- Lemon Blueberry Scones
- Strawberry Tiramisu

Berry Cobbler Recipe
Ingredients
Filling
- 2 pounds berries fresh or frozen, mixed
- ¾ cup granulated sugar
- 3 tablespoons cornstarch
- 1 tablespoon lemon zest about 1 lemon
- 2 tablespoons lemon juice fresh squeezed, about 1 lemon
Topping
- 2 cups all-purpose flour spooned and leveled
- ½ cup granulated sugar
- 1 tablespoon baking powder
- ½ teaspoon fine sea salt
- ½ cup salted butter frozen for 10 or more minutes
- 1 cup heavy cream whole milk or buttermilk can be substituted
- 1 teaspoon vanilla extract
Assembly
- 2 tablespoons heavy cream milk can be substituted
- 2 tablespoons sanding sugar or turbinado sugar or granulated sugar
Optional Garnishes:
- fresh berries
- mint leaves
- vanilla ice cream
- whipped cream
Instructions
- Preheat oven to 350°F. Lightly spray an 9×13 baking dish with nonstick cooking spray. Set aside.
Filling
- In a large bowl, combine the berries, granulated sugar, corn starch, lemon zest and lemon juice. Stir to combine until the berries are fully coated. Transfer to prepared baking dish and set aside.2 pounds berries, ¾ cup granulated sugar, 3 tablespoons cornstarch, 1 tablespoon lemon zest, 2 tablespoons lemon juice
Topping
- In a large bowl, whisk together flour, granulated sugar, baking powder and salt.2 cups all-purpose flour, ½ cup granulated sugar, 1 tablespoon baking powder, ½ teaspoon fine sea salt
- Use a cheese grater to grate the butter and mix everything together with a fork or your fingers.½ cup salted butter
- Stir the cream and vanilla extract together. Pour cream mixture over flour mixture and stir just until just combined.1 cup heavy cream , 1 teaspoon vanilla extract
Assembly
- Scoop out biscuits with a cookie scoop or large spoon and place on top of the berries in the baking dish. Flatten slightly with your hands or the back of a spoon. Repeat until you have mostly covered the berries, it's fine to have some peeking out.
- Brush the heavy whipping cream over the top of the biscuits and sprinkle with sugar.2 tablespoons heavy cream , 2 tablespoons sanding sugar
- Bake for 40 to 50 minutes or until the blueberry filling is bubbling and the biscuits are lightly golden brown and cooked through. (Note: Check halfway through cooking and if the topping is too dark, lightly tent with foil and finish cooking.)
- Remove from oven and transfer the pan to a wire rack and let cool for at least 10 minutes before serving. Cobbler can be served warm or at room temperature. Enjoy with whipped cream or vanilla ice cream.fresh berries, mint leaves, vanilla ice cream, whipped cream
Notes
-
- Make Ahead: You can prep the filling and topping separately and refrigerate them for up to 24 hours before baking.
-
- Leftovers: Store cooled cobbler in an airtight container in the refrigerator for up to 4 days.
-
- To Reheat: Warm individual portions in the microwave or reheat the whole dish in the oven at 325°F until warmed through.
-
- Freezing: You can freeze the fully baked cobbler. Let it cool completely, then wrap tightly and freeze for up to 2 months. Thaw overnight in the fridge and reheat before serving.
Make sure you let the cobbler cool for at least 10-15 minutes before serving. It will still be hot, but this will give the cornstarch extra time to firm up the filling so it’s less runny.
If the topping start to get too brown, tent the cobbler with foil until it finishes cooking.
Tools and Equipment (affiliate links): 9×13 Baking Dish | Glass Mixing Bowls | Whisk | Silicone Spatula | Lemon Zester | Lemon Juicer
Please see post above for more information, step-by-step process photos, recipe tips and frequently asked questions.


Leave a Reply